

Median U.S. homeowner remodeling-project spending rose 60%, from $15,000 in 2020 to $24,000 in 2023, according to Houzz's 2024 study. With that much invested in renovation, a closet should deliver more than attractive shelving. It should let you retrieve your clothes, open drawers, and move comfortably without working around the cabinetry.
Good custom closet design and installation starts with accessible capacity, meaning storage you can use. Measuring the room, planning structural support, and testing the finished hardware belong in the design sequence, not on a punch list after everything's built.
Assess What the Closet Must Do First
Closet remodels increased 53% year over year in 2023, according to Thumbtack data cited by the National Association of Realtors. Wanting better storage isn't unusual, but the right improvement depends on what makes your current closet frustrating.
Start with the belongings, not the existing shelves. Separate clothes by how they're stored, and measure garments on their actual hangers. A shirt belongs in short-hang storage; a dress or overcoat may need an uninterrupted long-hang bay.
Inventory the routine as well as the clothes
Count folded stacks, shoes, handbags, belts, jewelry, and anything else competing for space. Separate daily-use belongings from occasional items. Don't design an entire drawer bank around accessories you rarely wear while leaving work clothes difficult to reach.
Record who shares the closet and how they use it. Different schedules, heights, grip strength, and mobility needs can justify different storage arrangements within the same room. Include linens, sports equipment, or office supplies if they'll remain there, rather than assuming they'll somehow fit later.
Use this checklist to organize the decisions before choosing cabinetry.
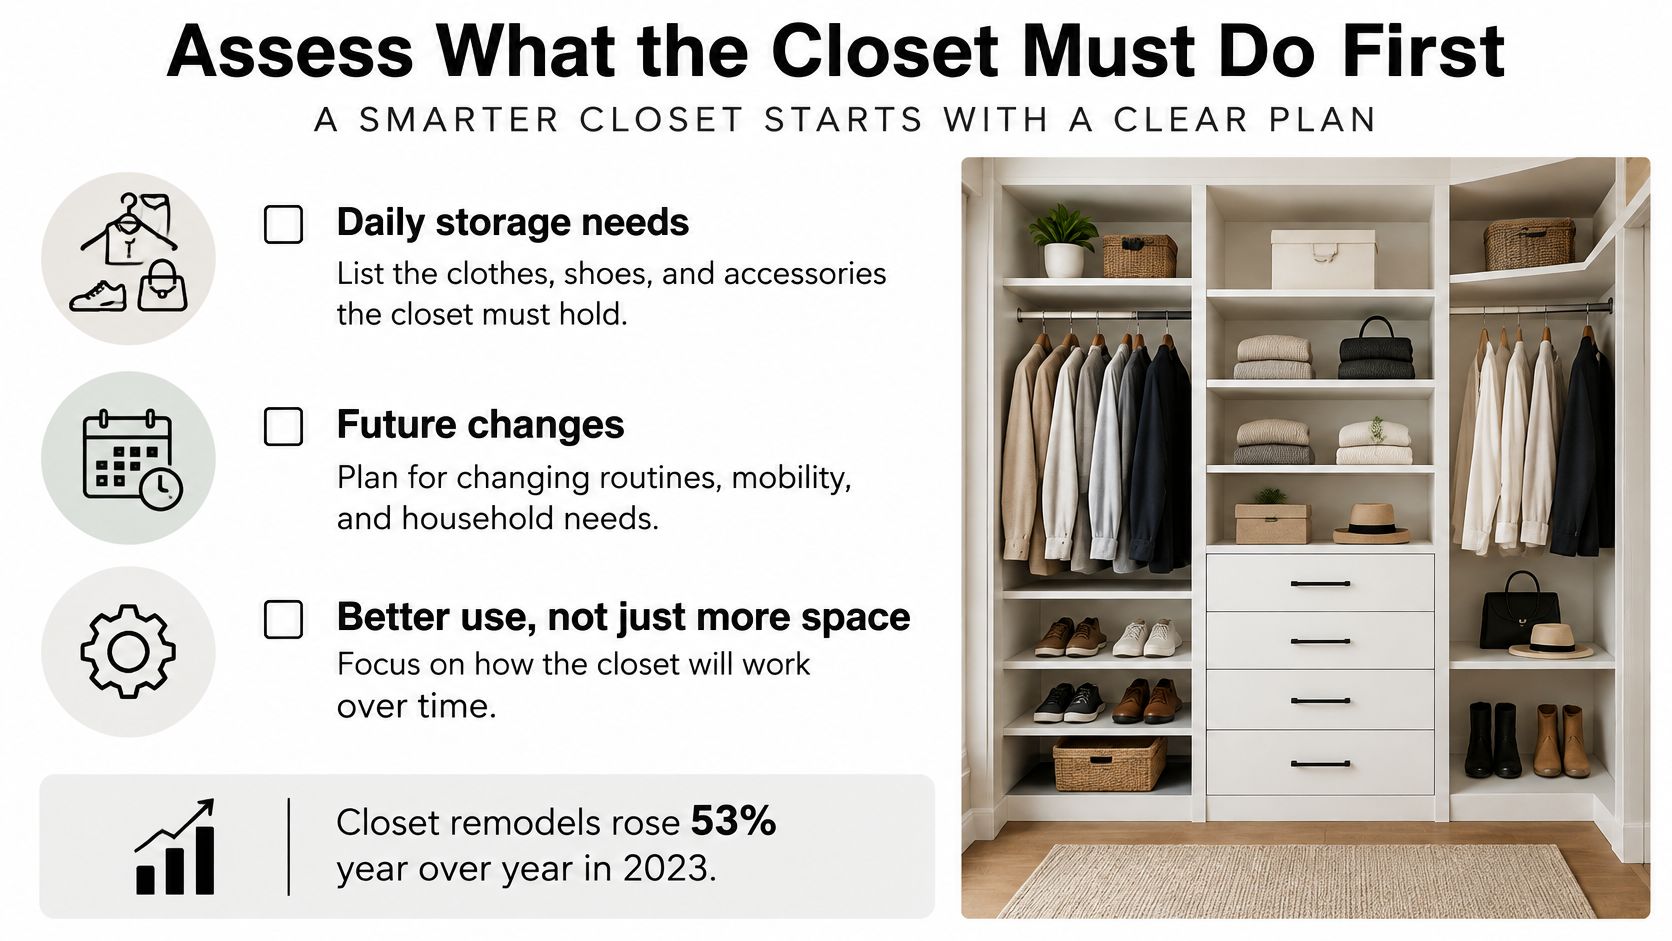
Set priorities before demolition
Establish a budget range and rank the features that matter. If accessible drawers solve your biggest problem, protect that allowance before spending on decorative panels. Separate essential functions from upgrades that could wait.
For one customer couple's remodel, our Jason reviewed ideas and established a budget before demolition began. He also guided them through materials, timeline, costs, and possible issues. That order lets homeowners resolve compromises while they're still decisions on paper.
Our guide to closet organization systems can help you compare storage approaches before committing to a layout.
Complete this working checklist tonight:
- Belongings by length: Record short-hang and long-hang garments, folded stacks, shoes, and accessories.
- Daily-use items: Identify what must be visible and easy to retrieve every morning.
- Household members: Note shared use, height differences, and present or anticipated mobility needs.
- Budget range: Identify essential features and optional finishes separately.
- Current problems: Write down the main frustrations, such as blocked drawers, crowded rods, or inaccessible shelves.
Practical rule: Don't pay to reproduce an inconvenient closet in better-looking materials.
Measure the Space and Set Clearances
A layout drawn from guessed dimensions can look convincing and still fail at installation. Survey the actual room, including the parts that won't appear in the finished photograph: trim, sloping floors, switches, and structural attachment points.
Use a tape measure, laser measure, long level, stud finder, and painter's tape. Record dimensions on a sketch with a consistent starting corner so the cabinetmaker can reconcile the plan with the room.
Record the room before drawing modules
- Wall lengths and ceiling height: Measure at multiple locations. Check corners for square and walls for bowing rather than assuming the room is rectangular.
- Openings and trim: Mark door and window swings, casing, baseboard projection, and floor transitions.
- Services: Locate outlets, switches, vents, returns, and any equipment requiring access.
- Structure: Map studs and existing blocking. Confirm proposed attachment locations carefully, after checking for concealed utilities.
Don't subtract trim mentally and expect the installer to remember it. Show the obstruction on the drawing, with enough detail to decide whether cabinetry will clear it, sit forward of it, or require trim removal.
Use the measurement sequence below before finalizing cabinet widths.
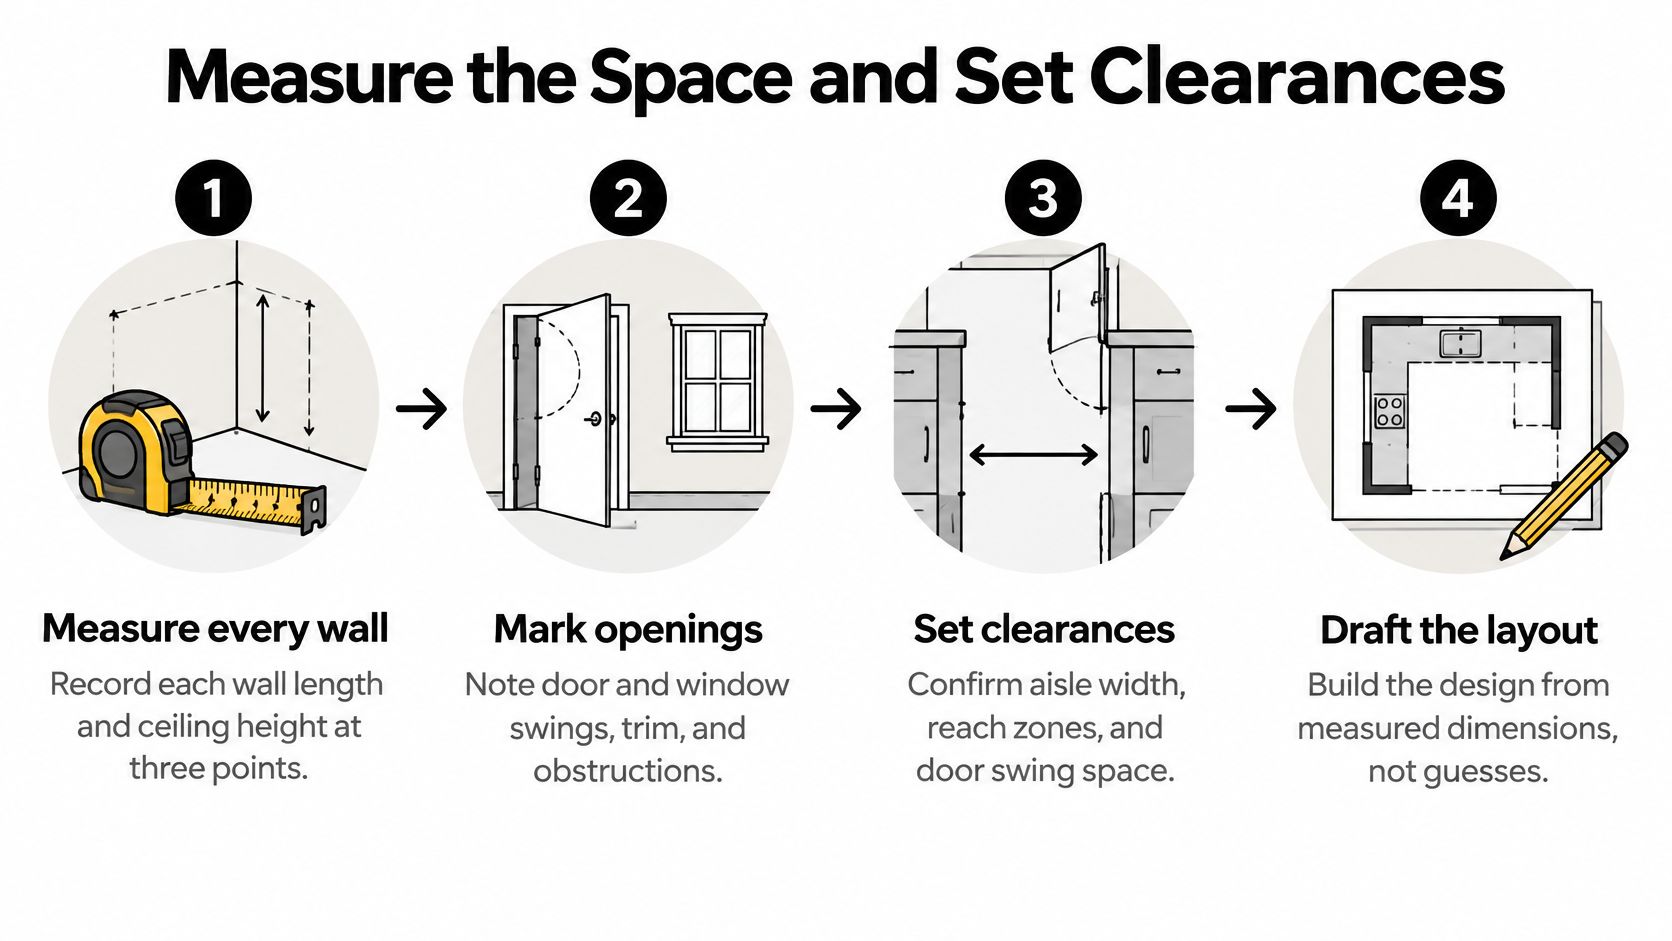
Test movement at full scale
The Vallier Closets accessible-design guide gives the following reach and clearance benchmarks, including an approximate 800–1,400 mm (31.5–55 in) ergonomic reach zone and a 915 mm (36 in) minimum accessible clear route.
Clearance and reach benchmarks for closet planning
| Planning target | Metric | Imperial | Why it matters |
|---|---|---|---|
| Reach zone for frequently used items | 800–1,400 mm | 31.5–55 in | Provides a starting range for reachable daily storage |
| Comfortable passage | At least 900 mm | At least 35.4 in | Preserves passage, with additional space needed for passing and open drawers |
| Accessible clear route | 915 mm minimum | 36 in minimum | Keeps a walker or wheelchair route open |
| Wheelchair turning circle | 1,525 mm | 60 in | Gives room to turn where feasible |
Treat these as universal-design planning targets, not automatic legal requirements for a private residential closet. The accessibility guide distinguishes most private homes from covered public accommodations. Actual usability still needs testing with the person who'll use the space.
A passage dimension alone doesn't establish comfortable dressing space. An open drawer, hanging sleeves, or a projecting handle can consume that clearance. Measure between the furthest projections, not merely between cabinet boxes.
Our walk-in closet dimensions guide can help you evaluate the room configuration before committing to storage on opposing walls.
Tape cabinet footprints onto the floor and mark shelves and rods on the walls. Represent drawer extension with cardboard, open the room door fully, and walk through the routine. Resolve collisions before fabrication, when moving a drawer bank doesn't require rebuilding it.
Pick the Layout, Materials and Accessories
In a 2022 survey of 1,199 U.S. homeowners with annual household incomes of at least $50,000, 70% preferred the organization of built-in organizers over the flexibility of open cabinetry, according to the New Home Trends Institute survey for John Burns Real Estate Consulting. Defined storage has appeal, but that doesn't mean every compartment should be fixed permanently.
Map the inventory onto storage zones before choosing finishes. A built-in system should organize what you own without forcing every category into the same cabinet shape.
Match hanging space to garment length
Double-stacked rods work for shirts, blouses, and pants folded over hangers. Full-length dresses and coats need a separate long-hang bay. Putting them beneath another rod only works when the actual garment length clears the floor and surrounding components.
Place adjustable shelves where folded stacks, bags, and bins change size. Keep upper storage for lightweight, occasional belongings rather than items you'll need to retrieve while balancing on a stool.
Accessory options compared by use and trade-off
| Option | Best for | Trade-off | Typical zone |
|---|---|---|---|
| Adjustable shelves | Folded sweaters, linens, bins | Need reconfiguring if needs change | Middle and upper zones |
| Double-stacked rods | Shirts, blouses, folded pants | Both rods need suitable support; garment length limits use | Upper and lower short-hang bays, beside separate long-hang storage |
| Pull-out drawers | Small items, shoes, accessories | Add cost and need cabinet depth and opening clearance | Lower zone at reachable height |
| Built-in organizers | Jewelry, ties, belts, socks | Fixed compartments are less flexible | Drawers and wall sections |
Specify support before surface finish
Shelf material, unsupported span, edging, and brackets work together. A shelf carrying dense bins needs a different support arrangement from one holding light linens. Shortening a span or adding a vertical partition can be a better solution than choosing a thicker-looking edge.
Melamine-faced panels offer a wipeable surface, but exposed edges need protection and fastening details matter. Plywood can suit cabinet construction and veneered finishes. Solid wood brings its own appearance and finishing options, but it still needs suitable support and allowance for movement.
Choose drawer glides for the loaded drawer, not the empty display sample. Full-extension glides make shoes and accessories at the back easier to retrieve, provided the drawer has room to open completely. Check that the selected handle won't strike an adjacent door or wall.
A useful accessory earns its place by solving a named storage problem. Otherwise, it's another obstruction to work around.
Keep everyday belongings in the user's comfortable reach, and make likely-to-change zones adjustable. A removable divider or movable rod is often more useful than a perfectly fitted compartment that only suits today's wardrobe.
Design Closets That Stay Usable with Age and Change
Maximum capacity can be the wrong target. A closet isn't more useful because it holds additional bins above an unreachable rod or fills the floor with cabinetry that prevents someone from approaching a drawer.
A usable layout lets the owner retrieve, carry, and replace belongings without unnecessary stretching or awkward bending. That may mean leaving part of a wall empty.
The goal is independent use, not a full wall of storage.

Test the hardware with the intended user
Have the person try sample pulls and drawer mechanisms before ordering. A large loop pull may be easier to operate than a small knob, but grip, wrist movement, and opening resistance all matter. Soft closing doesn't automatically mean easy opening.
Lower a dedicated hanging section for seated use and check approach space beneath or beside it. A general ergonomic reach band isn't a guarantee that someone can reach forward comfortably from a wheelchair, particularly when a shelf or cabinet projects between them and the item.
- Pull-down rods: Test operating effort and handle position. Use them only with suitable structural anchoring and a clear operating path.
- Pull-out storage: Bring contents forward instead of requiring someone to reach into a deep fixed cubby.
- Lighting controls: Put switches where the user can reach them, or consider a suitable motion sensor.
- Door hardware: Select handles that can be operated with one hand without a tight pinch.
Watch the closet-planning video with your own access needs in mind.
Leave a practical route for change
Plan wiring and outlets before the walls close. Have an electrician select and position closet-suitable lighting so clothing won't obstruct fixtures, and keep controls out of corners hidden by open doors.
Design adaptability into the cabinet structure. Adjustable shelf holes, removable drawer organizers, and repositionable rods allow useful changes without dismantling every cabinet. Confirm which components can move; an adjustable shelf doesn't make the entire tower adjustable.
For a shared closet, don't force both users into identical elevations. Individual reach, visibility, and operating comfort matter more than symmetrical hanging rods.
How to Install Your Custom Closet Step by Step
Installation begins with approved scope, not the delivery truck. Confirm removal, wall repairs, trim work, electrical coordination, blocking, and hardware responsibilities before ordering.
Build With a Plan's change-order guidance describes 10–20% change-order exposure when concealed framing, plumbing, or electrical conditions emerge, alongside the installation-control benchmarks below. That isn't a closet-specific price allowance, but it reinforces why concealed conditions and written approvals need attention early.
Prepare the structure and establish the reference
- Confirm the approved design. Check field dimensions against the order, identify finished ends and fillers, and document who approves changes. Don't modify a cabinet to solve an unexplained discrepancy.
- Verify attachment points. Locate studs and confirm them with a small test hole only after assessing concealed services. Drywall alone isn't adequate support for heavily loaded rails, tall towers, or pull-down hardware.
- Install blocking where needed. Add plywood or dimensional lumber at planned attachment points before closing the wall. Photograph it while it remains visible, with reference measurements that make it useful later.
- Establish a level reference. Use a laser or long level and identify the floor's high point. Position the reference so the complete run can be installed without cutting away required support.
Keep the installation sequence visible while checking the room and components.
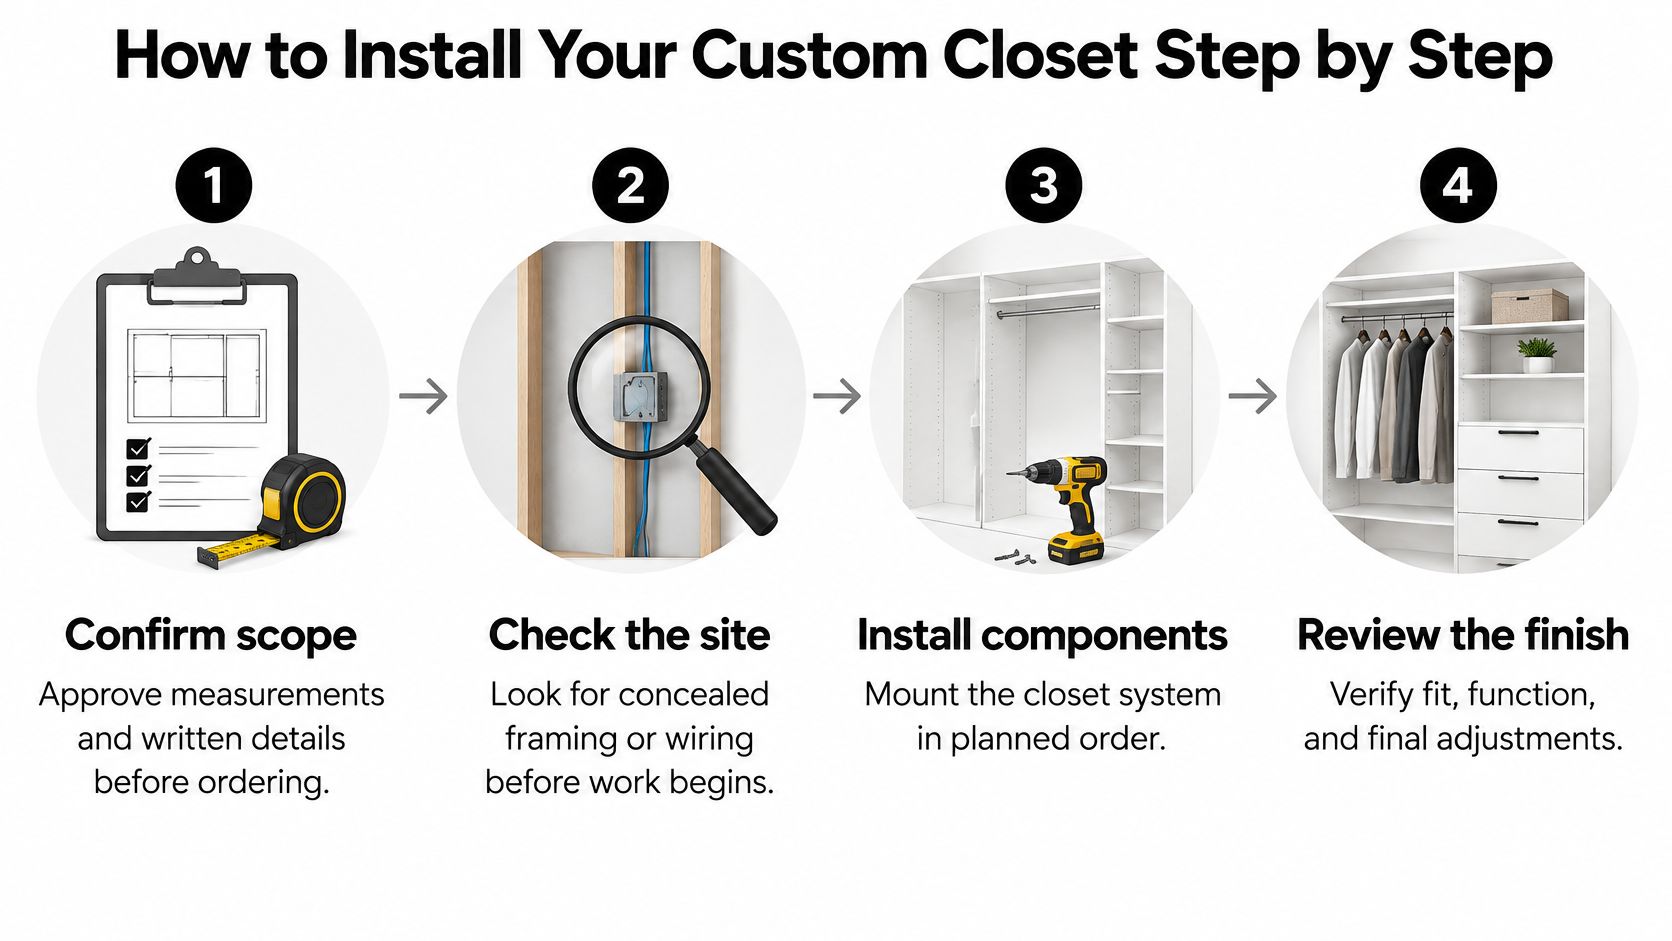
Set modules without forcing them
- Shim and secure progressively. Bring each module level and plumb, then align it with its neighbor. Put shims behind fastening locations so tightening a screw doesn't bow the cabinet against an uneven wall.
- Fit working components. Install rods, slides, drawers, doors, and selected accessories. Check operation as you go, rather than waiting until the full run hides an alignment problem.
Use these as commissioning benchmarks, with manufacturer specifications governing the selected cabinet system.
Installation tolerance targets
| Check | Target | Measured over | Note |
|---|---|---|---|
| Wall plumb | ±1/8 in | 8 ft | Manufacturer specifications govern |
| Floor level | ±1/16 in | 4 ft | Shim before setting modules |
| Door reveal | 1/16–1/8 in, consistent | Full door height | Adjust modules progressively |
| Heavy-load anchoring | Into studs or blocking | Each attachment point | Drywall alone is not enough |
Don't use hinge adjustment to disguise a twisted cabinet box. Correct the module's position first, then fine-tune doors and drawer fronts. Our cabinet installation guide provides additional preparation and fitting guidance.
- Complete a documented walkthrough. Verify fasteners, test drawer travel with representative contents, inspect reveals, and operate every accessory. Check anchoring and load limits before loading storage, and record unfinished corrections rather than treating them as verbal promises.
We handle professional cabinet installation and can install the cabinet hardware you selected. Confirm those responsibilities in the written scope so no one assumes another trade is bringing the pulls or fitting the accessories.
Sign-off standard: A finished closet must work under its intended load, not just look aligned while empty.
Maintain Hardware and Alignment Over Time
Treat maintenance as a way to catch movement before a loose bracket damages its mounting point. Put a recurring reminder on your calendar and use the following recommended routine, adjusting it to the hardware manufacturer's care instructions.
Keep the checks simple
Maintenance schedule for a custom closet
| Task | Frequency | What to check | Notes |
|---|---|---|---|
| Tighten rods, brackets and drawer fronts | Quarterly | Screws snug and no shifting | Recheck after heavy loads |
| Drawer runs and glides | Quarterly | Level travel with no rubbing | Lubricate only if the manufacturer recommends it |
| Door alignment | Quarterly | Consistent reveals matching the approved installation | Correct cabinet movement before adjusting hardware |
| Empty and reorganize | Each season | Sagging shelves and bowing rods | Reduce load and rebalance zones |
| Full walkthrough | Yearly | Fasteners, drawer travel under load, reveals and accessories | Repeat the installation sign-off checks |
Use a hand screwdriver for minor tightening so you can feel resistance. Don't keep turning a screw that spins without gripping, and don't overtighten into a damaged hole. A loose attachment may need repair, not more torque.
Wipe accessible tracks and glides with a soft cloth or remove debris with a vacuum brush. Avoid spraying general-purpose lubricant into a slide mechanism; some hardware is designed to run without it. Our cabinet hardware guide can help you identify the components you're maintaining.
Respond to movement rather than hiding it
Unload a shelf that's sagging or a rod that's bowing. Check the support arrangement before putting the same contents back.
- Binding drawers: Check for displaced contents, loose fasteners, and changed alignment.
- Rubbing doors: Look for cabinet movement before adjusting hinges.
- Shifting brackets: Stop using the affected storage until the attachment is assessed.
Keep installation photographs, hardware identification, and spare fittings together in a labeled place. Matching the original slide or hinge is easier when you don't have to identify it from a worn component.
Confirm Your Design Before You Order
Bring your inventory, measured survey, and full-scale layout notes to the design consultation. Include photographs of obstructions and describe what must improve in your daily routine, not just the finish you prefer.
We provide a detailed design plan and a quote based on your custom cabinet selections. Our design services carry a fee, so confirm what that fee covers before work begins.
Approve the responsibilities as well as the drawing
The written scope should identify who handles concealed-condition findings, additional blocking, wiring changes, selected hardware, and final adjustments. Confirm delivery and installation coordination before removing the existing closet. You'll also need a temporary place for clothing and a clear route into the work area.
- Design approval: Confirm cabinet locations, usable interior space, accessories, and finish selections.
- Site preparation: Identify removal, repairs, electrical work, and structural preparation.
- Completion: Define the operational checks and how outstanding corrections will be recorded.
Decide whether you'll install the system yourself. If you can't confidently verify structure, establish a level reference, shim modules, and check alignment against the specified tolerances, professional installation is the safer choice. Attractive cabinetry won't compensate for uncertain anchoring.
Make the final usability decision
Call (239) 444-2000 or visit our Design Center in Cape Coral, Florida, to schedule an appointment. Bring the decisions you've already made and the compromises you still need help resolving.
Before authorizing fabrication, test the drawing with these questions:
- Reach: Can each user retrieve everyday belongings comfortably?
- Movement: Can every door and drawer open without blocking the required approach?
- Adaptability: Can storage be rearranged as clothing, routines, or mobility needs change?
If any answer is no, revise the design before ordering.
Sinclair Cabinetry inc provides design, manufacturing, and professional installation for custom storage solutions. Visit Sinclair Cabinetry inc to arrange a consultation and bring your closet inventory, room measurements, and accessibility priorities into a buildable plan.