

“Choose solid wood” is common advice for buying cabinet doors, but it doesn't tell you enough. A solid-wood face doesn't identify the center panel, adhesive, coating, or cabinet box behind it. It also doesn't tell you whether a damaged door can be refinished or matched later.
Better custom wood cabinet doors start with a complete specification, not a species name. The useful questions are practical: What's inside the door? How will the panel move? What protects the sink-side edge? And what information will another cabinetmaker need to reproduce it?
What Sits Inside a Custom Wood Cabinet Door
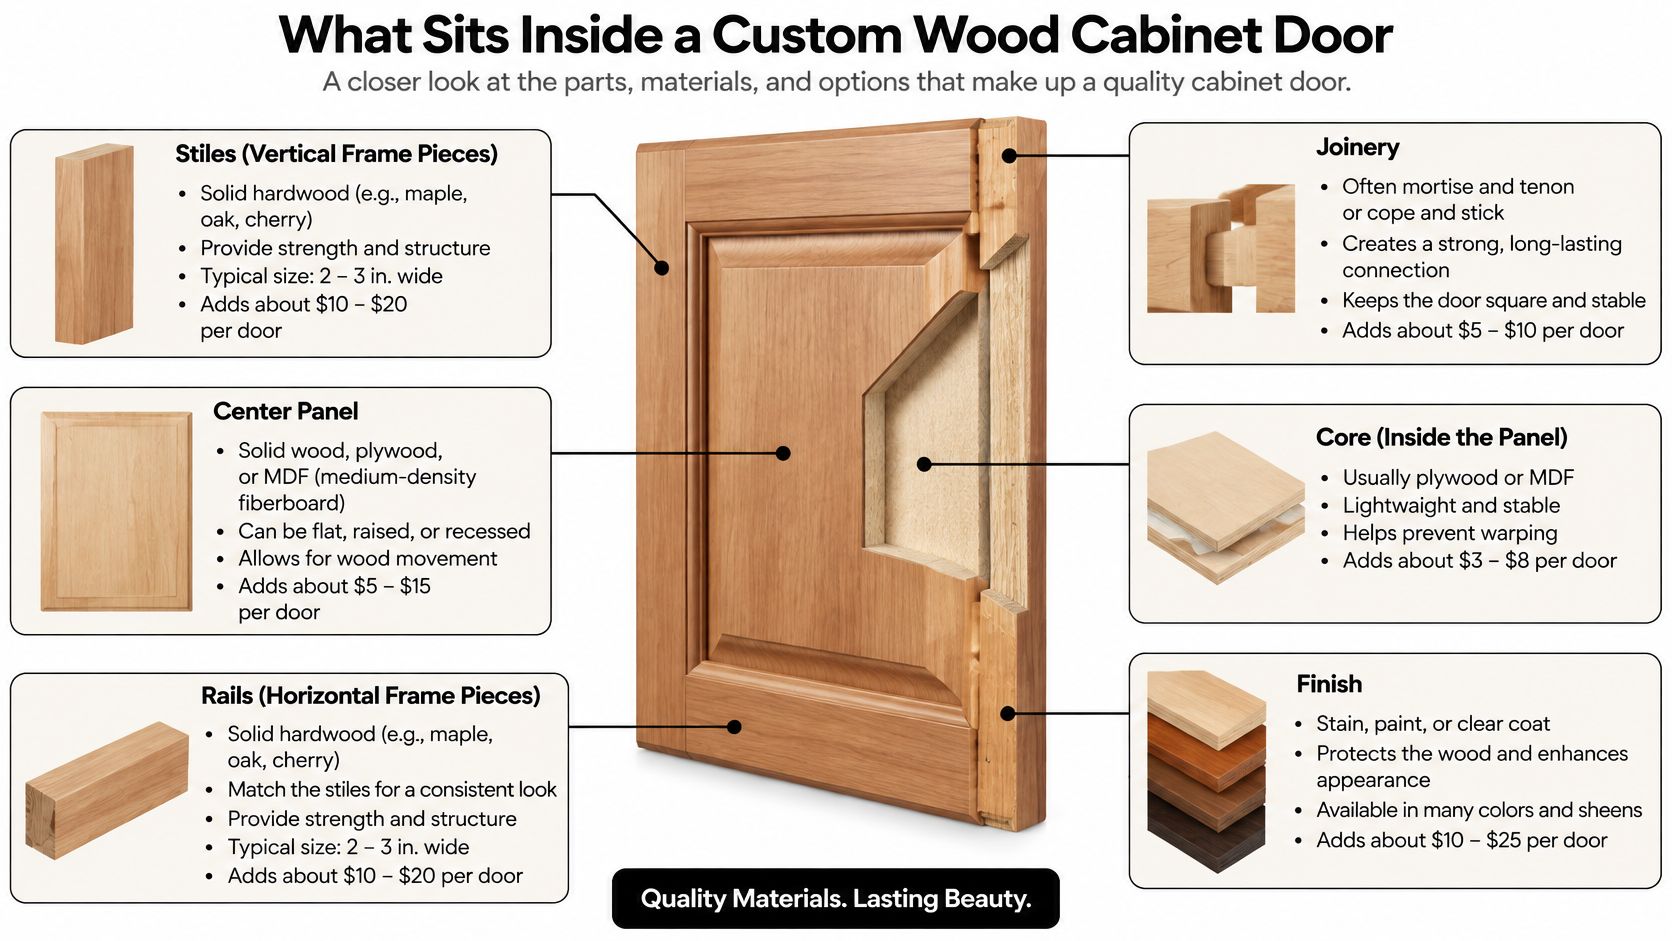
A custom cabinet door is the made-to-size front, not the cabinet box. Think of a framed door as a picture frame holding a center panel. The vertical members are stiles, the horizontal members are rails, and the panel fills the opening between them.
That description identifies the parts, but not their materials. A door can have a solid maple frame surrounding an MDF center, a veneered plywood panel, or a solid-wood panel. From the front, those assemblies can look surprisingly similar.
The construction diagram helps separate the visible face from the materials underneath.
Read the assembly in build order
Start with the frame species and finished thickness. Then identify the center: solid wood, veneer over a named core, or glass. “Wood panel” is too vague for an order because it leaves the actual construction undecided.
Next comes the frame joint. Cope-and-stick joints use matching shaped profiles, mortise-and-tenon joints connect a projecting tenon to a receiving pocket, and dowels align and reinforce mating parts. Joint quality depends on accurate machining, suitable adhesive, and enough sound material around the connection.
Finish the description with the outside edge profile, overlay, hinge boring, and coating coverage. These details decide whether the door clears adjacent fronts, accepts the intended hinge, and matches the rest of the room. Our guide to cabinet construction methods explains the broader relationship between fronts, frames, and boxes.
Stock, semi-custom, and custom describe purchasing flexibility rather than a universal quality ranking. Stock doors follow catalog sizes; semi-custom offerings generally combine selected sizes and finish options. Full custom allows an opening-specific width or a coordinated filler and end-panel treatment, but each component still needs its own dimensions.
Separate appearance from indoor air
The U.S. Environmental Protection Agency's indoor-air guidance identifies particleboard, hardwood plywood, and MDF used in cabinetry as potential formaldehyde sources, notes MDF's generally higher resin-to-wood ratio among urea-formaldehyde pressed-wood products, and explains that emissions are highest when products are new.
A stained hardwood door fitted to an older particleboard cabinet therefore isn't automatically a low-emission cabinet system. The box, shelves, adhesives, and new coating deserve attention too. Plan ventilation during and after installation, particularly when the home is tightly sealed.
Before discussing style, identify these items in writing:
- Frame: Name the species and finished thickness.
- Panel or core: Identify the material beneath the visible surface.
- Adhesive: Request documentation supporting any no-added-formaldehyde claim.
- Coating: Name the primer, stain, and topcoat system where applicable.
Practical rule: A material label describes a component. It doesn't describe the whole cabinet's indoor-air performance.
Wood Species Compared for Cabinet Doors
| Species | Grain and movement | Best use | Price tier |
|---|---|---|---|
| Hard maple | Tight grain; board selection still matters for movement | Smooth paint or a carefully sampled light stain | Mid |
| Red oak | Open pores; visible cross-grain character | Stain; fill grain before a smooth painted finish | Mid |
| White oak | Pronounced grain; ray figure changes with the cut | Stained modern or traditional doors | Premium |
| Cherry | Smooth grain; color develops with light exposure | Clear finish or stain when visible wood is the goal | Premium |
| Walnut | Naturally dark grain with possible lighter sapwood | Clear finish or restrained stain | Premium |
| Hickory | Strong grain and color contrast; hard to disguise | Rustic stain rather than uniform paint | Mid to premium |
| Alder | Relatively even grain; susceptible to dents | Paint-grade or softly colored stained doors | Budget to mid |
| Pine | Soft, often knotty; resin and knots need preparation | Cottage stain or paint | Budget |
Use a row as a finish decision, not a durability score. Red oak, for example, suits a homeowner who wants visible grain. Someone expecting a glass-smooth painted face must also allow for pore filling and sample approval.
The price tiers describe relative purchasing choices, not quoted door prices. Board grade, cut, width, availability, and finishing labor can change the order. A carefully matched paint-grade assembly can require more finishing work than its species name suggests.
Maple and oak create different painted surfaces
Hard maple is a sensible starting point when paint should look smooth and restrained. Its tighter grain avoids the pronounced pore pattern associated with oak, although joints and surface preparation can still show under an unforgiving finish.
For a pale stain, approve a sample rather than assuming maple will color uniformly. End grain, face grain, and individual boards can absorb color differently. A sample should include a frame joint and panel, not just a flat scrap.
Red oak makes its grain part of the design. Stain can emphasize that structure, while paint without pore filling leaves the grain texture visible. Neither result is wrong, but the finish sample must establish which one you're buying.
White oak also needs a grain-selection conversation. Rift-sawn, quarter-sawn, and plain-sawn material don't produce interchangeable appearances. If you want quiet, straight lines across a run of doors, specify that preference rather than approving species alone.
Cherry and walnut reward a visible finish
Cherry suits a finish intended to reveal the wood. Its changing color makes a later replacement more complicated: a newly finished door may not immediately resemble surrounding doors that have aged in daylight.
That doesn't mean cherry cannot be painted. It means buying it with the expectation of covering it later may spend money on an appearance you won't keep. Choose it because you want its grain and developing color.
Walnut already contributes a dark base color. A clear or lightly colored finish often makes more sense than applying an opaque coating. Review sapwood allowances because a pale strip can be conspicuous beside darker heartwood.
For either species, a small sample won't establish the full range of an entire kitchen. Approve the acceptable color variation as well as the preferred sample.
Hickory, alder, and pine need realistic expectations
Hickory works when contrast is welcome. Trying to turn strongly patterned boards into a perfectly uniform stained kitchen creates an avoidable conflict between material and finish.
Alder offers a quieter appearance, but dents can become part of its service history. Consider that trade-off around frequently handled lower doors or homes where stools and cleaning equipment strike the fronts.
Pine suits cottage work when knots and softer surfaces belong in the design. For paint, knot treatment and resin control matter; opaque color alone won't solve every preparation problem.
Choose the species for the finish you intend to keep. Stain makes wood selection more visible; paint shifts attention toward preparation, joints, and coating quality.
Door Styles and Panel Movement
Wood movement is a construction issue before it's a style issue. Below the fiber-saturation point, wood gains or loses bound water in its cell walls, changing dimensions as surrounding conditions change.
The USDA Forest Products Laboratory's wood-moisture guidance reports typical longitudinal shrinkage from green to oven-dry of about 0.1–0.2%, with substantially greater movement across the grain. That difference explains why a broad solid panel needs room to change width rather than being locked rigidly into its frame.
A floating panel sits in grooves with clearance for that movement. The frame joints remain bonded, but the solid center isn't glued continuously around its perimeter. If the panel is trapped, seasonal swelling can stress the frame or split the panel.
Match the profile to a workable assembly
| Style | Construction | Where it fits | Movement or matching risk |
|---|---|---|---|
| Shaker | Square frame with a flat floating panel | Kitchens, baths, closets | Accommodates movement when the solid panel has proper clearance |
| Raised panel | Frame with a beveled solid or veneered center | Traditional kitchens | Additional machining; solid center still needs movement allowance |
| Recessed panel | Frame with a shallow center recess | Transitional rooms | Panel depth and reveal consistency affect matching |
| Slab | Solid, glued-up, or veneered flat door without a surrounding frame | Modern frameless fronts | Wide solid slabs can cup; core construction matters |
| Beadboard | Frame with joined boards or a routed bead pattern | Cottage rooms and laundries | Joined boards and routed panels require different detailing |
| Mullion glass | Frame with muntins and a glass insert | Hutches and upper cabinets | Wood framing moves; glass retention must allow appropriate clearance |
| Louver | Frame with spaced slats | Ventilated closets | Numerous edges complicate finishing and cleaning near splashes |
Shaker is straightforward, but the name doesn't fix rail width, inside profile, or panel depth. Those dimensions determine whether a replacement really matches. A simple profile may be easier to reproduce than an elaborate one, but a drawing is still better than a style name.
Raised panels introduce another surface transition and more tooling choices. A beveled solid center and a veneered shaped center may present similar faces while requiring different construction details.
Slabs need a direct conversation about their build. A veneered panel and a wide solid-wood slab aren't interchangeable just because both are flat. For a solid slab, board selection, grain orientation, width, and hinge support all deserve review.
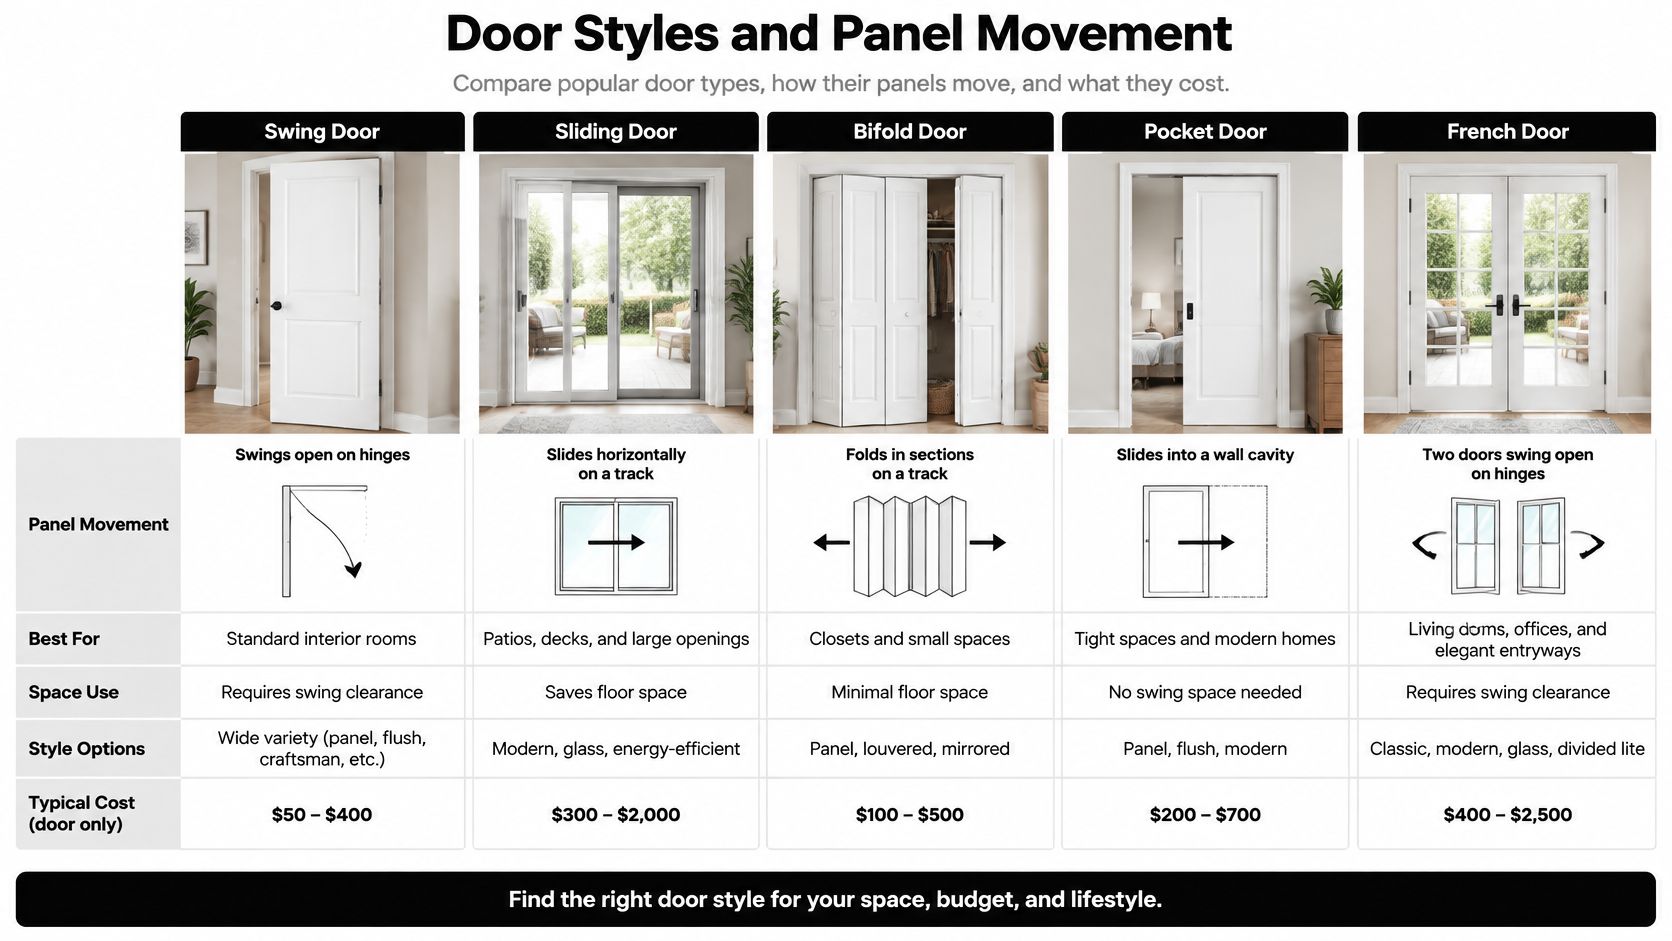
This comparison visual helps distinguish the door types before you approve a profile.
Overlay describes fit, not style
Full overlay covers most of the cabinet's front edge or face frame. Partial overlay leaves more of the frame exposed. Inset places the door within the opening, where squareness and consistent clearance become especially visible.
A shaker door can use any of these arrangements. Calling a door “European” or “traditional” doesn't provide the hinge manufacturer with enough information to select the mounting arrangement.
Face-frame cabinetry has a front framework around its openings; frameless cabinetry mounts hardware to the cabinet sides. Either can support contemporary or traditional-looking fronts. Specify the actual cabinet construction and intended reveal instead of assuming the decorative style settles the fit.
For beadboard, louvers, and glass doors, inspect the back as carefully as the face. Retaining strips, slat edges, and intersecting profiles affect cleaning, finishing access, and later repairs.
Finishes Hardware and Emission Limits
| Finish | Look | Repair | Notes |
|---|---|---|---|
| Stain and clear lacquer | Reveals grain and wood color | Compatible touch-up or refinishing after a test | Protect the back, edges, and exposed end grain |
| Paint over primer | Covers color; surface texture may remain | Match primer, color, and sheen | Edge preparation is critical, particularly on MDF |
| Conversion or post-catalyzed varnish | Furniture-style film in selected sheens | Often best handled by a finishing shop | Durable kitchen option, but not permission to leave standing water |
| Oil or wax only | Soft, natural appearance | Can be refreshed with a compatible product | Less suitable for repeatedly splashed sink-side doors |
A beautiful sample shows appearance. It doesn't establish the complete coating system or how that system will behave around a dishwasher vent, wet hands, or a leaking sink.
Specify the finish chemistry, sheen, preparation, and application schedule. “Satin white” identifies neither the primer nor the topcoat. A stain name is equally incomplete without the clear finish that protects it.
Specify the film, not just the color
Lacquer touch-ups can be practical when the existing and repair materials are compatible. However, a visible patch may still differ in sheen or color, especially where the underlying wood has aged. Test in an inconspicuous location before sanding the face.
Paint chips require more than a dab of color if the damage exposes absorbent wood. Prepare the damaged area, restore primer where needed, and blend the finish without building a raised blob. On a factory-finished door, obtain the coating identification before attempting a repair.
A catalyzed coating can be a strong kitchen choice, but its repair procedure may not resemble that of ordinary lacquer. Mixing incompatible coatings can cause adhesion failures or an obvious repair boundary.
Ask whether stain is sprayed, wiped, or hand-shaded, and approve the result on the intended species. Specify corresponding protection on the front, back, and edges. Coatings slow moisture exchange, rather than making wood dimensionally inert.
Choose the hinge before drilling
A European cup hinge must match the door thickness, overlay or inset application, mounting plate, and boring pattern. Soft-close describes a closing feature, not the whole hinge specification. Adjustable hinges help refine height, side clearance, and depth after hanging, but they can't correct a wrong door size.
Drawer slides are a separate component. An undermount glide supports a drawer box; it doesn't determine door boring. Keep those hardware schedules distinct, and use our cabinet hardware and finishes guide to coordinate visible hardware with the finish.
Request composite-panel documentation
For regulated composite materials, request EPA TSCA Title VI documentation rather than accepting an unqualified “low-emission” description. CARB Phase II terminology may appear in product information, but it shouldn't replace the required federal compliance identification for current regulated products.
The EPA's composite-wood standards guidance lists formaldehyde-emission limits of 0.05 ppm for hardwood plywood, 0.11 ppm for MDF, 0.13 ppm for thin MDF, and 0.09 ppm for particleboard. These are panel-category compliance limits, not predictions of the concentration in your kitchen.
Low-VOC coating and no-added-formaldehyde construction describe different attributes. Neither phrase substitutes for identifying the material and obtaining the relevant documentation.
A useful finish-and-hardware specification records:
- Finish system: Named primer, color treatment, and topcoat.
- Appearance: Approved color and sheen on the selected material.
- Coverage: Face, back, edges, and exposed end grain.
- Hardware: Hinge model, mounting arrangement, and boring.
- Compliance: Documentation for any regulated composite component.
Cost Lead Time and Doors That Last
| Scope | Lead time | Main cost driver |
|---|---|---|
| One custom painted door | Written production commitment after approval | Size, profile, preparation, color |
| One custom stained hardwood door | Confirm material sourcing and finishing schedule | Species, grain matching, panel type |
| Door-front replacement for one kitchen | Separate production, delivery, and installation dates | Door count, drawer fronts, retained-surface work |
| Major remodel of a small kitchen | Project-specific construction schedule | Cabinetry plus the rest of the room |
Two quotes for "a cabinet door" can differ by several multiples and both be honest. The gap usually lives in the scope. Comparing a bare, unfinished door with one that arrives finished, bored for hinges, delivered, and installed works like comparing an engine price with the price of a running car. A kitchen-front quote that leaves out drawer fronts or exposed face-frame work reads cheap until those items appear as separate add-ons. Before comparing numbers, compare what they buy.
For whole-room context, Houzz's 2025 home-renovation spending report reports that the 2024 median spend for a major remodel of a U.S. kitchen measuring 200 square feet or less was $35,000, up 9% year over year. That figure covers cabinetry plus the rest of the room, so it frames a remodel budget rather than a door order.
Separate door costs from project costs
List doors, drawer fronts, false fronts, and decorative panels individually. Then price the work around them: hinge supply, boring, handles, delivery, finishing, installation, and preparation of the retained cabinetry.
A doors-only refresh keeps the existing boxes and layout. Refacing also treats exposed cabinet surfaces, while full replacement changes the boxes themselves. If water has weakened a hinge mounting point or swollen a cabinet side, a new front will not repair that structural problem.
Use the cabinet door replacement cost guide to organize the scope before requesting comparable prices. Ask for lead time tied to an actual approval milestone, since an informal estimate made before material and finish decisions are settled tends to drift.
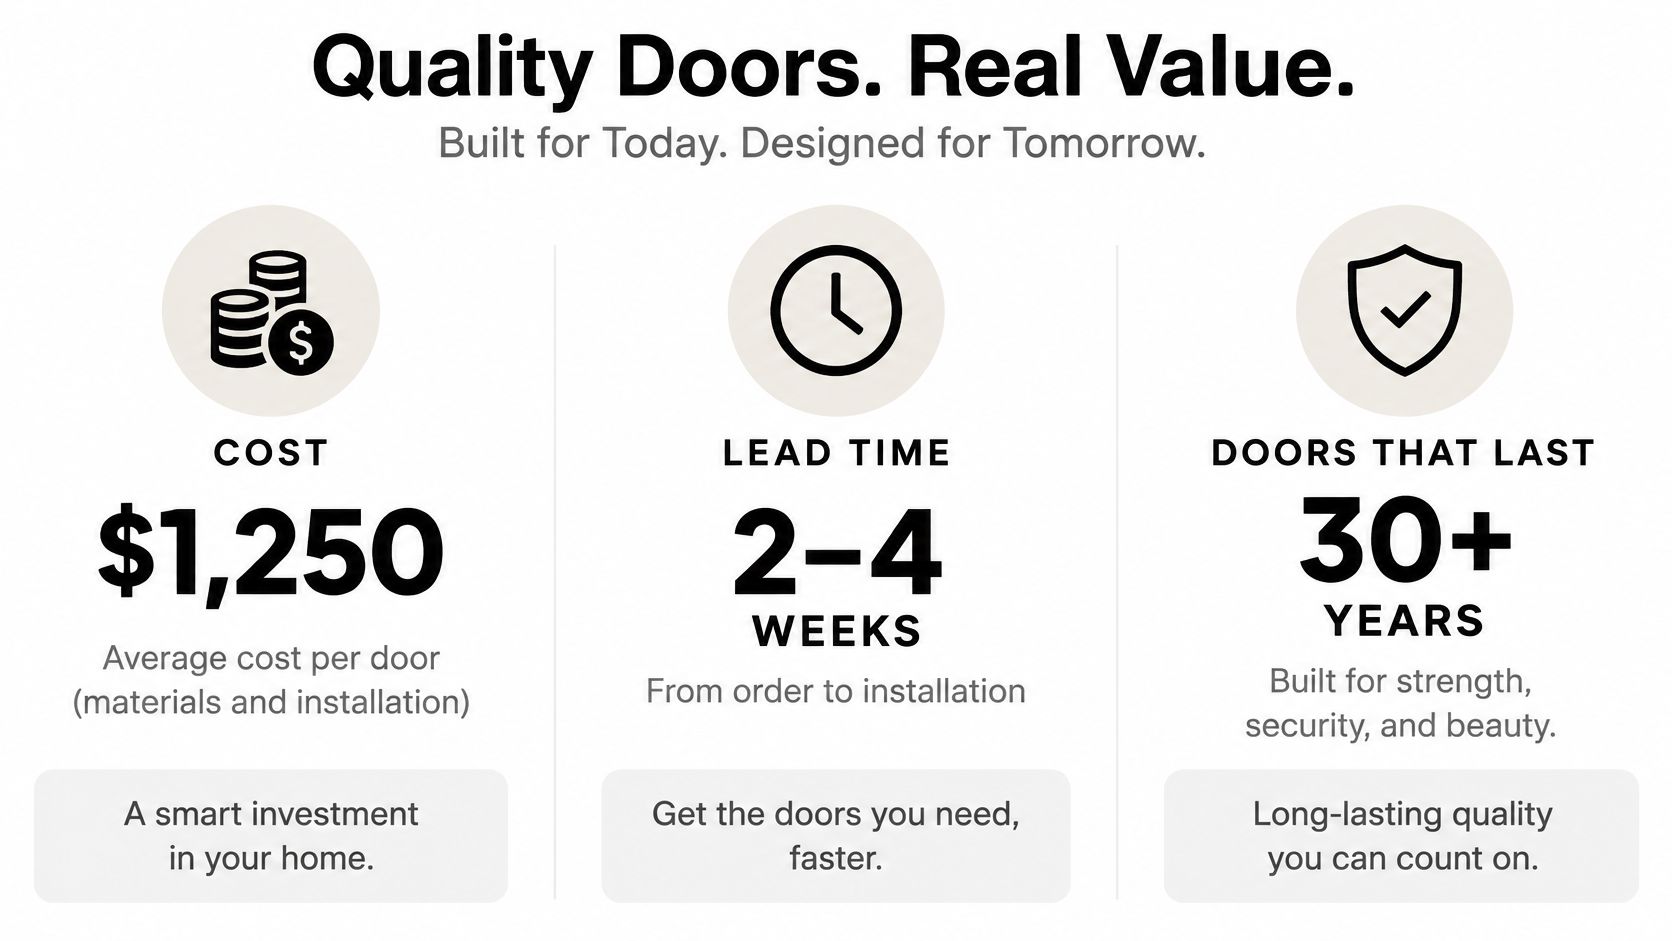
The value comparison should include future work as well as the initial order.
Evaluate sustainability through repairability
The 2025 U.S. Houzz Kitchen Trends Study found that 90% of renovating homeowners selected at least one sustainable option, while 12% specifically selected nontoxic or sustainable cabinets. Those selections describe homeowner choices, and a solid-wood face by itself settles neither indoor air quality nor service life. The core material, the adhesive, the finish system, and whether the door can be refinished and matched years later carry more weight.
A stronger purchase decision considers what happens after damage. Can the finish be renewed? Is there enough solid material to sand safely? Can a hinge be replaced without changing the boring? Can another shop identify the profile?
Veneer thickness matters if refinishing is part of the plan. A veneered door may be repairable, but aggressive sanding can expose the core beneath. Solid wood provides different refinishing possibilities, although deep profiles, water damage, and unsuitable coatings can still complicate restoration.
Keep a small project archive:
- Material record: Species, grade, grain selection, and panel construction.
- Finish record: Product identification, color formula, sheen, and approved sample.
- Hardware record: Hinge model, mounting plate, and drilling drawing.
- Geometry record: Finished sizes and dimensioned profiles.
Long-term value: A door that can be repaired individually may let you keep the surrounding cabinetry instead of replacing an entire matching run.
Responsible sourcing still matters. Request documentation supporting sourcing claims, and weigh it alongside repair, replacement availability, and continued use rather than treating a material label as the final answer.
Measure Specify and Sign Off the Order
Measure the cabinet you have, not the cabinet you assume is square. A tape measure, combination square, pencil, removable labels, and a component schedule are more useful than a collection of unlabelled phone photos.
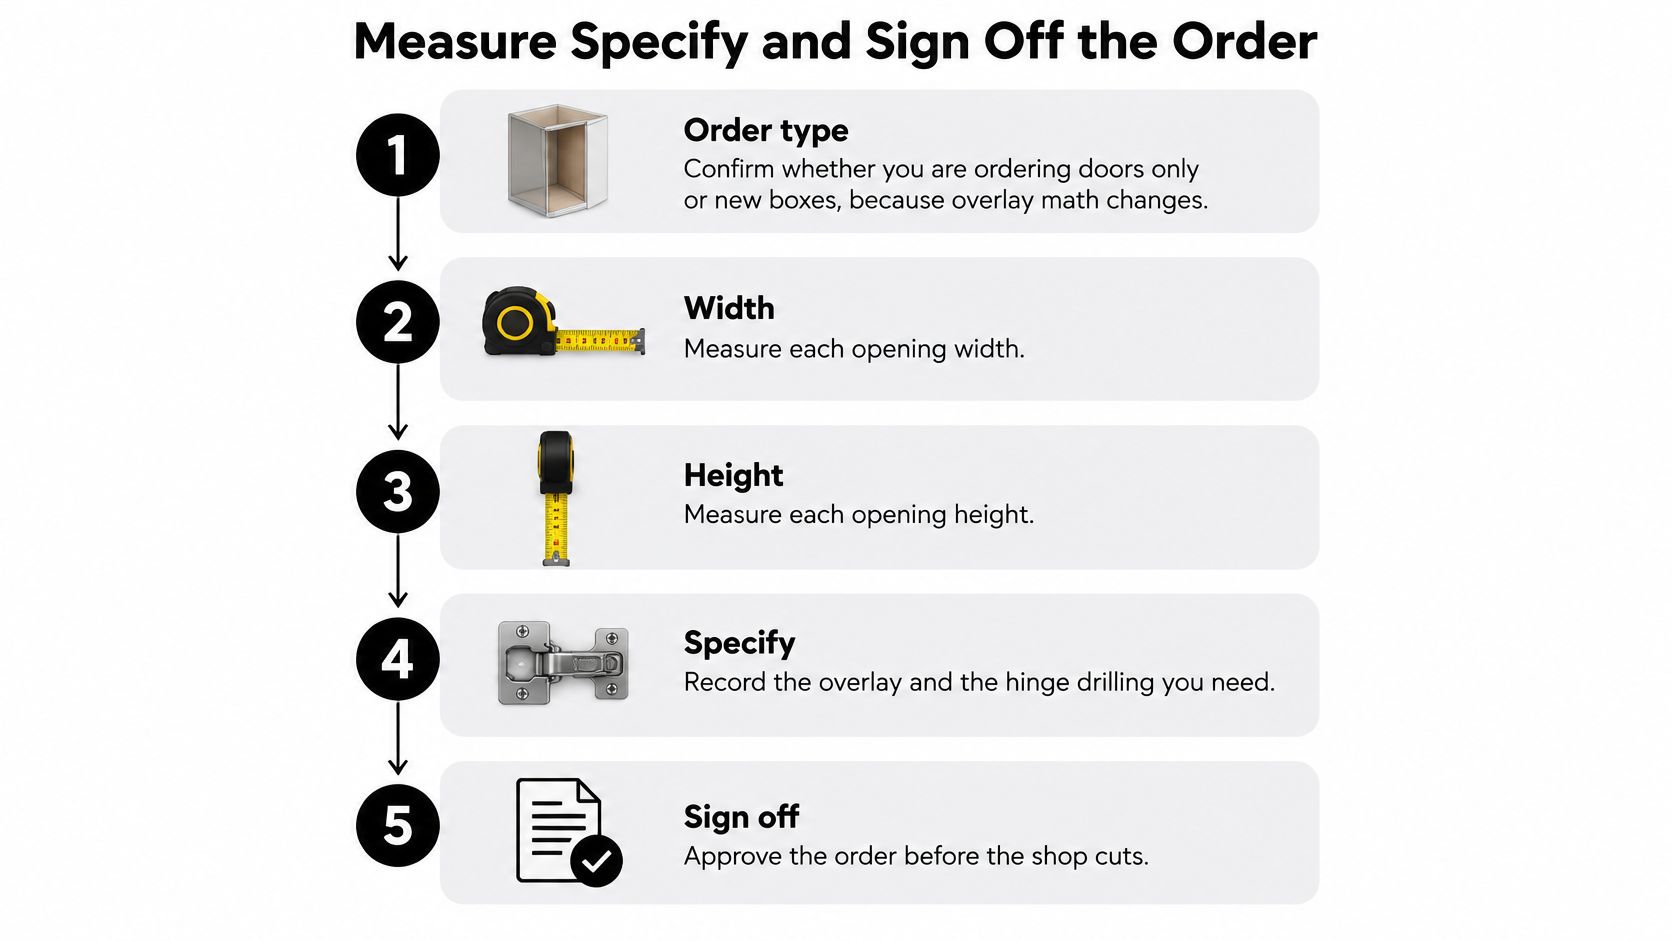
The order sequence should keep opening measurements separate from finished door sizes.
Follow a field routine
Confirm the scope. Mark whether the project retains the boxes, replaces them, or includes refacing. This prevents a drawing for new cabinetry from being mistaken for a replacement-front order.
Label every opening. Give each cabinet and component a unique identifier before measuring. Drawer fronts and fixed false fronts need their own entries rather than being counted as doors.
Measure width and height at several locations. Record the smallest opening readings and note any difference between them. Check diagonals with a tape and corners with a square so an out-of-square opening doesn't disappear into a single dimension.
Record cabinet construction and intended fit. Identify face-frame or frameless construction, then mark overlay or inset. Don't calculate finished sizes until the hinge arrangement and intended gaps are settled.
Measure retained doors only when their fit is correct. For a like-for-like replacement, record the old door's actual finished size and boring. If the old door binds or leaves uneven gaps, copying it preserves the problem.
Identify hinge and handle drilling. Record hinge side, cup location, mounting method, and pull-hole spacing. Photograph the hinge markings and mounting plate rather than relying on appearance.
Complete the material description. Enter frame species, panel construction, finished thickness, edge profile, style, finish, and sheen. Write exceptions against the affected component instead of leaving them in a separate email.
Document moisture conditioning. Obtain shop and installation readings and compare them with the expected occupied indoor conditions. An unfinished building with intermittent air conditioning is not the same environment as an occupied kitchen.
Plan delivery storage and acclimation. Keep doors supported, dry, and away from direct heat or damp concrete. Confirm that the room is ready before bringing finished woodwork onto the site.
Reconcile the schedule with the drawing. Match every component identifier to its opening, photograph, and elevation. Have the builder, designer, and shop approve the same revision.
Our cabinet measuring tutorial can help organize the field work. Measurement assistance doesn't remove the need to identify who approves the final manufactured dimensions.
Specify moisture for the actual room
The USDA Wood Handbook's dimensional-change guidance applies coefficients within roughly 6–14% moisture content, using a reference dimension at 10% moisture content. That reference is a calculation basis, not a universal installation target.
Specify a moisture condition appropriate to the building's expected service environment. Wood installed too wet may shrink and open joints; wood installed excessively dry may swell and bind. Record conditions before finishing and at installation so an avoidable mismatch isn't mistaken for a hinge problem.
For a visual complement to the field checklist, use this video before finalizing the component schedule.
Approve a buildable order
Before paying a deposit, obtain a dimensioned elevation or CAD view, a complete component schedule, an approved finish sample, and written production timing. Identify who owns field verification and how changes will be recorded.
At our Cape Coral, Florida, workshop, every cabinet box, drawer, face, and set of stairs is handcrafted. Matt Sinclair will meet with any customer to help turn their custom cabinet vision into a buildable design.
We offer customizable styles, finishes, materials, hardware, and storage options, including pull-out drawers, adjustable shelves, and built-in organizers. Use the design meeting to resolve those choices while checking the schedule against the room, not after the shop has begun cutting.
Install Maintain and Answer Common Questions
Install against the approved schedule
Check before fastening. Match component labels, hinge boring, overlay, and finish to the order. Inspect the backs and edges while the doors are accessible, and report damage before making alterations.
Hang a trial door and check its swing, clearance, and closed position. Support its weight while attaching the hardware, then use the hinge's height, lateral, and depth adjustments to align the gaps. If adjustment reaches its limit without producing the intended fit, investigate the component size or hardware selection rather than forcing the door.
Leave the designed panel clearance intact. Don't inject glue, caulk, or filler into a floating-panel joint to stop a rattle or close a seasonal line. Recheck alignment after the cabinetry has settled into normal use.
Clean without damaging the film
- Use a soft cloth: Wipe with a barely damp cloth and mild soap when needed, then dry immediately.
- Protect vulnerable edges: Remove drips around sink doors, dishwasher-adjacent fronts, and handle locations before they linger.
- Avoid aggressive cleaners: Abrasives, scouring pads, and solvent-heavy cleaners can dull or damage the coating.
- Inspect loose hardware: Tighten appropriate screws carefully, and repair stripped mounting points rather than overtightening.
- Manage room conditions: Use ventilation and consistent conditioning to reduce prolonged dampness and abrupt environmental changes.
For a chip or scratch, identify the existing finish before choosing a repair product. Clean first, test compatibility out of sight, and keep sanding localized. Deep damage or a repair across a prominent face may justify shop refinishing.
Common questions
Does solid wood mean no formaldehyde?
No. A visible solid-wood frame doesn't identify the entire assembly. Check the panel, adhesive, coating, and surrounding cabinet materials before accepting an indoor-air claim.
Why did a door develop a gap in winter?
Seasonal drying can change the panel's dimensions and reveal a narrow line near the frame. An opening frame joint, however, deserves inspection rather than being dismissed as normal movement.
Can a painted maple door be stained later?
Sometimes, but it isn't a simple color change. Paint must be removed, residual pigment can remain in grain and joints, and the underlying wood may have been selected for painting rather than a uniform stained appearance.
Can I replace only the doors?
Yes, if the retained boxes, hinge attachment points, and layout are suitable. Inspect for swelling, delamination, looseness, and out-of-square openings before investing in new fronts.
Sinclair Cabinetry inc offers custom real-wood cabinetry for kitchens, bathrooms, closets, and specialty spaces, with design choices coordinated around your room. Bring your opening measurements, photographs, and preferred finish to Sinclair Cabinetry inc to discuss the door construction, hardware, and complete specification before approving an order.