
Understanding Dovetail Drawer Construction Fundamentals
Dovetail drawer construction is a true testament to craftsmanship. It's not simply about joining wood; it's about understanding the mechanics that have made this method the gold standard for centuries. The signature interlocking dovetail design, with its precisely angled pins and tails, creates a joint that is remarkably strong and resistant to pulling forces.
This inherent strength contrasts sharply with other joinery methods that rely primarily on glue or fasteners. In fact, the pressure exerted on a dovetail joint actually enhances the connection, making it incredibly resilient to the wear and tear of frequent opening and closing.
Even without glue, a well-fitted dovetail joint holds together surprisingly well. This is due to the mechanical lock created by the angled tails and pins, which effectively prevents the joint from separating. This inherent strength explains why dovetail joints have been a mainstay in furniture construction for centuries, used in everything from simple boxes to intricate cabinets.
A History of Dovetail Joinery
The history of dovetail joints is surprisingly rich. This technique is one of the oldest known joinery methods, with examples found in ancient Egyptian furniture dating back to the First Dynasty. Dovetails have also been discovered in the tombs of Chinese emperors and even within a stone pillar at the Vazhappally Maha Siva Temple in India. To delve deeper into this fascinating history, check out this resource: Dovetail Joint History
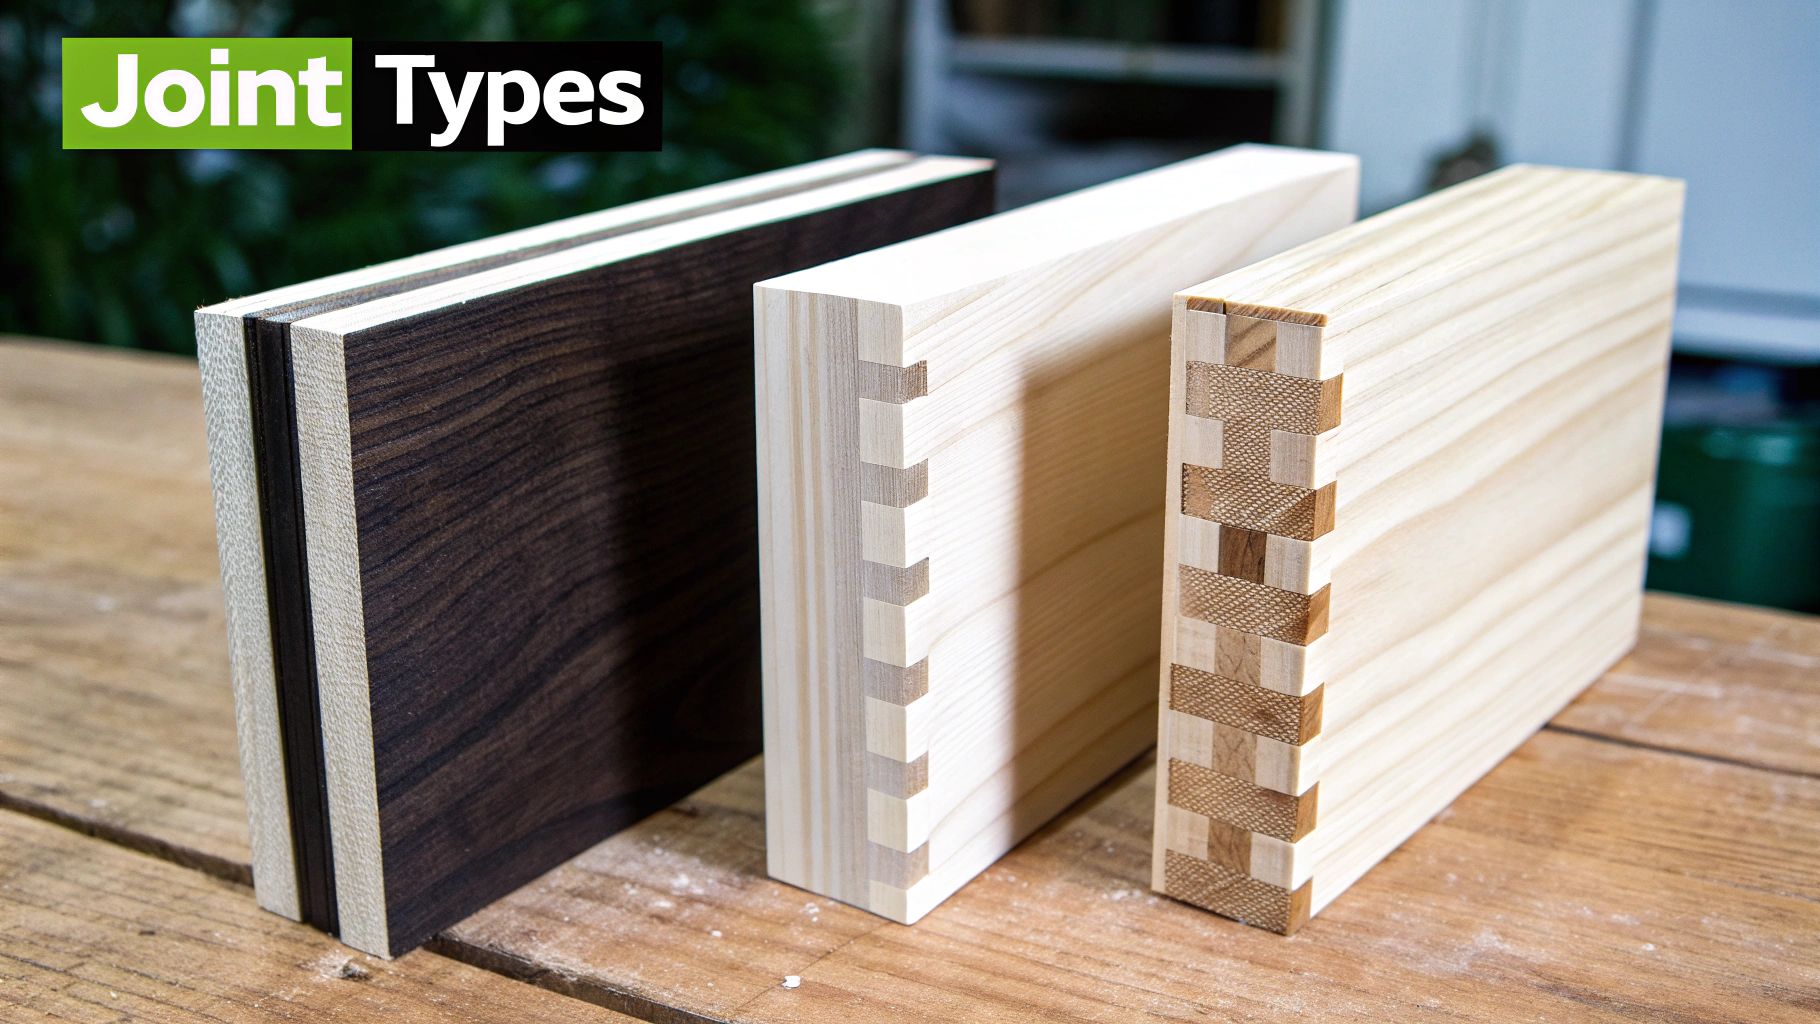
Types of Dovetail Joints in Drawer Construction
Several types of dovetail joints are used in drawer making, each offering distinct advantages:
-
Through Dovetails: The most common type, through dovetails are easily recognizable as both the pins and tails are visible from both sides of the joint. They are valued for their strength and attractive appearance, showcasing the skill of the woodworker.
-
Half-Blind Dovetails: When a clean, uncluttered exterior is desired, half-blind dovetails are the preferred choice. These joints conceal the tails on one side, making them perfect for drawer fronts where only the pins should be visible.
-
Sliding Dovetails: This less common variation involves sliding one board into a groove cut into another. The result is a strong and versatile joint suitable for specific applications.
This variety allows woodworkers to select the ideal joint for their project, striking a balance between aesthetics and function. For further exploration of cabinet construction, see this helpful resource: Cabinet Construction Basics. Understanding these fundamental principles is key to mastering dovetail drawer construction. The combination of mechanical strength, historical significance, and variety ensures the enduring popularity of this time-tested technique.
The Evolution From Basic Joints To Dovetail Mastery
Before the widespread use of dovetail joints, drawers often relied on simpler, less sturdy construction. Early methods, like lapped and nailed joints, frequently failed, particularly in changing humidity. This meant drawers were likely to break down with regular use. This inherent weakness created a demand for a more robust and dependable solution.
The advent of dovetail drawer construction significantly improved furniture making. This change arose from the limitations of earlier techniques. For instance, traditional joints struggled to handle the constant stress and movement drawers experience. The result was furniture prone to damage and in need of constant repair.
Historically, dovetail joints in drawer construction gained popularity during the 19th century. Before then, the common lapped and nailed joints often fell apart, especially in damp conditions. Dovetail joints offered a much stronger and more durable alternative. Explore this topic further This shift aligned with the Industrial Revolution, a period of significant technological progress. The era called for stronger, more resilient furniture, a need perfectly met by dovetail construction.
The Impact of the Industrial Revolution
The Industrial Revolution played a vital role in the rise of the dovetail joint. New machinery enabled more precise and efficient manufacturing. This made high-quality dovetail joints accessible to more furniture makers. Dovetail construction then became a symbol of quality, representing durability and skilled craftsmanship.
This advancement had a profound impact on woodworking. Dovetail joints emerged as the favored method for drawer construction. They offered unmatched strength and durability compared to earlier methods. This cemented the dovetail joint's importance in furniture making.
Dovetails in Modern Woodworking
Even today, mastery of dovetail drawer construction remains a key skill for serious furniture makers. It represents not just a technical ability, but a deep understanding of woodworking principles. Creating strong, lasting joints is fundamental to quality furniture.
This enduring relevance speaks to the significance of the dovetail's development in furniture construction. It showcases the ingenuity that continues to inspire woodworkers today.
Hand-Cut Versus Machine-Cut: Choosing Your Approach
The enduring debate between hand-cut and machine-cut dovetails continues within the woodworking community. When executed properly, both methods produce strong and useful drawers. However, each caters to different priorities. Understanding these nuances is crucial for selecting the right approach for your next project.
Precision and Consistency in Machine-Cut Dovetails
Machine-cut dovetails offer exceptional precision and consistency. This is especially important for projects involving multiple identical drawers, where uniformity is key. Modern woodworking machinery like a CNC router effortlessly creates tight-fitting joints. This level of quality has become increasingly accessible to the home woodworker.
This accessibility means that complex joinery, once a hallmark of master craftsmen, is now achievable with readily available tools. For those looking to expand their joinery skills, resources like this guide on cabinet joinery techniques can be very helpful.
The Artistry of Hand-Cut Dovetails
The distinct character and handcrafted appeal of hand-cut dovetails remain highly prized. Each joint carries subtle variations, a testament to the woodworker's skill and an artistic touch. This meticulous method is preferred for heirloom-quality furniture or projects where the journey is as important as the destination.
Consider a handcrafted jewelry box with hand-cut dovetails. It becomes more than mere storage; it embodies time and dedication, a tangible representation of the maker's skill.
A Historical Perspective on Dovetails
By the 1890s, American furniture makers integrated machine-cut dovetail joints into mass production. This made quality furniture more attainable for the growing middle class. Machine-cut dovetails proved as strong as their hand-made counterparts, quickly becoming a standard. Learn more about the history of dovetails in furniture. This shift highlighted the balance between efficiency and craftsmanship in furniture making.
Workshop Setup and Time Investment Considerations
The choice between hand-cut and machine-cut also depends on workshop resources and available time. Hand-cutting requires fewer specialized tools but demands substantial time and honed skill. Machine cutting, conversely, entails a larger initial equipment investment but drastically reduces production time, especially for multiple joints. The ideal approach aligns with your individual project needs, budget, and woodworking goals.
Making the Right Dovetail Choice
The final decision involves balancing precision, character, and practicality. The table below offers a direct comparison to help you determine the best method for your dovetail drawer project:
"Hand-Cut vs Machine-Cut Dovetail Comparison"
Comprehensive comparison of hand-cut and machine-cut dovetail construction methods, including time requirements, skill levels, and quality outcomes.
| Method | Time Required | Skill Level | Precision | Character | Cost |
|---|---|---|---|---|---|
| Hand-Cut | High | High | Moderate | High | Low |
| Machine-Cut | Low | Moderate | High | Low | Moderate/High |
This table highlights the inherent trade-offs of each method. Hand-cutting offers a distinctive aesthetic but requires patience and a higher skill level. Machine cutting prioritizes efficiency and precision, especially beneficial for larger or professional woodworking projects. Understanding your priorities is paramount for successful dovetail drawer construction.
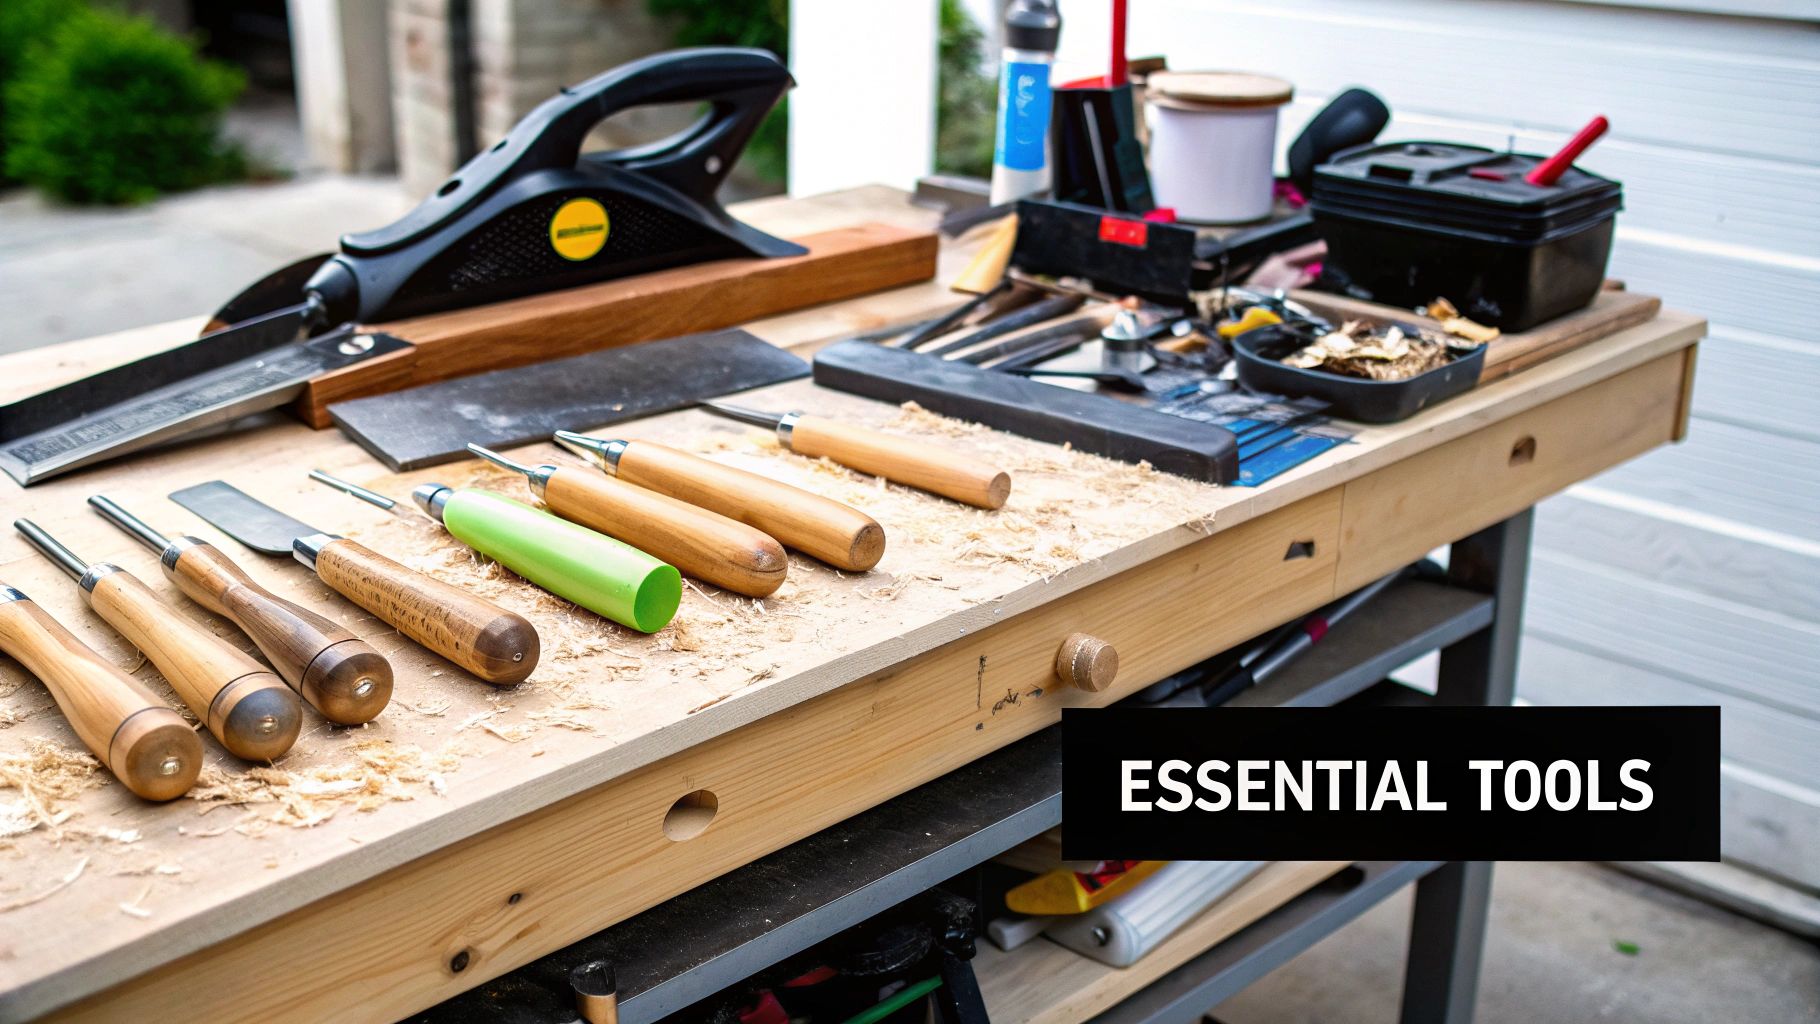
Essential Tools and Materials For Professional Results
Success in dovetail drawer construction relies on a deep understanding of your tools and materials. It's not simply about acquiring equipment; it's about appreciating how each component contributes to a robust and visually appealing joint. Let's bypass the marketing hype and concentrate on the truly important aspects.
Wood Selection: The Foundation of Your Dovetail Drawer
Choosing the correct wood can significantly impact the success of your dovetail drawer. Certain species, like hard maple, offer exceptional strength and a tight, close-grained structure, perfect for intricate dovetails. However, its hardness can also present a woodworking challenge. Soft maple, while easier to work with, might not hold fine details as effectively.
Consider the drawer's intended use. A utility drawer designed for tools might benefit from the ruggedness of oak, while a delicate jewelry box is better suited to the refined texture of cherry or walnut. Grain orientation is also key. Wood exhibits its greatest strength along the grain. Aligning the tails and pins with the grain therefore maximizes the joint's strength.
This principle is similar to how a rope is strongest when pulled lengthwise. Understanding how wood responds to stress is vital for crafting durable dovetail joints. The wood species and grain orientation greatly influence both the strength and workability of your project. These are crucial factors to consider before even picking up a chisel.
Essential Measuring and Marking Tools
Precision joinery relies heavily on accurate measurements. A marking gauge is indispensable for scribing consistent tail and pin locations. A high-quality combination square ensures precise 90-degree angles and helps maintain squareness during the process. Sharp pencils enable clear, precise lines, minimizing errors when cutting. These tools form the foundation of your dovetail drawer construction.
Cutting Tools: Achieving Clean, Accurate Cuts
Clean, precise cuts are paramount for tight-fitting dovetails. A fine-toothed dovetail saw is specifically designed for this task, minimizing kerf and allowing for controlled cuts. Sharply honed chisels are essential for removing waste material between cuts, creating the crisp, defined dovetail shape.
A coping saw can be helpful for removing waste in confined spaces, preventing damage to neighboring pins or tails. For instance, when creating half-blind dovetails, a coping saw facilitates cleaner cuts along the interior baseline of the tail sockets. Just as a surgeon relies on a scalpel for precision, a woodworker depends on sharp, well-maintained tools to achieve the desired result.
Essential Supplies: The Often-Overlooked Details
Beyond the primary tools, certain supplies are instrumental in creating professional-looking dovetails. Wood glue, specifically formulated for joinery, provides strength and stability. Clamps hold the pieces securely during assembly, guaranteeing a tight bond and preventing gaps. Sandpaper, used in progressively finer grits, smooths the surfaces and refines the drawer's final fit.
These finishing touches, though seemingly minor, elevate your work. The smooth operation of a well-fitted drawer is a testament to the attention to detail invested throughout the construction process. Even seemingly insignificant details, such as the wood glue selection, can affect the long-term durability and appearance of your dovetail joints. Each tool and material has a crucial role in achieving a successful outcome.
Step-By-Step Dovetail Construction Process
Creating dovetail drawers is a precise woodworking process, blending accurate measurements with skilled cutting and fitting. Achieving a structurally sound and visually appealing drawer requires careful attention at each step, beginning with the initial layout.
Layout and Marking: The Foundation of Accuracy
The first step involves meticulously laying out the pins and tails on the drawer sides and front. This requires marking the locations with a marking gauge, ensuring consistent spacing and depth. Accurate marking is essential for preventing issues later and establishes the groundwork for clean, tight-fitting joints. This initial step eliminates guesswork and reduces measurement errors.
Cutting the Tails: Precision and Control
Cutting the tails is typically the next stage. The infographic below visualizes the three key steps: marking the tail layout, sawing along the waste lines, and paring the waste with a chisel.
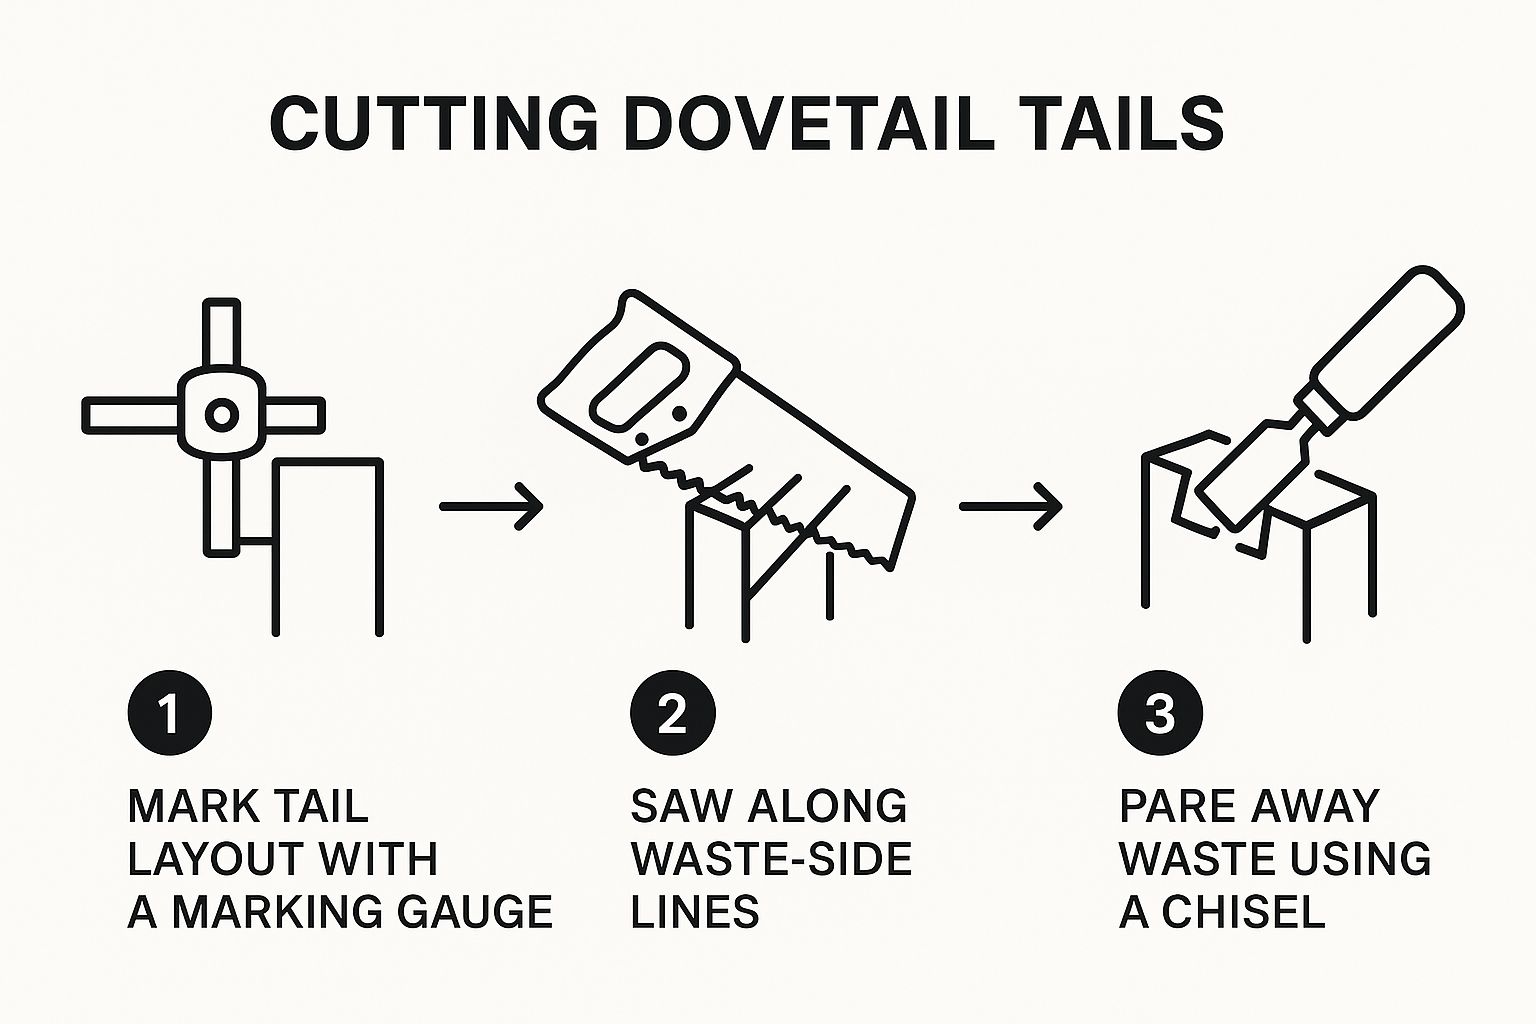
The infographic emphasizes the importance of precise sawing and careful chisel work. Accurate saw cuts, guided by the markings, define the tail shape. The chisel then refines the form, removing waste wood and creating the final dovetail. Accuracy in this stage directly impacts the joint's fit and strength.
Cutting the Pins: Matching the Tails
After cutting the tails, the focus shifts to creating the corresponding pins on the drawer front. This involves transferring the tail layout to the drawer front using a marking knife or a sharp pencil. Similar to cutting the tails, careful sawing and chiseling are crucial. The pins and tails are essentially mirror images, designed to interlock seamlessly. The precision of the tails directly influences the accuracy of the pins.
Test Fitting and Adjustments: Achieving a Perfect Fit
A test fit is crucial before applying any glue. This allows for identifying discrepancies and making adjustments. Minor gaps can be addressed with careful paring, while larger issues might require recutting. This step ensures a tight, gap-free final joint, critical for the drawer's strength and smooth operation. A properly fitted joint will hold securely even without glue.
Addressing Tear-Out and Mistakes
Tear-out can occur when cutting dovetails, especially in brittle woods. Using sharp tools and supporting the wood during cutting minimizes this risk. Small imperfections can often be corrected with sanding or wood filler. These techniques can salvage a project and build confidence.
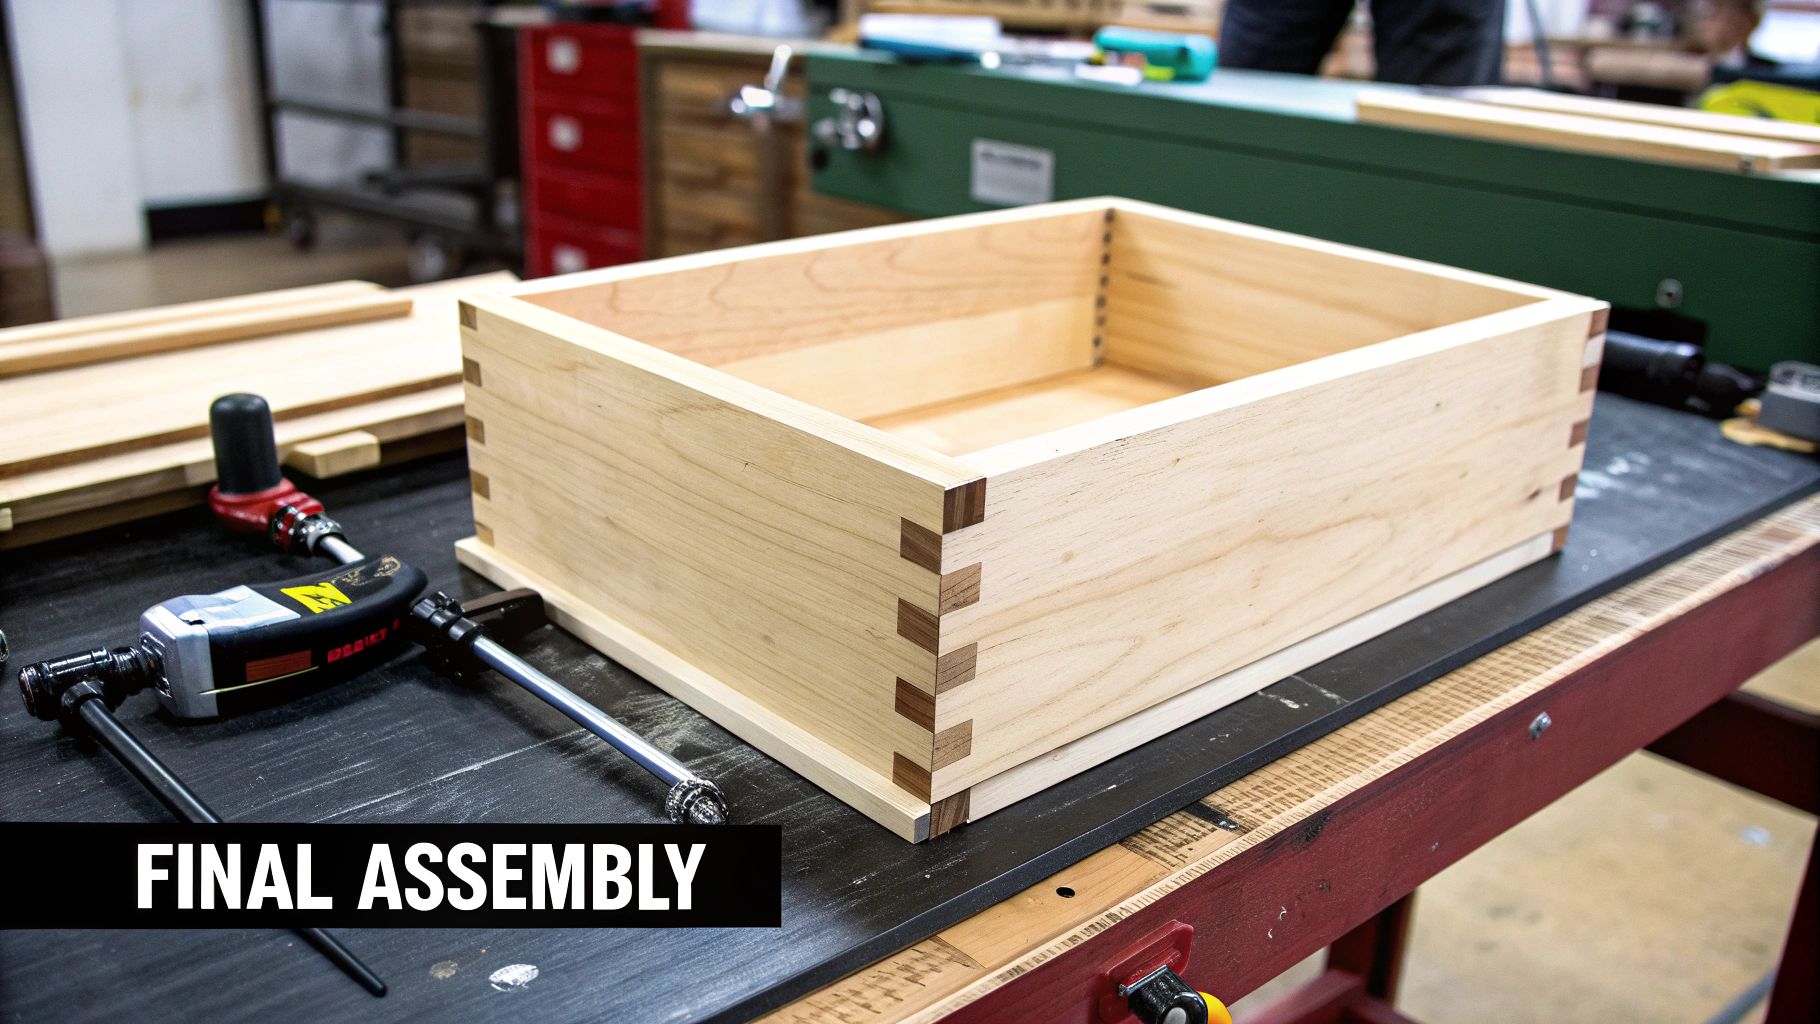
Glue-Up and Clamping: Securing the Joint
Finally, the drawer components are assembled with wood glue. Clamps ensure a uniform, tight fit during drying. Evenly distributed clamping pressure prevents warping. Careful glue application prevents squeeze-out, which can affect the finished appearance. This final step creates a strong, durable, and visually appealing joint, resulting in a functional and beautiful drawer.
Troubleshooting Common Construction Challenges
Even experienced woodworkers run into occasional snags when building dovetail drawers. This section tackles common issues and provides practical solutions. Honing these troubleshooting skills is essential for crafting high-quality dovetail drawers. This knowledge also allows you to diagnose and fix problems, preventing minor setbacks from affecting the entire project.
Dealing With Gaps in Dovetail Joints
Gaps in dovetail joints are a frequent source of frustration. They can compromise both the drawer's look and its structural integrity. Fortunately, there are several ways to fix this. For small gaps, carefully applied wood filler can be an effective fix.
For larger gaps, thin wood shims glued into the gap before final assembly can restore strength and appearance. However, prevention is always the best strategy. Precise marking and cutting are essential for minimizing gaps in the first place.
Preventing Splitting During Assembly
Splitting during assembly can ruin hours of meticulous work. This often happens because of excessive force during assembly or misaligned joints. To avoid this, make sure your joints fit snugly before applying glue.
Using a mallet and a protective wood block to apply even pressure during assembly can reduce the risk of splitting. Pre-drilling pilot holes for screws can also prevent the wood from splitting when installing hardware.
Addressing Misaligned Cuts
Misaligned cuts are another common problem, often resulting in uneven joints and gaps. These issues become harder to fix as the project progresses, so catching them early is key. Dry fitting the joints before gluing allows you to identify and correct misalignments early on.
Minor misalignments can sometimes be fixed with careful sanding or planing. However, significant errors may require recutting the affected joint. This highlights the importance of accurate measurements and precise cutting techniques from the start.
Developing Diagnostic Skills
This troubleshooting guide helps you identify and address common dovetail construction problems. Understanding the root causes is just as important as knowing the quick fixes. For example, consistently finding gaps might point to a problem with your marking or sawing technique.
Repeated splitting during assembly could indicate issues with wood selection or clamping pressure. By analyzing recurring problems, you can refine your technique and build stronger, more attractive dovetail drawers. Developing these diagnostic skills will give you the confidence to take on more complex dovetail projects.
Assembly And Finishing For Lasting Beauty
The final stages of dovetail drawer construction require meticulous attention. These crucial steps determine the overall quality and appearance of your finished piece. From precise glue application to a well-defined assembly sequence, your careful execution will transform skillful joinery into a beautiful, functional drawer.
Glue Selection and Application
Selecting the right wood glue is paramount. A quality glue specifically designed for joinery ensures a strong, lasting bond. Apply the glue sparingly to both surfaces of the dovetail joint. Too much glue results in unsightly squeeze-out, requiring extra cleanup and potentially impacting the final finish.
Remember, less is often more when it comes to glue. A thin, even layer provides ample bonding strength without the mess. This sets the stage for a smooth assembly process.
Assembly Techniques for Dovetail Drawers
Assembling the drawer demands patience and precision. First, dry-fit the components. This crucial step confirms proper alignment and helps prevent issues during the gluing process.
Once satisfied with the fit, apply glue and carefully slide the tails into their corresponding pin sockets. Gentle, even pressure is key to avoid damaging the delicate wood. Clamps are essential for maintaining tight joints throughout the drying period. Distribute clamping pressure evenly to prevent warping.
These careful steps ensure a strong, square drawer, ready for the finishing touches that truly bring it to life.
Finishing Touches for Dovetail Drawers
The finishing process enhances the drawer's beauty and protects the wood. Begin by sanding the drawer smooth. Start with coarser sandpaper grits and gradually progress to finer grits for a polished surface. How to master cabinet finishing techniques provides a helpful resource for perfecting your finishing skills.
Thorough surface preparation is essential for any finish. Whether you choose a clear finish to showcase the wood grain or a painted finish, apply multiple thin coats. This technique provides more even coverage and a more durable finish than a single thick coat. The chosen finish protects the wood and highlights the precision of your dovetail joints.
Fitting and Hardware Selection
Proper fitting ensures the drawer functions smoothly. Account for seasonal wood movement by leaving a small gap around the drawer's perimeter. This allows for expansion and contraction without binding.
Selecting the right hardware complements your craftsmanship. Simple, understated pulls or knobs enhance the dovetail joinery without overpowering the design. Thoughtful hardware selection adds the final touch of elegance.
Dovetail Drawer Finishing Schedule
The table below outlines the finishing process, providing a timeline for sanding, applying finishes, and drying times. Following this schedule helps achieve optimal results.
| Step | Grit/Product | Application Method | Drying Time | Notes |
|---|---|---|---|---|
| Sanding | 120, 150, 180, 220 grit | Hand/Orbital Sander | N/A | Remove any glue residue and smooth surfaces |
| First Coat | Stain/Sealer | Brush/Rag | 24 hours | Follow manufacturer's instructions |
| Second Coat | Stain/Sealer | Brush/Rag | 24 hours | Apply thin coats to prevent drips and runs |
| Top Coat (1st) | Polyurethane/Lacquer | Brush/Spray | 24-48 hours | Sand lightly between coats with fine grit sandpaper |
| Top Coat (2nd) | Polyurethane/Lacquer | Brush/Spray | 24-48 hours | Apply multiple thin coats for durability |
This schedule provides a guideline for achieving a professional-looking finish. Remember to always follow the manufacturer's instructions for specific products.
Visit Sinclair Cabinetry for expert advice and custom cabinetry solutions featuring beautiful dovetail construction.