
Unlocking the Beauty of Your Cabinets
Cabinetry is more than just storage; it defines your kitchen or bathroom's overall aesthetic. From rustic farmhouse kitchens to sleek modern bathrooms, your cabinets' finish plays a crucial role. Achieving this perfect look requires more than a simple coat of paint. Understanding cabinet finishing techniques is key to transforming ordinary cabinets into stunning focal points, increasing your home's value, and creating a space you'll adore.
Historically, cabinet finishes primarily protected against moisture and wear. Early techniques used natural oils and waxes, eventually evolving with varnishes and lacquers. Today's advancements in materials science and finishing techniques offer a wide range of possibilities. These range from durable, eco-friendly options to luxurious high-gloss finishes. The best approach depends on several factors. These include the cabinet material (like wood species or MDF), desired look, durability needs, and environmental impact.
Exploring Cabinet Finishing Techniques
This guide explores eight popular cabinet finishing techniques, examining their nuances, benefits, and best practices. Whether you're a DIY enthusiast, an interior design professional, or a homeowner seeking inspiration, you'll gain valuable insights into cabinet finishing. This knowledge will empower you to make informed decisions and create the kitchen or bathroom of your dreams.
Spray Finishing Cabinets: Achieving a Professional Look
Spray finishing is the gold standard for cabinet finishing, delivering a flawless, factory-like result. Professional cabinet makers favor this technique for its ability to create an even, smooth coat free from brush marks. It’s the preferred method for a truly professional look, especially for large projects or intricate cabinet designs.
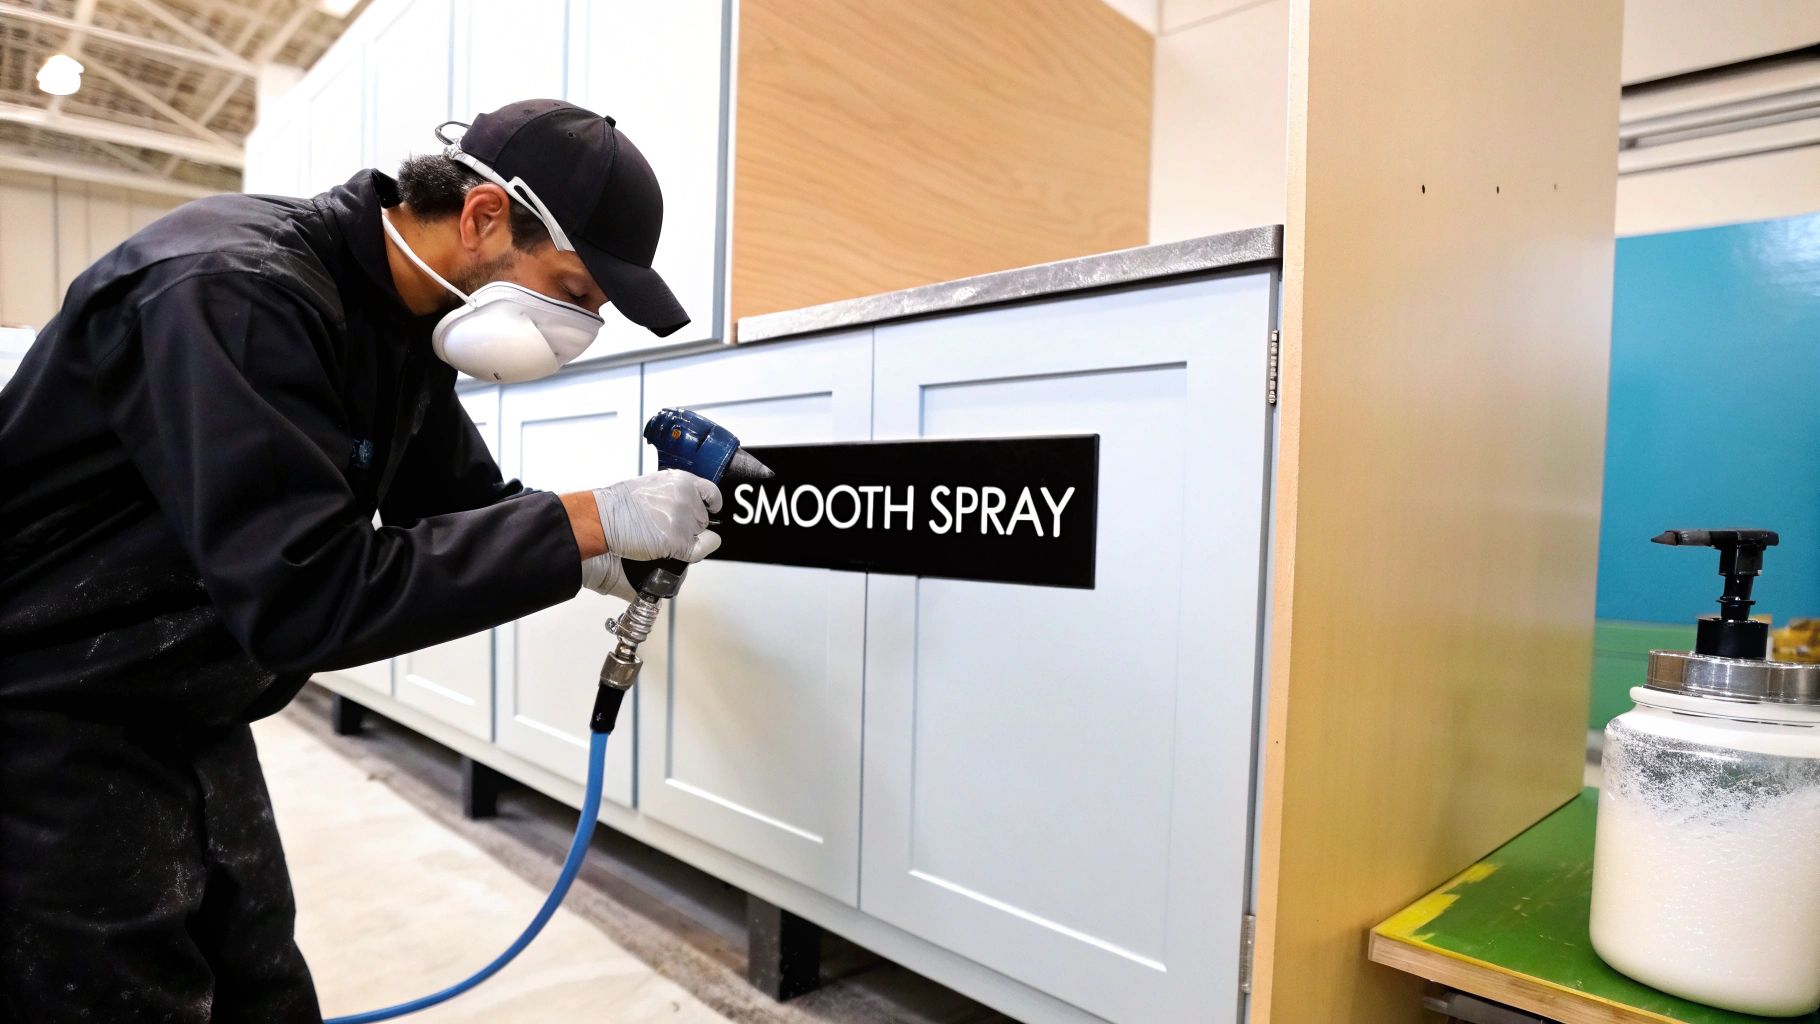
The essence of spray finishing lies in atomizing the finish into fine particles, evenly distributed across the cabinet surfaces. This is achieved with specialized equipment, most commonly HVLP (High Volume, Low Pressure) spray guns. Other options include airless and air-assisted sprayers, each with slightly different performance characteristics. The fine atomization ensures consistent finish thickness and allows the finish to penetrate intricate details, something nearly impossible with brushing. Think of the smooth finish on factory-finished kitchen cabinets – that’s the hallmark of spray finishing. High-end custom cabinetry companies like Woodmode and Brookhaven rely heavily on spray finishing for their polished look.
Why Choose Spray Finishing?
Several factors contribute to the rising popularity of spray finishing. Advancements in sprayer technology, such as more affordable and user-friendly HVLP systems by companies like Fuji Spray, Graco, and Apollo, are a key driver. Increased demand for high-quality finishes and the efficiency it offers for large-scale projects also play a significant role.
-
Even Application: Achieve a smooth, consistent finish without brush marks, elevating your cabinetry's overall look.
-
Project Efficiency: Significantly reduces finishing time for large projects compared to brushing or rolling.
-
Intricate Detailing: Ensures complete coverage, even on complex cabinet doors and drawers. You might also be interested in: Cabinet Doors & Drawers.
-
Equipment Variety: Choose the sprayer that best suits your project and budget.
Weighing the Pros and Cons
| Pros | Cons |
|---|---|
| Professional-looking results | Significant setup and cleanup required |
| Time-efficient for large projects | Equipment investment cost |
| Excellent for complex cabinet designs | Learning curve to master the technique |
| Consistent finish thickness | Overspray concerns and need for proper ventilation |
Tips for Success
-
Practice Makes Perfect: Start on scrap pieces to get comfortable with the sprayer and finish before your project.
-
Maintain Distance: Keep a 6-8 inch distance from the surface for even coverage and to prevent runs or drips.
-
Overlap Passes: Overlap each pass by approximately 50% for a uniform finish.
-
Thin Finishes: Consult the finish manufacturer's instructions for proper thinning ratios.
-
Clean Equipment: Thoroughly clean your equipment after each use for longevity and optimal performance.
Is Spray Finishing Right for You?
Spray finishing delivers a high-quality, professional finish. While it requires equipment investment and practice, the results are worth the effort, especially for a premium cabinetry look. Consider reading more about Choosing the Right Cabinet Finish.
Hand-Rubbed Oil Finish
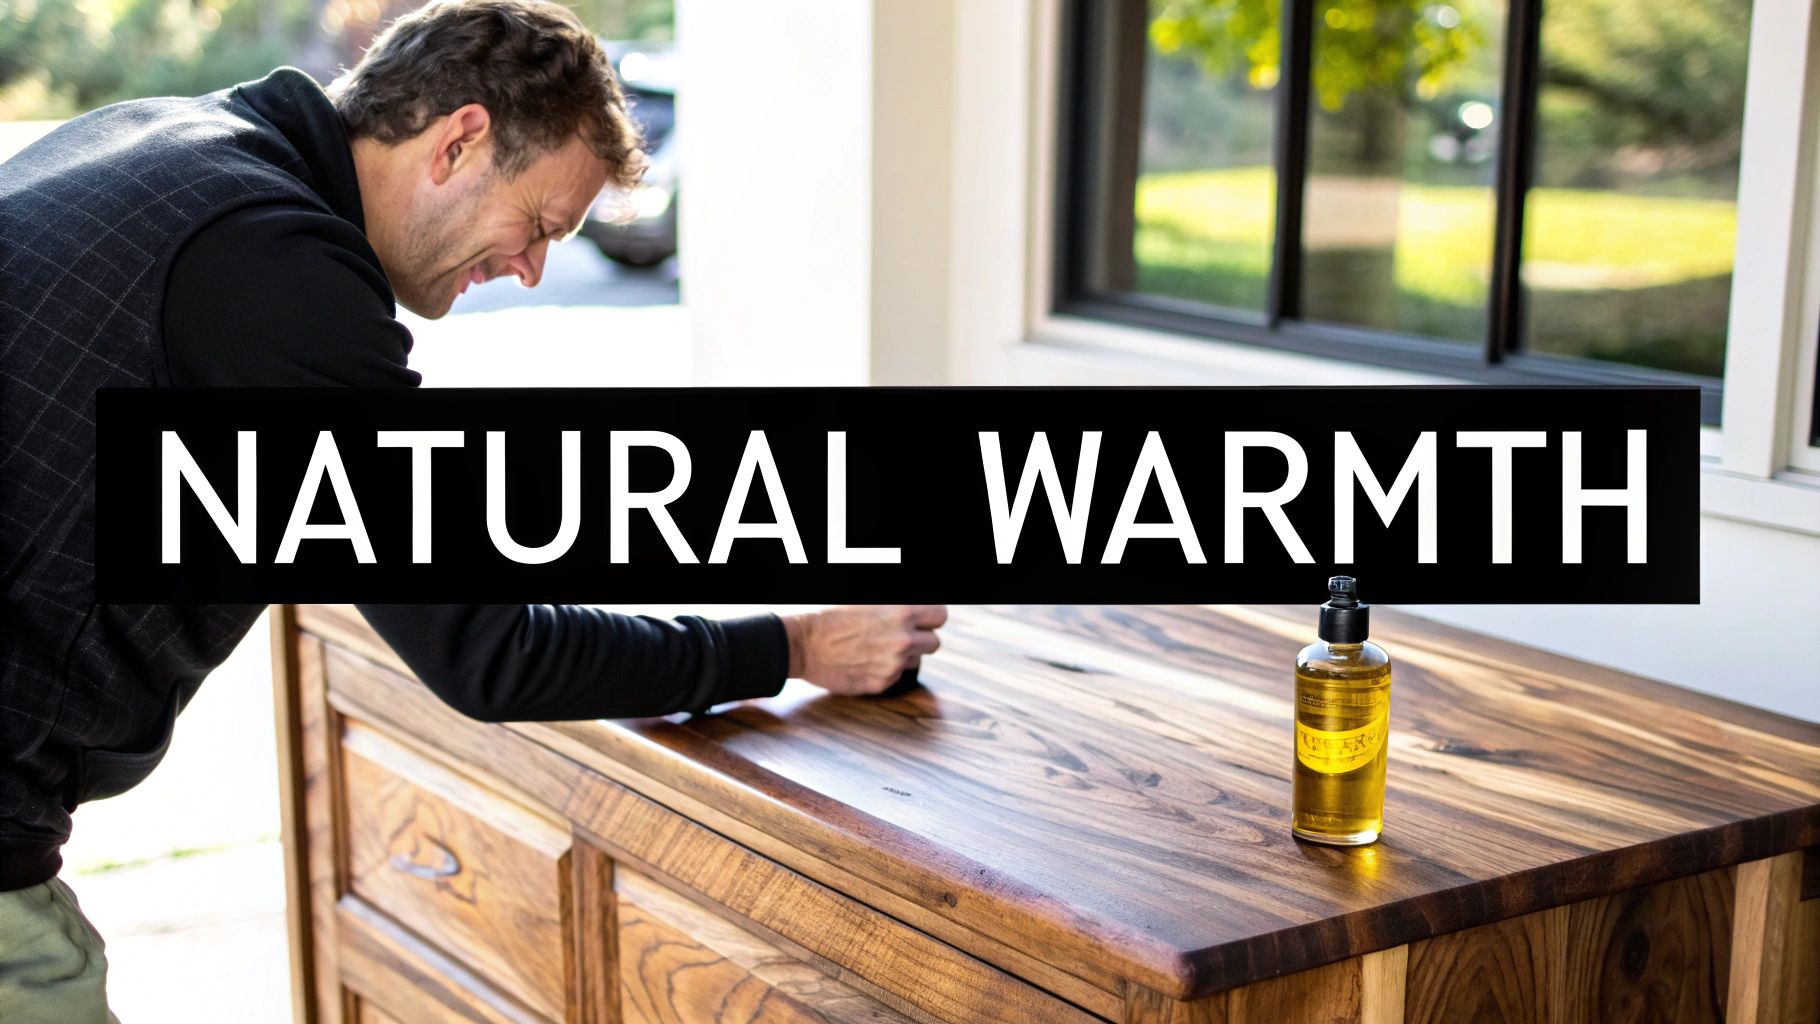
Hand-rubbed oil finishing is a classic woodworking technique. Unlike finishes that sit on top of the wood, this method involves carefully working oil into the wood grain. The result is a finish that becomes part of the wood itself, offering a beautiful and durable result perfect for cabinetry.
This finish truly enhances the natural beauty of wood. It creates a depth and richness that other finishes often miss. The oil saturates the wood fibers, highlighting the grain and producing a warm glow. This is especially noticeable on open-pore woods like walnut or oak. Think Shaker-style kitchen cabinets or elegant Mid-century modern pieces by companies like Heywood-Wakefield. These styles often showcase hand-rubbed finishes.
Beyond aesthetics, hand-rubbed finishes are also practical. The application process, while lengthy, is relatively simple and doesn't require special equipment. This makes it perfect for DIY enthusiasts. Plus, the finish is easy to repair. Scratches can often be fixed by applying more oil, unlike film-forming finishes which require more extensive work. This makes it a good choice for high-use areas like bedrooms and bathrooms.
The popularity of this technique owes something to the work of furniture maker Sam Maloof, whose signature pieces showcased its beauty and resilience. The availability of commercial oils like Watco Danish Oil and Tried & True Oil finishes further broadened its appeal. These products made it simpler for everyone to achieve professional results.
Pros:
- Highlights natural wood character and grain
- Easy application without specialized tools
- Simple repair without stripping
- Non-toxic options available (like pure tung oil)
- Offers a tactile connection to the wood
Cons:
- Less protective than film-forming finishes (not ideal for kitchens)
- Time-consuming application (multiple coats and drying times)
- Requires regular maintenance
- Not suitable for kitchens with significant water exposure
Tips for Application
- Sand to at least 220 grit for a smooth finish.
- Apply thin coats, wiping excess oil after 15-20 minutes.
- Allow 24 hours of drying time between coats.
- Use 0000 steel wool between coats for extra smoothness.
- Apply 3-5 coats for optimal protection and depth.
Hand-rubbed oil finishes deserve recognition for their unique blend of beauty, durability, and repairability. While the process demands patience, the resulting finish is a testament to traditional woodworking, offering a warm, natural look and feel. It’s a perfect choice for those who want a natural, low-VOC finish that enhances the beauty of their cabinetry.
Milk Paint: A Timeless Finish
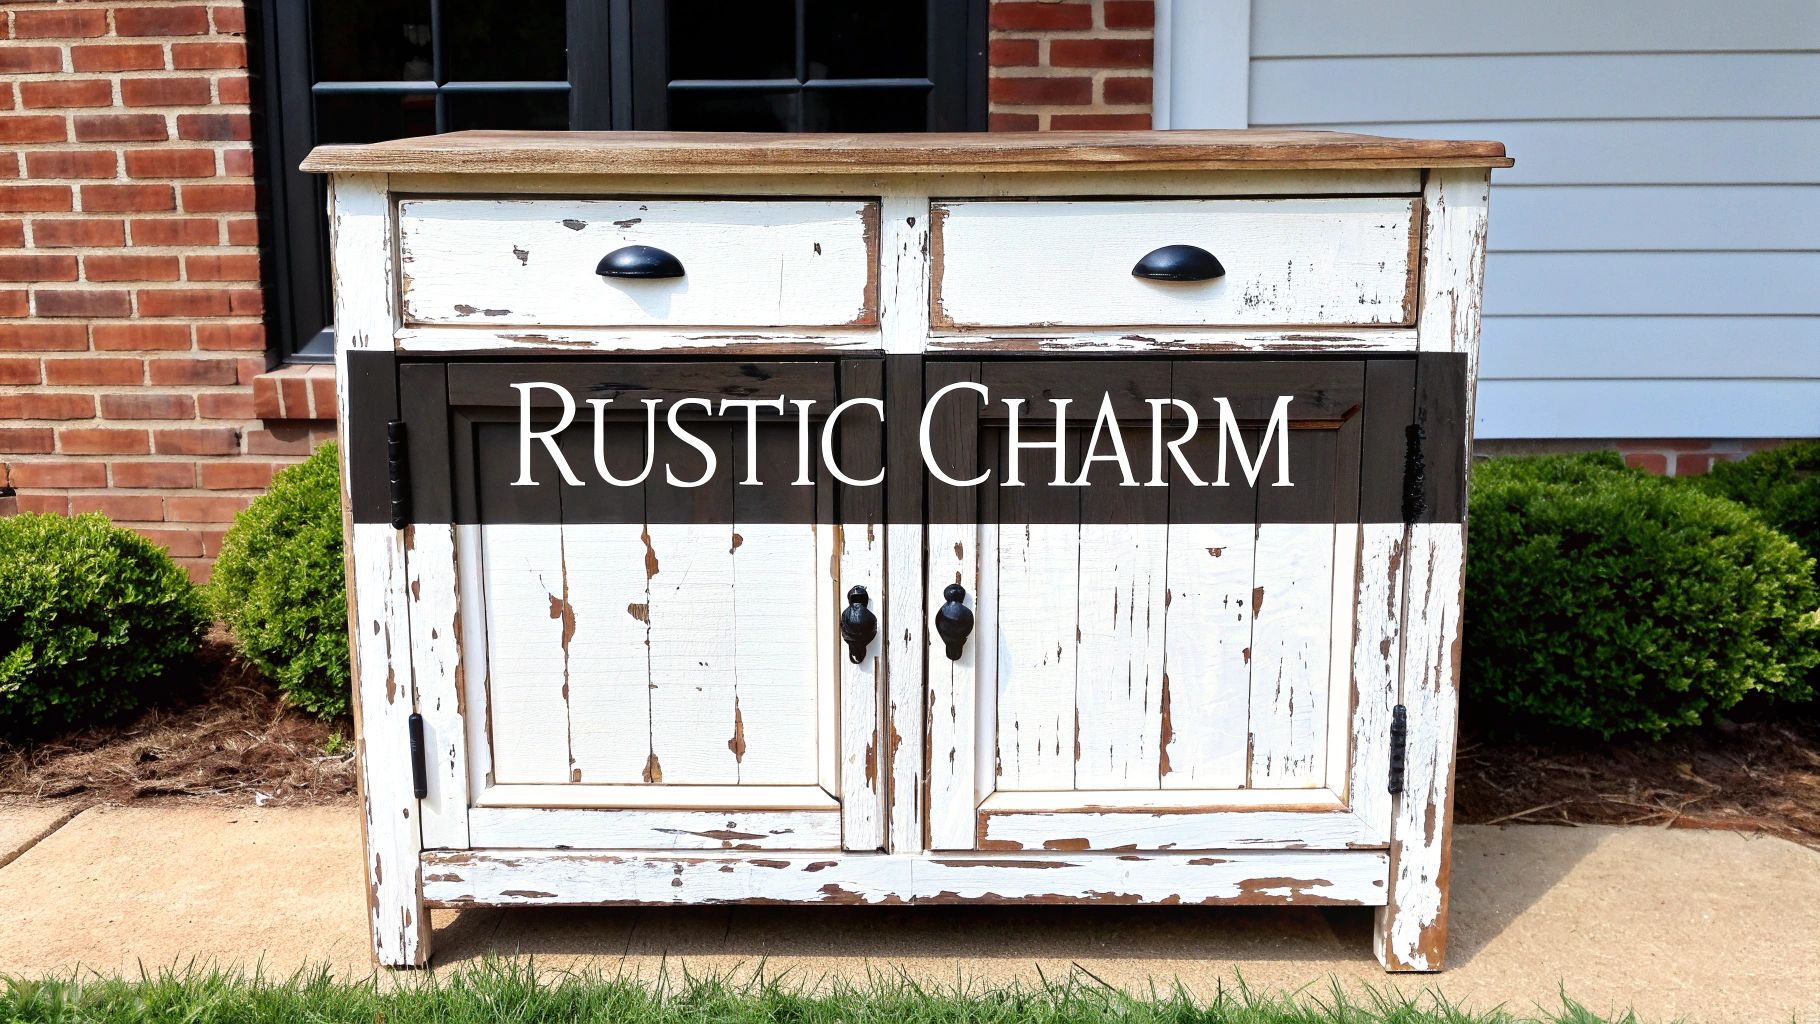
Milk paint offers a distinctive and historically rich finish for cabinets. Its appeal lies in its ability to create authentic vintage and rustic looks. Unlike modern paints, milk paint uses simple, natural ingredients: milk protein (casein), lime, clay, and pigments—a formula used for centuries. This gives milk paint its signature matte, slightly textured finish, perfect for period-style kitchens and farmhouse aesthetics.
Milk paint has seen a resurgence in recent years, thanks to growing consumer interest in eco-friendly and non-toxic home décor. Milk paint contains no VOCs or harmful chemicals, making it a healthy choice for homeowners. The rise of DIY and restoration projects has also contributed to its renewed popularity. Brands like Old Fashioned Milk Paint Company, Miss Mustard Seed's Milk Paint, and Real Milk Paint Co. offer a wide array of authentic colors and helpful resources.
The Versatility and Challenges of Milk Paint
Milk paint is incredibly versatile. Its porous nature allows it to deeply penetrate wood, creating a strong bond, especially on raw or unfinished cabinets. This allows for various finishing techniques. Layering different colors and then sanding through the top layers reveals the underlying hues, mimicking the wear of antique furniture. This “chippy” distressed look is a hallmark of milk paint, perfect for farmhouse and vintage styles.
While beautiful, milk paint does present challenges. On non-porous surfaces like laminate, a bonding agent is essential for proper adhesion. The paint also has a limited shelf life once mixed, requiring careful planning. Color consistency can be an issue, and the finish, while charming, is less durable than modern paints, requiring a protective topcoat of wax or sealant for kitchen and bathroom cabinets.
Pros:
- Creates authentic historical looks
- No VOCs or harmful chemicals
- Can be mixed for custom colors
- Naturally chippy appearance for distressed styles
- Excellent for farmhouse/rustic aesthetics
Cons:
- Requires preparation with bonding agent on non-porous surfaces
- Less durable without topcoat
- Color can appear inconsistent
- Limited shelf life once mixed
Tips for Using Milk Paint
- Mix only what you need.
- Apply with natural bristle brushes for a smoother finish.
- Always use a bonding agent on non-porous surfaces.
- Experiment with layering different colors and sanding for an aged effect.
- Seal with wax or a clear topcoat for added protection in high-use areas.
Milk Paint: More Than Just a Finish
Milk paint is more than just a finish; it's a statement. From colonial and Early American kitchens to modern farmhouse renovations, it allows homeowners and designers to capture the beauty of historic craftsmanship. The work of specialty cabinet makers showcases the potential of milk paint to transform ordinary cabinetry into art. If you're aiming for an authentic vintage or rustic look with an eco-friendly approach, milk paint is worth considering.
French Polishing
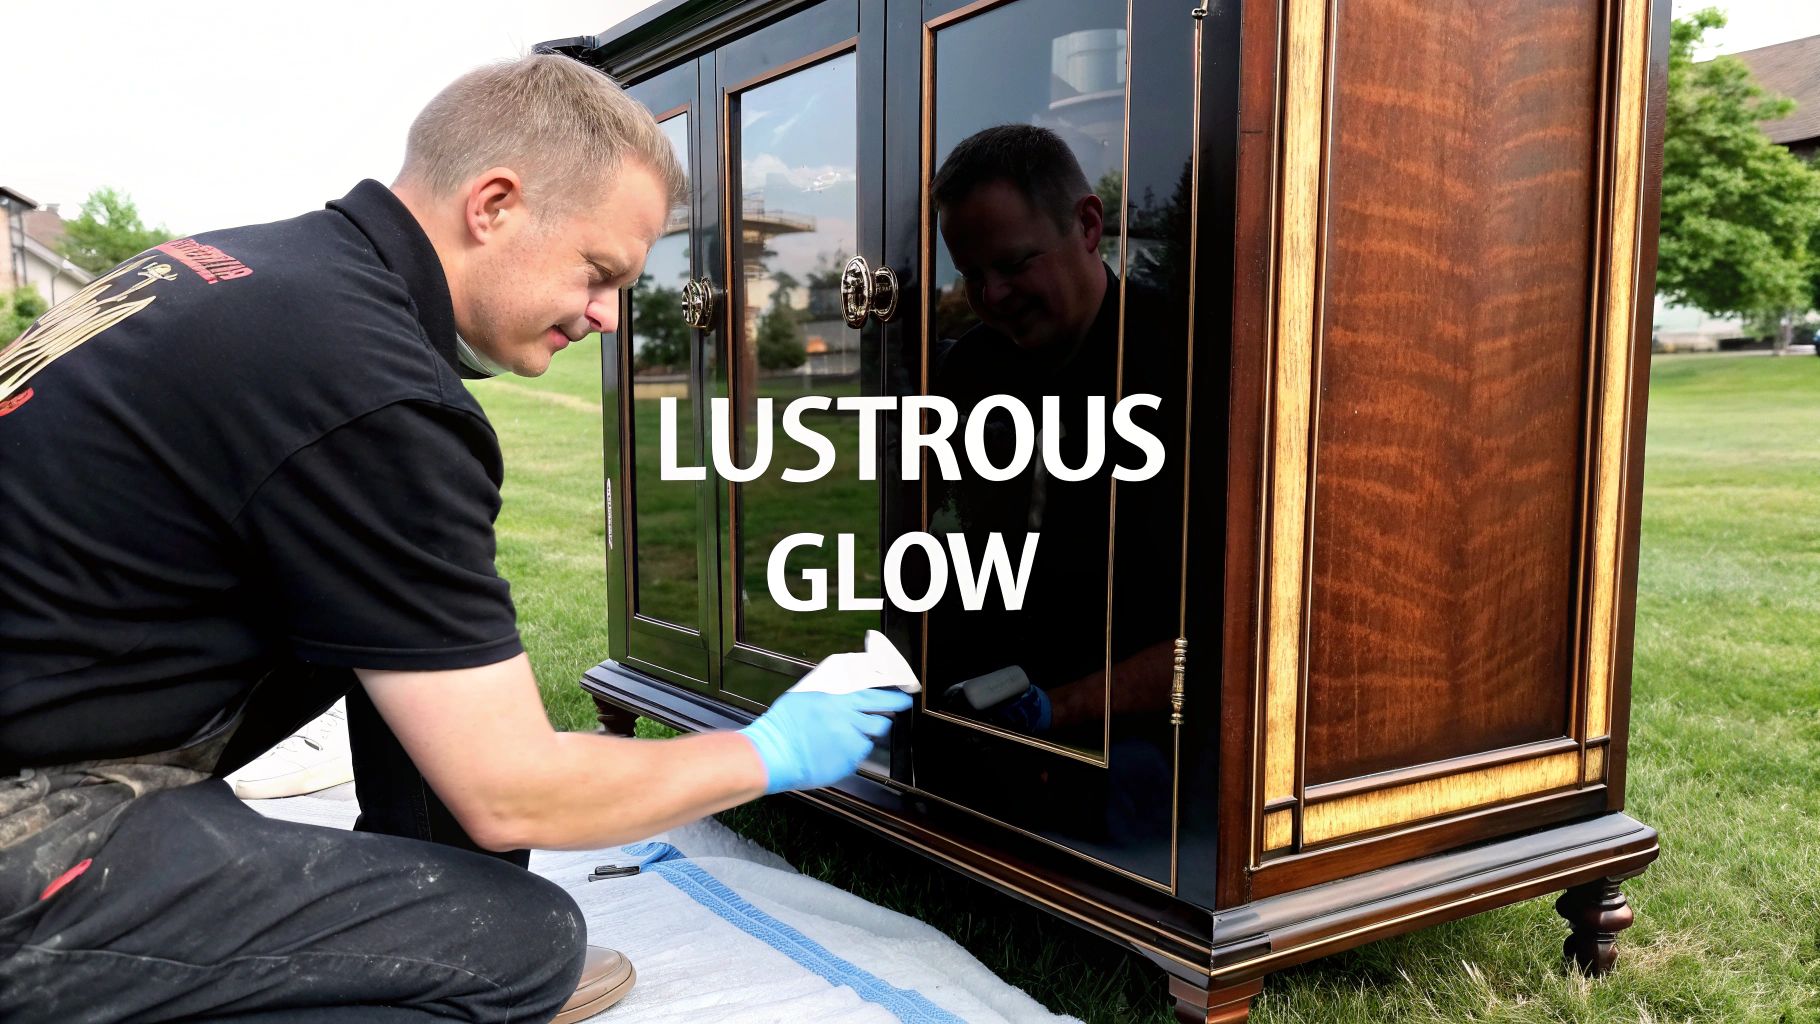
French polishing stands out as the ultimate traditional cabinet finishing technique. Other methods may offer sheen and protection, but French polishing delivers a unique depth and clarity. This makes it the preferred choice for truly high-end cabinetry.
This meticulous process involves applying many thin layers of shellac using a special pad, called a tampon or rubber. The result? A mirror-like, high-gloss finish that showcases the wood grain with exceptional beauty and chatoyance. Chatoyance is a shimmering, three-dimensional effect that changes with the light.
A Historical Perspective
This technique originates from the 18th century. It gained popularity through renowned furniture makers like Thomas Sheraton and French artisans. Think of the exquisite, lustrous furniture by Thomas Chippendale – many pieces owe their breathtaking beauty to French polishing.
Today, this luxurious finish graces custom bar cabinets in luxury homes and high-end display cabinets. It truly highlights the inherent beauty of the wood.
The Process
The process involves dissolving dewaxed shellac flakes in denatured alcohol, creating a thin solution. This solution is meticulously applied to the carefully prepared wood surface (sanded to at least 400 grit) using the tampon. Circular or figure-eight motions are used for application.
A small amount of oil is added to the pad to prevent sticking and ensure a smooth application. The finish builds gradually with many thin coats, creating a deep, lustrous surface.
Features and Benefits
- Mirror-like, high-gloss finish.
- Exceptional depth and chatoyance, enhancing the beauty of figured woods.
- Extremely thin layers build a seamless and elegant appearance.
- Traditional technique with historical significance.
Pros and Cons
| Pros | Cons |
|---|---|
| Unmatched depth and clarity. | Extremely time-consuming and expensive. |
| Free from brush marks or orange peel texture. | Not highly resistant to heat, alcohol, or water. |
| Enhances figured woods beautifully. | Requires significant skill to master. |
| Can be locally repaired. | Not practical for demanding kitchen environments. |
| Uses alcohol as a base, avoiding harmful solvents. |
Tips for the Ambitious DIYer
- Prepare the wood meticulously, sanding to at least 400 grit.
- Use high-quality dewaxed shellac flakes and denatured alcohol.
- Apply shellac in consistent, overlapping circular or figure-eight motions.
- Add a small amount of pure mineral oil to the pad.
- Build the finish patiently with many thin coats, allowing ample drying time.
French polishing may not be for every project, but its unique beauty and depth make it a prized technique for those seeking luxury and craftsmanship. For more insights on cabinet finishes, read also: Choosing the Right Cabinet Finish for Your Home. This resource will help you choose the best fit for your project and lifestyle.
Glazing: Elevating Cabinetry to an Art Form
Glazing offers a unique approach to cabinet finishing, transforming ordinary cabinets into elegant, heirloom-quality pieces. This technique adds depth, dimension, and an aged patina to kitchens and bathrooms. Glazing involves applying a translucent colored topcoat over a sealed base coat. This glaze is then worked into the details of the cabinet, highlighting its architectural features.
Glazing's versatility is one of its greatest strengths. It can create a subtle antique effect or a more dramatic, layered look. This adaptability allows it to complement a wide range of styles, from Tuscan and Mediterranean to French Country and even contemporary designs. High-end custom cabinetry companies like Downsview and Clive Christian often use glazing to achieve bespoke and luxurious results. Think of the rich, layered finishes on a handcrafted armoire—glazing can replicate and even surpass this level of detail.
The technique gained popularity alongside the rise of handcrafted and custom cabinetry. Brands like Habersham, known for their furniture-quality cabinetry, and design groups like AGA Design Group, helped popularize glazing as a high-end look. Designers like Clive Christian further fueled this popularity, showcasing the dramatic impact of glazing in their opulent kitchen designs.
Why Choose Glazing?
Glazing elevates cabinetry from a functional element to a statement piece. It’s a technique for those who appreciate detail and craftsmanship. For homeowners seeking a truly custom kitchen or bathroom, glazing offers a level of personalization and artistry that's hard to match.
Features and Benefits
-
Creates Depth and Dimension: Glazing adds visual interest and complexity, making cabinets appear richer and more substantial.
-
Highlights Details: The glaze settles into recessed areas, emphasizing the craftsmanship and architectural elements.
-
Versatile Effects: Glazing can be tailored to suit a variety of design aesthetics, from subtle antiquing to dramatic color variations.
-
Sealed Base Coat: A sealed base coat ensures proper glaze adhesion and a smooth, even finish.
Weighing the Pros and Cons
| Pros | Cons |
|---|---|
| Enhances architectural details | Labor-intensive application |
| Adds character and a customized appearance | Requires skill for consistent results |
| Can unify cabinets made from different woods | Style can become dated |
| Creates a high-end look | Can look artificial if poorly executed |
| Effective for traditional aesthetics |
Tips for Successful Glazing
-
Seal the Base Coat: This crucial step ensures proper adhesion.
-
Work in Small Sections: Maintain control over the glaze and achieve a consistent appearance.
-
Experiment with Tools: Rags, brushes, and sponges can create a variety of textures and effects.
-
Practice Consistency: A uniform appearance requires a steady hand and attention to detail.
-
Seal with a Clear Topcoat: Protect the glaze and ensure its longevity.
For those seeking to add artistry and timeless elegance to their cabinetry, glazing is a technique worth considering. Its ability to transform ordinary cabinets into stunning focal points makes it a valuable addition to any cabinet finishing project.
Cerusing: A Sophisticated Finish For Cabinetry
Cerusing, also called limed wood finishing, is a technique that adds depth and texture to cabinetry. It transforms ordinary wood into eye-catching statement pieces. This process highlights the natural wood grain by filling its pores with a contrasting color, usually white or a light pigment. Originally used to protect oak from insects, cerusing has become a sought-after decorative finish, prized for its dramatic contrast and tactile appeal.
Originally, cerusing had a practical purpose. The lime paste filled the pores of oak, preventing insect infestation and offering some water resistance. The resulting aesthetic, with its pronounced grain and lighter tone, also caught the attention of designers. The technique was notably popularized in the 20th century by French designer Jean-Michel Frank, whose furniture designs showcased cerused oak. More recently, brands like Restoration Hardware (RH) have used cerusing in their collections.
Cerusing is especially effective on open-grained woods such as oak and ash, where the pores readily accept the pigment. The contrast between the wood's natural color and the lighter filler accentuates the grain pattern, creating a unique finish. This makes cerusing an excellent choice for those seeking a sophisticated, textural appearance. The variations in wood grain ensure each cerused piece is unique, adding an artisanal touch.
Cerusing is versatile, complementing both contemporary and traditional design schemes. Quartersawn oak, with its prominent medullary rays, is a particularly striking option for cerusing. You'll find cerused cabinetry featured in high-end kitchens by companies like Bakes & Kropp, and in custom wine cellars and bars.
Features and Benefits of Cerusing
- Highlights natural wood grain
- Creates dramatic contrast
- Best on oak, ash, and other open-grain species
- Sophisticated, textural appearance
- Works with contemporary and traditional designs
- Effective on quartersawn oak
- Trending in high-end cabinetry
- Each piece is unique
Pros of Cerusing
- Unique, eye-catching finish
- Suitable for various design styles
- Effective on quartersawn oak
- Popular in high-end cabinetry
- Unique character to each piece
Cons of Cerusing
- Labor-intensive and costly
- Ineffective on closed-grain woods (like maple)
- Requires skilled craftsmanship
- Difficult to repair
Tips for Cerusing Implementation
- Open the Grain: Use a wire brush to open the wood's pores for better pigment penetration.
- Seal the Wood: Apply a sealer to prevent unwanted stains and create an even finish.
- Apply the Pigment: Work the pigment across the grain, filling the pores.
- Remove Excess: Wipe away excess pigment while leaving it in the grain.
- Seal and Protect: Apply a clear topcoat for protection and durability.
Cerusing is a unique and sophisticated alternative to standard cabinet finishes. It embraces the natural beauty of wood while adding artistry and texture. While the process can be more involved, the resulting effect is striking, making it a worthwhile investment for a distinctive look.
Distressing: Adding Character to Your Cabinets
Distressing is a cabinet finishing technique that adds character and a story to your kitchen or bathroom. It mimics the wear and tear of age. Instead of a pristine look, distressing embraces imperfections. This creates a sense of history and lived-in warmth. It’s a popular choice for unique, personalized touches, especially in farmhouse, cottage, and rustic styles. Imagine a well-loved antique in your modern kitchen—that's the magic of distressing.
This technique involves intentionally adding marks, dents, and worn edges to new cabinets. This simulates decades of use. The beauty lies in its versatility. From subtle hints of wear to dramatic, timeworn effects, the level of distressing can be customized. It's often combined with other techniques, such as glazing or staining. This enhances the aged appearance and creates greater depth. For example, a darker glaze in distressed areas mimics the build-up of dirt and grime.
Methods for Distressing Cabinets
Several methods achieve different distressed looks. Chains, hammers, ice picks, and even sandpaper can create unique wear patterns. Studying antique pieces helps you understand natural wear and replicate it. Edges and corners typically show the most wear on older furniture. Focusing on these “high-traffic” zones results in a more believable look. You might be interested in Custom Trim Options to see how distressed finishes complement trim.
Features and Benefits of Distressed Cabinets
- Creates Artificial Wear: Mimics antique or vintage cabinets.
- Customizable Intensity: From subtle to dramatic.
- Combines With Other Techniques: Enhances the aged look.
- Multiple Methods Available: Flexibility in achieving effects.
- Adds Character and Uniqueness: Cabinets with personality.
- Hides Future Wear: Imperfections blend seamlessly.
- Suits Casual Styles: Complements farmhouse and rustic aesthetics.
Pros and Cons of Distressing
Pros:
- Unique character
- Hides future wear
- Suits casual styles
- Imperfections become design elements
Cons:
- Can look unnatural if overdone
- Not for all styles (e.g., modern)
- May become dated
- Difficult to reverse
Distressing in the Real World
Distressing gained popularity through brands and movements like Restoration Hardware, Pottery Barn, and The Shabby Chic movement. Think farmhouse kitchens in Country Living, rustic cabin cabinetry by companies like Old World Kitchen, or French country kitchens by Custom Cupboards. Joanna Gaines of Magnolia Homes/Fixer Upper further popularized the trend.
Tips for Distressing Cabinets
- Start Small: Begin lightly and gradually increase intensity.
- Focus on Natural Wear Areas: Edges, corners, and high-use areas.
- Vary Your Tools: Experiment with different tools for varied effects.
- Use Glaze: Apply a darker glaze to simulate dirt build-up.
- Study Antiques: Observe wear patterns on antique furniture.
Read also: Cabinet Finishes for Every Style for more finishing options. Explore custom trim options at https://sinclaircabinets.com/custom-trim/. Distressing offers a unique way to personalize your cabinets, adding character and a touch of history. It creates a one-of-a-kind kitchen or bathroom.
Lacquer Finishing: A Luxurious Touch for Your Cabinets
Lacquer finishing provides a high-end look for cabinetry, admired for its durability and beautiful appearance. This technique involves applying a quick-drying coating that evaporates the solvent, leaving a hard, protective layer that enhances the natural beauty of the wood. Lacquer's versatility makes it suitable for both contemporary and traditional designs, a popular choice for homeowners and designers.
Lacquer comes in different forms, including nitrocellulose, catalyzed, and pre-catalyzed. Nitrocellulose lacquer, the traditional type, is known for its quick drying and easy application. Catalyzed and pre-catalyzed lacquers offer increased hardness and chemical resistance, ideal for busy areas like kitchens. The finish itself can range from a subtle flat sheen to a dramatic high-gloss, offering flexibility in design aesthetics. This range of options contributes to lacquer's lasting popularity.
Features and Benefits of Lacquer
- Fast Drying: Allows for multiple coats in a single day, speeding up the finishing process.
- Durable Surface: Offers excellent protection against scratches, chips, and wear.
- Variety of Sheens: Provides a wide range of finishes, from flat to high-gloss, for various design preferences.
- Color Options: Can be clear or pigmented, enhancing natural wood grain or achieving a specific color.
- Clarity: Resists yellowing over time, maintaining the cabinet's original appearance.
- Chemical and Water Resistance: Suitable for kitchen and bathroom environments.
Pros and Cons of Lacquer Finishes
Pros:
- High durability and damage resistance
- Smooth, flawless finish
- Quick drying time
- Excellent clarity
- Good chemical and water resistance
Cons:
- Strong odor and VOCs (water-based options are increasingly available)
- Requires proper ventilation and a respirator
- Difficult to touch up seamlessly
- Spray application often yields best results
Lacquer in Action: Real-World Examples
Lacquer finishes are a common choice for high-end cabinetry, often found in:
- High-gloss contemporary cabinets from Italian manufacturers like Scavolini, creating a sleek, modern aesthetic.
- Factory-finished cabinets by companies like KraftMaid and Merillat, offering a durable finish for a wider market.
- Piano-finish black cabinets in luxury modern kitchens, showcasing the rich depth achievable with lacquer.
Tips for Applying Lacquer
- Prioritize Safety: Always use a respirator and ensure adequate ventilation when working with lacquer.
- Apply Thin Coats: Multiple thin coats prevent runs and sags.
- Sand Between Coats: Light sanding with fine-grit sandpaper (e.g., 320-grit) ensures a smooth finish.
- Control Dust: A clean, dust-free environment is crucial during application.
- Kitchen Considerations: Pre-catalyzed lacquer is recommended for kitchen cabinets for superior durability and moisture resistance.
Key Players in Lacquer Finishing
Companies like Sherwin-Williams, ML Campbell, and Mohawk Finishing Products have significantly contributed to the development and popularity of high-quality lacquer systems. While their products often cater to professionals, their advancements have influenced the quality and availability of lacquer for everyone.
Lacquer finishing stands out due to its unique combination of beauty and durability. While application requires care and attention to safety, the final result is impressive, making it a worthwhile investment for a premium cabinet look.
8-Point Cabinet Finishing Techniques Comparison
| Technique | Implementation Complexity 🔄 | Resource Requirements ⚡ | Expected Outcomes 📊 | Ideal Use Cases 💡 | Key Advantages ⭐ |
|---|---|---|---|---|---|
| Spray Finishing | High setup and skill needed | Specialized equipment (spray gun, compressor, booth) | Even, smooth, and consistent coat | Large-scale projects; intricate designs | Professional look & time-efficiency |
| Hand-Rubbed Oil Finish | Low-tech application but time-intensive | Minimal tools (oils, cloths, sandpaper) | Warm, natural, and rich wood grain finish | Custom wood pieces; traditional styles | Enhances natural beauty; easy touch-ups |
| Milk Paint | Moderate; requires careful mixing/prep | Natural ingredients (milk protein, pigments, lime, clay) | Matte, vintage, and rustic appearance | Farmhouse, colonial, and distressed designs | Eco-friendly with an authentic aged look |
| French Polishing | Very high; labor-intensive and skill-dependent | Traditional materials (shellac, pads, high-grit sandpaper) | Deep, lustrous, mirror-like finish | High-end furniture; decorative cabinetry | Unmatched clarity; easily repairable finish |
| Glazing | Moderate; technique-sensitive application | Glaze, sealed base coat, various applicators (brushes/rags) | Enhanced depth and dimension with highlighted details | Custom cabinetry with decorative elements | Accentuates architectural details; unifies design |
| Cerusing (Limed Wood) | High; precise pore filling and technique | White pigment or lime, sealer, wire brush | Dramatic contrast with highlighted wood grain | Contemporary and transitional oak cabinetry | Creates unique, textured, and eye-catching finishes |
| Distressing | Moderate; achievable with practice | Basic tools (chains, hammers, ice picks) | Realistic artificial aging and wear effects | Farmhouse, rustic, and vintage styles | Adds character and disguises wear naturally |
| Lacquer Finishing | Moderate to high; fast-drying but requires precision | Spray equipment, various lacquers, proper ventilation | Smooth, durable, glass-like finish | Modern, factory-finished, and luxury cabinetry | Durable, efficient application with excellent protection |
Choosing the Right Cabinet Finish
From the subtle sheen of lacquer to the rustic charm of milk paint, a wide variety of cabinet finishes can transform any kitchen or bathroom. Choosing the right one depends on several factors, including your desired look, budget, DIY skills, and the type of wood your cabinets are made of. For instance, the detailed process of French polishing demands expertise and patience, producing a high-gloss finish perfect for high-end projects.
On the other hand, techniques like distressing or glazing are more accessible for DIYers wanting to add character to their cabinets. Spray finishing creates a professional, even coat, ideal for sleek, modern designs. A hand-rubbed oil finish highlights the natural wood grain, perfect for a more traditional or rustic aesthetic. Understanding the specifics of each technique—spray finishing, hand-rubbed oil finish, milk paint, French polishing, glazing, cerusing, distressing, and lacquer—will help you choose the ideal finish for your project.
Project Planning and Preparation
Applying these techniques requires careful planning and preparation. Before you begin, honestly assess your skills and the time commitment needed for each technique. Researching and gathering the necessary materials and tools beforehand is essential. Start with smaller projects, like a single drawer front or cabinet door, to practice and build confidence before tackling the entire project.
Learning and Adapting Your Approach
Learning and adapting are key to successful cabinet finishing. Experiment with different techniques and finishes on scrap wood to find what suits your style and skillset. Many online resources, workshops, and tutorials can provide valuable guidance and inspiration. Keep up with current trends and future developments in cabinet finishing, such as the growing popularity of eco-friendly and low-VOC finishes, which offer both beauty and sustainability.
Key Considerations for Cabinet Finishing
- Skill Level: Choose a technique that matches your experience and available time.
- Style: Select a finish that complements the overall aesthetic of your room.
- Budget: Different finishes require different levels of investment in materials and tools.
- Wood Type: Certain finishes work better with certain types of wood.
- Practice: Experiment on sample pieces before starting the full project.
Sinclair Cabinetry Inc.: Custom Cabinetry Solutions
For truly exceptional, custom-crafted cabinetry with impeccable finishes, consider Sinclair Cabinetry Inc. With over 35 years of experience, we specialize in creating bespoke, real wood cabinetry that enhances both the beauty and functionality of your home. From initial design to professional installation, we handle every detail with meticulous care, ensuring lasting elegance and functionality. Bring your vision to life with Sinclair Cabinetry's craftsmanship and personalized service. Visit our website to explore the possibilities.