
If you've ever dreamt of a brand-new kitchen without the gut-wrenching cost and chaos of a full remodel, cabinet resurfacing might be the answer. It’s a savvy renovation strategy that completely changes the "skin" of your cabinets—the doors and drawer fronts—while applying a fresh new veneer to the cabinet boxes themselves.
The result? You get the jaw-dropping look of a new kitchen for a fraction of the cost and in a fraction of the time.
So, What Exactly Is Kitchen Cabinet Resurfacing?
Before you start picturing your dream kitchen, let's break down what this process actually involves. It’s far more than a simple paint job but way less disruptive than a full-scale demolition. Think of it as a major cosmetic overhaul that keeps the solid "bones" of your kitchen layout intact while giving its style a complete refresh.
The process keeps your existing cabinet boxes right where they are. A professional then covers the visible fronts and sides with a durable new material, like a beautiful real wood veneer or a tough, modern laminate. To complete the look, you get entirely new cabinet doors and drawer fronts, plus all-new hardware like handles, knobs, and hinges.
It’s a truly transformative approach that leaves you with a kitchen that looks and feels brand new, minus the dust, debris, and disruption of tearing everything out.
Why Resurfacing Is Such a Smart Move
When you start weighing your options, the benefits of resurfacing quickly stand out, especially when you stack them up against a total cabinet replacement. For many homeowners, it just makes sense.
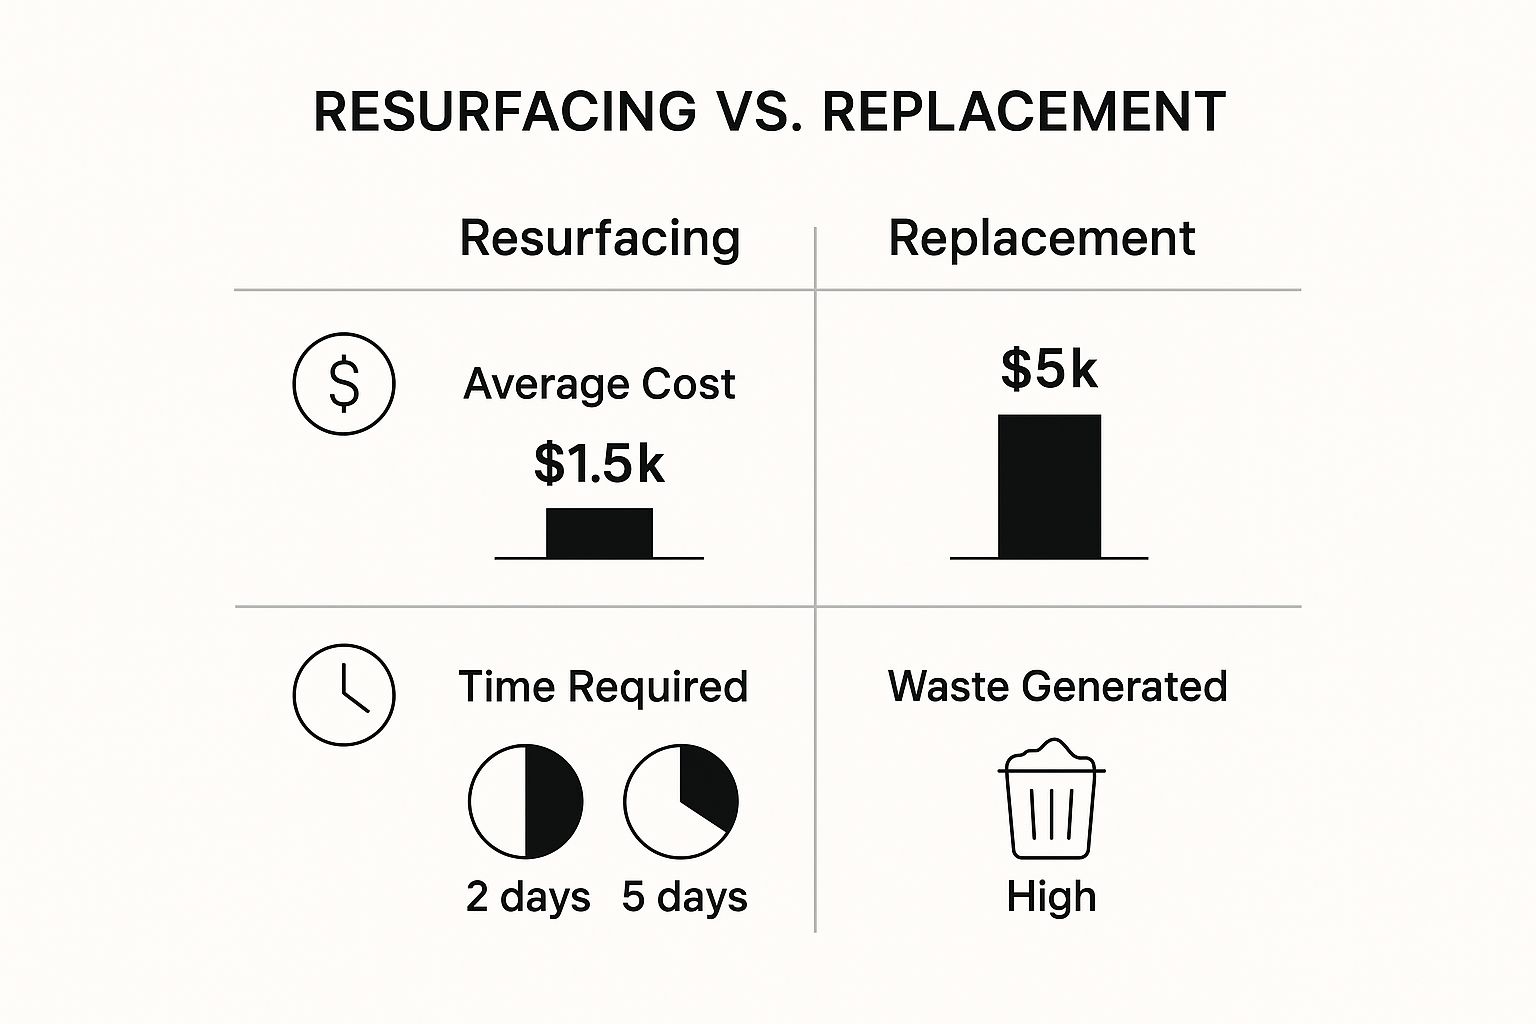
- Serious Cost Savings: This is the big one for most people. Kitchen cabinet resurfacing typically costs 30% to 50% less than installing brand-new custom or semi-custom cabinets. That's money you can put toward new appliances or countertops.
- Quick Project Turnaround: A full tear-out can put your kitchen on ice for weeks. A professional resurfacing job? It’s often done in just two to five days. That means way less disruption to your family's routine.
- A Greener Choice: By keeping your existing cabinet boxes, you're preventing a massive amount of material from ending up in a landfill. It's a more sustainable choice that reduces waste and the demand for new lumber.
- Keep the Layout You Love: If your kitchen layout works for you, why change it? Resurfacing lets you avoid the domino effect of costs that come with moving plumbing, electrical, and flooring for a new cabinet configuration.
Comparing Resurfacing vs Replacing Kitchen Cabinets
To make the choice clearer, let's put these two options side-by-side. This table breaks down the key factors to help you decide which path is right for your home and budget.
| Factor | Cabinet Resurfacing | Full Cabinet Replacement |
|---|---|---|
| Cost | 30-50% less than replacement. A major budget saver. | Significantly higher cost, especially for custom or semi-custom options. |
| Time | Fast turnaround, typically 2-5 days. Minimal kitchen downtime. | Can take several weeks, leaving your kitchen unusable for extended periods. |
| Disruption | Low. Cabinet boxes remain in place, reducing mess and chaos. | High. Involves a full demolition, which is dusty, loud, and disruptive. |
| Layout Changes | Not possible. The existing kitchen layout is preserved. | Full flexibility to redesign the kitchen layout, move appliances, etc. |
| Environmental Impact | Low. Reuses existing cabinet structures, reducing landfill waste. | High. Old cabinets are discarded, and new materials are consumed. |
Ultimately, if your cabinet boxes are solid and your layout is functional, resurfacing delivers nearly all the aesthetic benefits of a full replacement without the steep costs and lengthy disruption.
The numbers back this up. The global cabinet resurfacing market was valued at around USD 9.2 billion in 2024 and is expected to hit USD 15.7 billion by 2033. This surge is driven by homeowners who are looking for smarter, more cost-effective ways to renovate. You can read the full research about cabinet resurfacing market trends to see why it's becoming the go-to choice for savvy renovators.
Key Takeaway: If your cabinet boxes are in good shape and you like your kitchen's layout, resurfacing offers an unbeatable mix of value, speed, and stunning transformation.
Is Resurfacing the Right Call for Your Kitchen?
So, how do you know if your cabinets are a good candidate? Resurfacing is the perfect solution in a few common scenarios.
First, check your cabinet boxes. If they are structurally sound—meaning they’re sturdy, square, and free from any water damage or rot—you’re in business. The main issue should be cosmetic, like a dated wood finish, worn-out surfaces, or a door style that screams 1992.
This method is also ideal when you're craving a major style change without the headache of altering your kitchen's footprint. Maybe you want to go from a traditional golden oak to a sleek, modern white or a moody, dramatic navy blue. Resurfacing makes that kind of drastic aesthetic shift completely achievable and affordable.
On the other hand, if your cabinets are literally falling apart, have serious water damage, or you just can't stand your kitchen's layout anymore, a full replacement is the more logical path forward.
Choosing Your Path: Refacing vs. Refinishing
So, you’ve decided it’s time to update your kitchen cabinets. That’s the easy part. But "kitchen cabinet resurfacing" isn't a single project; it’s a term that covers two very different approaches: refacing and refinishing.
Picking the right path is a big deal for your budget, your timeline, and the final look of your kitchen. One option gives you a dramatic, nearly total transformation, while the other breathes new life into the cabinets you already have.
What Is Cabinet Refacing?
Think of cabinet refacing as giving your kitchen a brand-new skin. The cabinet boxes—the core structure—stay right where they are, but almost everything you see and touch gets replaced. It’s a major facelift without the major demolition.
Here’s what’s involved:
- A New Veneer: We cover the visible surfaces of your cabinet boxes with a fresh layer of real wood veneer, durable laminate, or thermofoil.
- All-New Doors & Drawer Fronts: This is the game-changer. You get brand-new, factory-finished doors and drawers in whatever style and color you want.
- Fresh Hardware: To complete the look, we install new hinges, handles, and pulls.
Refacing is your best bet when you want a completely different look. If you're tired of those dated oak cathedral-style doors and dreaming of a sleek, modern shaker design, refacing gets you there without ripping your entire kitchen out.
What Is Cabinet Refinishing?
Cabinet refinishing, on the other hand, is all about reviving your existing cabinets. It’s a more hands-on, surface-level approach that works with the doors, drawers, and cabinet boxes you already own.
The process usually involves stripping the old finish, sanding everything down smooth, and then applying a fresh coat of paint or stain. This is the perfect solution for homeowners who have high-quality, solid wood cabinets that are structurally sound but are just looking a little worn out or dated.
Refinishing is about restoration and a color makeover. It keeps the quality craftsmanship of your original cabinets but gives them a modern look with a new finish.
This method lets you keep the original style of your cabinetry, which is a huge bonus if you love the design but just want to switch the color from, say, a dark cherry to a light and airy gray.
Comparing the Two Approaches
Making the call between refacing and refinishing really comes down to four things: the final look you want, your budget, the condition of your current cabinets, and how much work you’re willing to do yourself. Let's see how they stack up.
| Factor | Cabinet Refacing | Cabinet Refinishing |
|---|---|---|
| Aesthetic Change | Dramatic. New style, color, and material. | Significant. New color or stain, same style. |
| Cost | Higher. Typically costs 30-50% more than refinishing. | Lower. More budget-friendly, especially as a DIY project. |
| Best For | Cabinets with dated styles but solid boxes. | High-quality wood cabinets that are cosmetically worn. |
| Durability | High, with factory-finished doors and professional veneers. | Varies based on prep work and quality of materials used. |
Cabinet refacing has become a huge deal in home improvement. The market hit an estimated USD 4.5 billion in 2023 and is expected to climb to USD 7.8 billion by 2032. Homeowners love it because it’s a fast, less disruptive way to get a new kitchen while also cutting down on waste.
Refacing is that perfect middle ground between a simple paint job and a full-gut remodel. If you're still weighing a complete overhaul, our guide on cabinet refacing vs replacement is a great resource to help you decide.
Here's the bottom line: if your cabinet doors are warped, damaged, or a style you just can't stand anymore, refacing is the clear winner. But if you have solid, well-made cabinets that just need a color refresh, refinishing can give you a stunning new look for incredible value.
Gathering Your Toolkit for a Flawless Finish
Starting a cabinet resurfacing project without having all your tools ready is a surefire way to get frustrated. You don't want to be that person covered in dust, making a last-minute dash to the hardware store for painter's tape. A truly professional-looking finish starts long before you ever crack open a can of paint—it begins with a well-organized toolkit.
Getting everything you need in one place from the get-go keeps your momentum going and turns what could be a chaotic job into a smooth, methodical process. Here’s the definitive checklist to make sure you’re ready for anything.
Safety and Preparation Essentials
Before you touch a single cabinet, let's talk about the boring but critical stuff: safety and prep. These items are completely non-negotiable. They protect you, your kitchen, and the final quality of your work.
- Safety Gear: Don't even think about skipping this. You'll need safety glasses, gloves, and a good respirator mask. Fine dust from sanding and paint fumes are no joke.
- Cleaning Supplies: Kitchens are greasy environments. A powerful degreaser like Trisodium Phosphate (TSP) is your best weapon against years of built-up grime that will ruin your paint job. Stock up on sponges and plenty of clean rags, too.
- Painter's Tape and Drop Cloths: Meticulously tape off your countertops, backsplash, appliances, and floors. Trust me, spending an extra 30 minutes on prep will save you hours of painful cleanup later.
A common DIY mistake is underestimating the cleaning phase. Paint and primer simply will not adhere to a greasy or dusty surface, leading to peeling and chipping down the line. Don't skip the degreaser.
Tools for Disassembly and Repair
With your kitchen prepped and protected, it’s time to take things apart and fix any imperfections. Having these tools handy will make this stage a breeze.
- Drill or Screwdriver: A cordless drill is your best friend here. It makes quick work of removing all those cabinet doors, drawers, hinges, and handles.
- Labeling System: This is a pro tip that will save your sanity. Use masking tape and a marker to label every single door and drawer with its exact location. A simple "UL" for "upper left" is all it takes to avoid a frustrating puzzle during reassembly.
- Wood Filler and Putty Knife: Perfect for patching any nicks, dings, or old hardware holes you want to get rid of. Go for a quality, sandable wood filler to ensure the repairs are invisible.
- Sandpaper or a Sander: An orbital sander will save you a massive amount of time on large, flat surfaces. You'll also need sheets of sandpaper in various grits—something coarse like 120-grit to start, and a finer 220-grit to get everything silky smooth.
Priming and Painting Materials
This is where the magic happens. The quality of your paint, primer, and brushes will directly determine how good your cabinets look and how well they hold up over time.
Choosing the Right Primer and Paint
Don't just grab any can of paint off the shelf. For cabinets, you need products designed to withstand the high-traffic environment of a kitchen. A high-adhesion bonding primer is a must—it creates a tenacious grip that helps the paint stick for good.
For your topcoat, these are the go-to choices:
| Paint Type | Best For | Key Characteristics |
|---|---|---|
| Alkyd Enamel | High-traffic areas | Incredibly durable and self-leveling for a beautiful, smooth finish. The tradeoff is a longer dry time. |
| Acrylic Latex | DIY-friendly projects | Easy to work with, low odor, and fast-drying. Modern formulas are surprisingly tough. |
| Cabinet-Specific Paint | A professional finish | Usually a hybrid formula that gives you the durability of oil-based paint with the easy cleanup of water-based. |
Application Tools for a Smooth Finish
Your technique is only as good as your tools. Using cheap applicators is a recipe for a streaky, unprofessional finish.
- High-Quality Angled Brush: An absolute must-have for cutting in corners and tackling the detailed areas on cabinet frames.
- Mini Foam Roller: This is your secret weapon for getting a perfectly smooth, brush-stroke-free finish on flat door panels and cabinet sides.
- Paint Sprayer (HVLP): If you're aiming for that flawless, factory-like finish, a sprayer is the way to go. It takes more prep work and practice, but the results are second to none.
For a deeper dive into application methods, our guide on how to finish cabinets offers expert tips for achieving that professional look you're after.
The Critical Steps of Cabinet Preparation
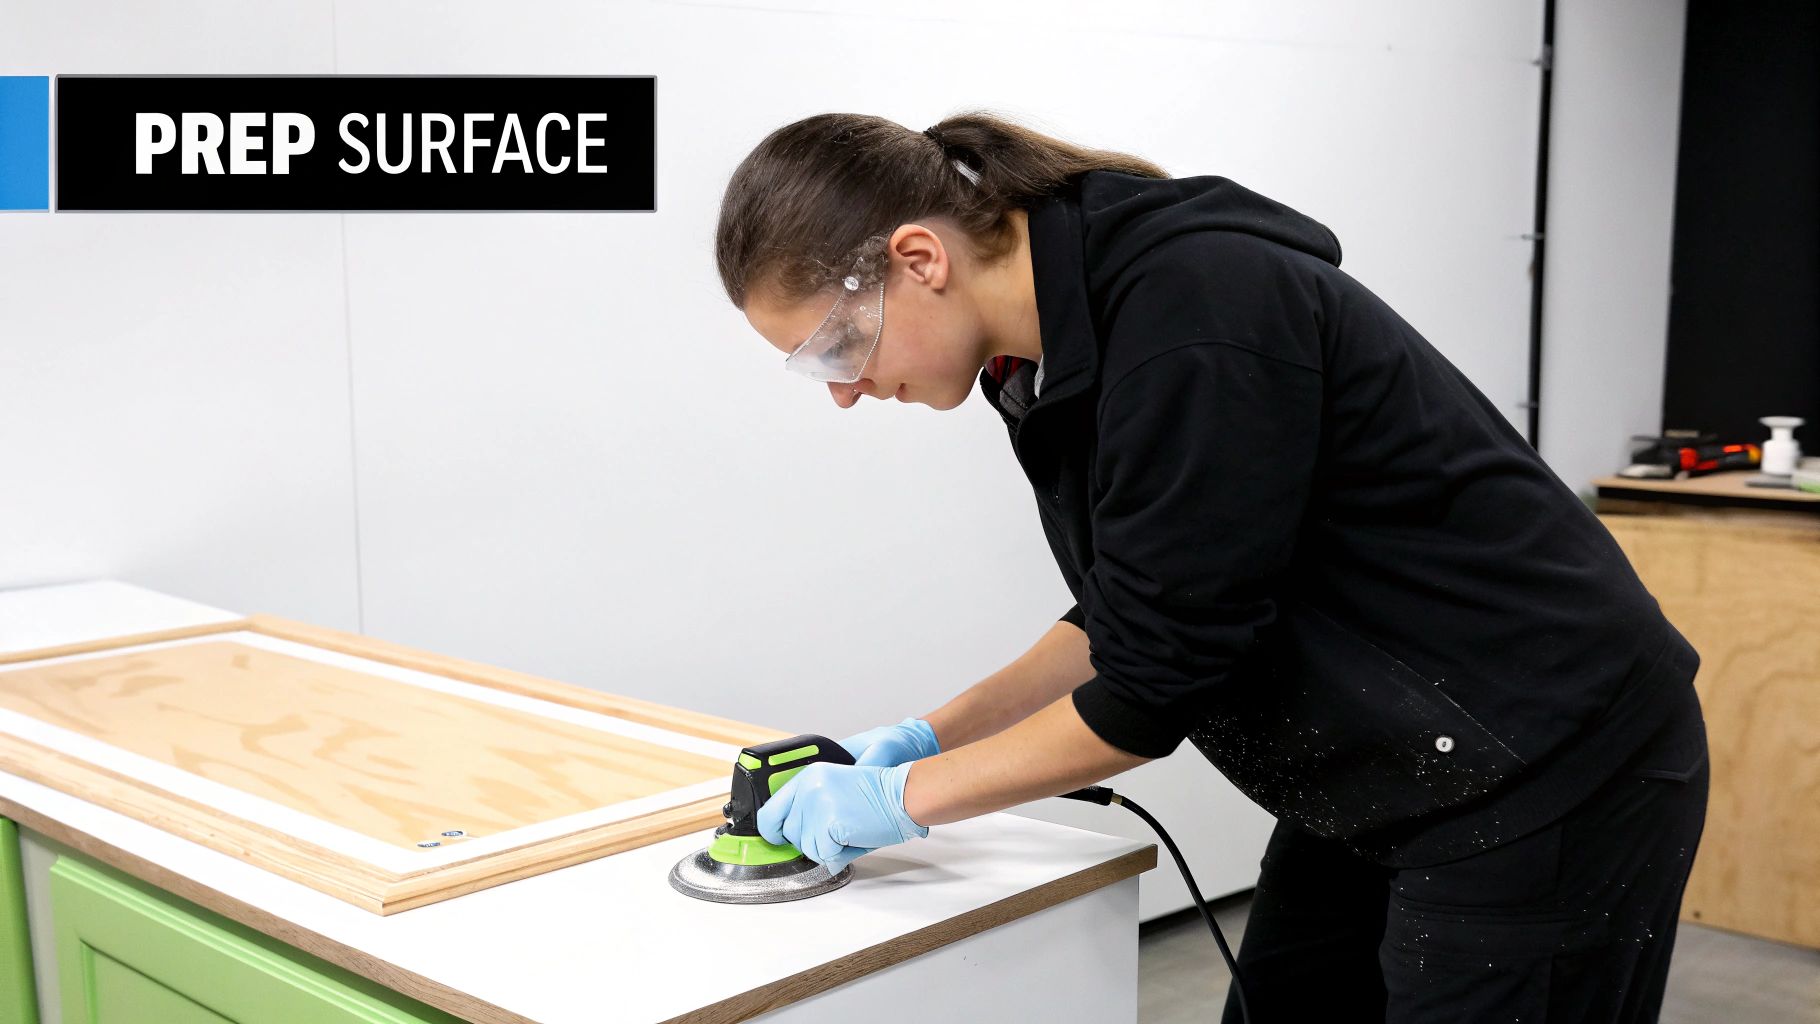
Let's be honest—the secret to a jaw-dropping, durable finish isn't in that final coat of paint. It’s in the meticulous, often-overlooked prep work you do beforehand. This is the foundation of your entire project. Rushing this stage is the number one reason DIY cabinet projects fail, leading to peeling paint and a finish that just looks amateurish.
Think of it like building a house. You wouldn't put up walls on a crumbling foundation, right? In the same way, you can't expect paint to perform miracles on a dirty, damaged surface. This is where your patience and attention to detail will pay off tenfold, ensuring your hard work lasts for years, not just a few months.
Dismantling Your Kitchen Systematically
Before you can even think about cleaning or sanding, you need to carefully take your kitchen apart. This isn’t a demolition job; it’s a systematic disassembly that will make putting it all back together smooth and stress-free. Start by removing all the cabinet doors, drawer fronts, and hardware like hinges and handles.
A cordless drill will be your best friend here, saving you a ton of time and wrist strain. As you take each piece off, it’s absolutely essential to create a labeling system. Grab some masking tape and a marker to label each door and drawer with its exact location—something simple like "upper right of sink" or "bottom left corner."
Trust me, this one simple act prevents a massive headache later. Trying to solve the puzzle of which door goes where during reassembly is a frustrating game you don't want to play.
The Non-Negotiable Cleaning Phase
Kitchens are greasy places. Years of cooking vapors, food splatters, and fingerprints create an invisible film on your cabinets that paint simply cannot stick to. This is why a thorough cleaning with a powerful degreaser is the most critical part of your prep.
Don’t just give them a quick wipe with a damp cloth. You need a dedicated cleaning agent to really cut through the grime.
- Trisodium Phosphate (TSP): This is a heavy-duty cleaner that is exceptionally effective at removing grease. Always wear gloves and eye protection when using it.
- Liquid Deglosser: This product is a great two-for-one. It not only cleans but also slightly etches the old finish, creating a better surface for the new paint to grip.
- Denatured Alcohol: A good alternative for a final wipe-down to remove any remaining residue after the main cleaning.
Scrub every square inch of the cabinet boxes, doors, and drawer fronts. Once you're done, wipe them down again with a rag dampened with plain water to remove any leftover cleaner, then let everything dry completely.
Pro Tip: Don't underestimate the grime. Even cabinets that look clean can have a thin layer of grease that will cause your new paint to fail. A proper degreasing is your insurance policy against chipping and peeling.
Creating a Flawlessly Smooth Surface
With your cabinets clean and dry, it’s time to address any imperfections. This is your chance to make old cabinets look brand new by filling in dings, scratches, or old hardware holes. Use a high-quality, sandable wood filler and a flexible putty knife to apply it.
Always overfill the repair slightly, as the filler will shrink a bit as it dries. Once it’s fully cured, you can move on to the most transformative step of all: sanding. Sanding does two crucial things. First, it smooths out your wood filler repairs until they are invisible to the touch. Second, it scuffs up the old finish, creating thousands of microscopic grooves for the primer to lock into.
For this job, an orbital sander will save you a tremendous amount of time on flat surfaces like door panels and cabinet sides.
Sanding Grit Guide
- Start with 120-grit sandpaper to smooth out repairs and knock down any stubborn blemishes.
- Follow up with a finer 220-grit sandpaper over the entire surface to create that perfectly smooth, ready-to-paint finish.
Remember to always sand with the grain of the wood to avoid creating visible scratches. After sanding, the final, crucial step is to remove every last speck of dust. Use a vacuum with a brush attachment first, then wipe everything down with a tack cloth for a pristine surface. Any dust left behind will get trapped in your primer and create a gritty, unprofessional texture.
With all that meticulous prep work behind you, it’s time for the fun part—the transformation. This is where your vision for a new kitchen really starts to take shape, whether you're adding a fresh coat of paint or giving your cabinets a completely new skin.
How you apply your new finish is just as critical as the prep work. A sloppy application can undo all your hard work, so let's get it right. We'll look at two different paths here: painting for a refinished look, and applying new veneer and doors for a full reface.
The Art of a Flawless Paint Finish
When you're painting cabinets, the goal is a smooth, even coat that looks like it came from the factory, not a weekend DIY project. You have two main tools to get you there: the classic brush-and-roller combo or a paint sprayer.
A good quality angled brush is a must-have for cutting in on the cabinet frames and getting into all the detailed trim. For the bigger, flat surfaces like doors and side panels, a mini foam roller is your absolute best friend. It’s the key to minimizing texture and avoiding the brush strokes that can scream "I did this myself."
Now, if you're aiming for the ultimate smooth finish, an HVLP (High Volume, Low Pressure) paint sprayer is the gold standard. It does require more setup—you'll have to mask off pretty much the entire kitchen—but it delivers an incredible, glass-like surface that’s hard to beat.
No matter which tool you use, the secret is applying multiple thin coats instead of trying to get it done in one thick one. A heavy coat will drip, take ages to cure properly, and won't be nearly as durable. Give each coat plenty of time to dry (usually 2-4 hours), and think about a quick, light sanding with 220-grit sandpaper to smooth out any tiny bumps before your final coat.
If there's one key takeaway for resurfacing cabinets, it's patience. Rushing the paint job by laying it on too thick or not letting it dry is the quickest way to get an uneven finish that chips and peels. Thin, even layers are what create durability.
The cabinet refinishing market is really picking up steam, mostly because the products and tools available today are so much better. It was valued at around USD 1.5 billion in 2024 and is expected to more than double to USD 3.2 billion by 2033. This boom is thanks to better low-VOC paints and sprayers that make it easier for anyone to get pro-level results. You can find more details in this cabinet refinishing services market trends report to see why so many homeowners are choosing this route.
Precision Application for Cabinet Refacing
Refacing is less about painting technique and more about being precise with your measurements and application. This process involves sticking a new veneer onto your cabinet boxes and then hanging brand-new doors and drawer fronts.
Your first job is to carefully measure and cut the veneer for the cabinet face frames and any side panels that will be visible. Remember the old rule: measure twice, cut once. A sharp utility knife and a good straight edge are non-negotiable for getting clean, straight cuts.
To attach the veneer, you'll need a seriously strong adhesive. Your main options are:
- Contact Cement: This stuff creates an immediate, powerful bond. You brush it on both the cabinet box and the back of the veneer, let it get tacky, and press them together. Be warned: once it makes contact, it’s stuck for good, so your placement has to be dead-on.
- Peel-and-Stick Veneer: This is a much more forgiving choice, especially for first-timers. It has a pre-applied adhesive backing, so you can position it carefully before pressing down firmly to lock it in place.
Once the veneer is on, use a J-roller or even a small block of wood to apply firm, even pressure over the entire surface. This squeezes out any air bubbles and guarantees a solid bond that won’t start peeling up in a few years.
Final Assembly and Hardware Installation
This is the home stretch—hanging your new doors, attaching the drawer fronts, and installing the hardware.
If you’re using new hinges, especially the concealed European-style ones, you'll likely need to drill new holes. A hinge-drilling jig is a cheap tool that will save you a world of frustration by ensuring every hole is perfectly aligned.
Attach the new doors and drawer fronts, taking the time to adjust them so they’re perfectly level with consistent gaps all around. The final touch? Installing your new knobs or pulls. This is the jewelry for your kitchen that ties the whole new look together.
Now, step back and take it all in. You've just successfully resurfaced your kitchen cabinets.
Answering Your Cabinet Resurfacing Questions
Jumping into a kitchen cabinet project always brings up a few questions. Getting straight answers is the best way to feel confident about the process and love the final result. Let's dig into some of the most common things homeowners ask.
How Long Does Cabinet Resurfacing Usually Take?
One of the best things about resurfacing is that it’s way faster than a full cabinet replacement. The exact timeline, though, really depends on whether you’re refinishing or refacing, and if you’re tackling it yourself.
A DIY refinishing job will probably take you a weekend or two—think 4 to 7 days. That includes taking everything apart, a serious deep clean, sanding, priming, a few coats of paint (with drying time!), and putting it all back together. Pros can usually knock this out in 3 to 5 days since they have the process down to a science.
Refacing is even quicker. Since you're applying new veneers and doors instead of waiting for paint to dry, a professional can often wrap up a refacing project in just 2 to 4 days.
How Durable Is a Resurfaced Finish?
The lifespan of your new cabinets comes down to two things: how well you prep and the quality of the materials you use. If you rush the prep and use cheap paint, it's not going to last. But when it's done right, the durability is fantastic.
A properly refinished surface using a high-quality bonding primer and tough cabinet paint can easily last 8-15 years with normal kitchen wear and tear. It’ll hold up against scuffs and chipping just as well as many factory-new cabinets.
The same goes for refacing. The high-quality veneers used by professionals are incredibly resilient and designed to handle the chaos of a busy kitchen, matching the lifespan of brand-new cabinets.
The bottom line is that a resurfaced finish is not a temporary fix. When done correctly, it is a long-term investment in your kitchen's beauty and functionality.
Can I Resurface Any Type of Cabinet?
Most kitchen cabinets are great candidates for resurfacing, but not all of them. The material of your current cabinet boxes is the biggest factor.
- Solid wood and wood veneer cabinets are perfect for both refinishing and refacing. They give you a great base for sanding and painting, and veneers stick to them without a problem.
- Laminate or thermofoil cabinets are tough to refinish. Paint just doesn't like to stick to those slick, non-porous surfaces. They are, however, excellent candidates for refacing.
- Cabinets with structural damage, like warped frames or crumbling particle board, can't be saved with resurfacing. In these situations, replacement is really your only smart option.
What Are the Biggest DIY Mistakes to Avoid?
If you want a professional-looking finish, you have to avoid the common DIY traps. The single biggest mistake people make is rushing the preparation work.
Skipping the degreasing step is a surefire way to get peeling paint down the road. Another classic error is improper sanding, which leaves you with a rough, blotchy finish no matter how good your paint is.
Applying paint too thickly is another one. It causes drips and creates a soft, gummy finish that gets damaged easily. And finally, being impatient and not letting the paint fully cure between coats will kill the durability of the final product. Patience is probably your most important tool on a project like this.
At Sinclair Cabinetry inc, we want you to have all the information you need to make the right choice for your home. For a complete look at the numbers involved, check out our detailed guide to cabinet resurfacing cost and get ready to plan your project with confidence.