
Before you even pick a paint color, we need to talk about the one thing that will make or break your cabinet project: the prep work. Seriously. Rushing this stage is the #1 mistake I see people make, and it almost always leads to a frustrating, amateur-looking finish that just doesn't last.
Properly preparing your cabinets comes down to a few critical steps: taking off all the hardware, giving every surface a deep clean, scuff sanding to create grip, and finally, applying a quality bonding primer. If you skip any of these, you're setting yourself up for chipping, peeling, and a finish that looks anything but professional.
This guide will walk you through turning those greasy, dated cabinets into a perfectly smooth, paint-ready surface. Let's cover the non-negotiables to make sure all your hard work pays off.
Why Smart Prep Is Your Secret to a Pro-Level Finish
The whole cabinet prep process can be broken down into four core phases, each one building on the last.
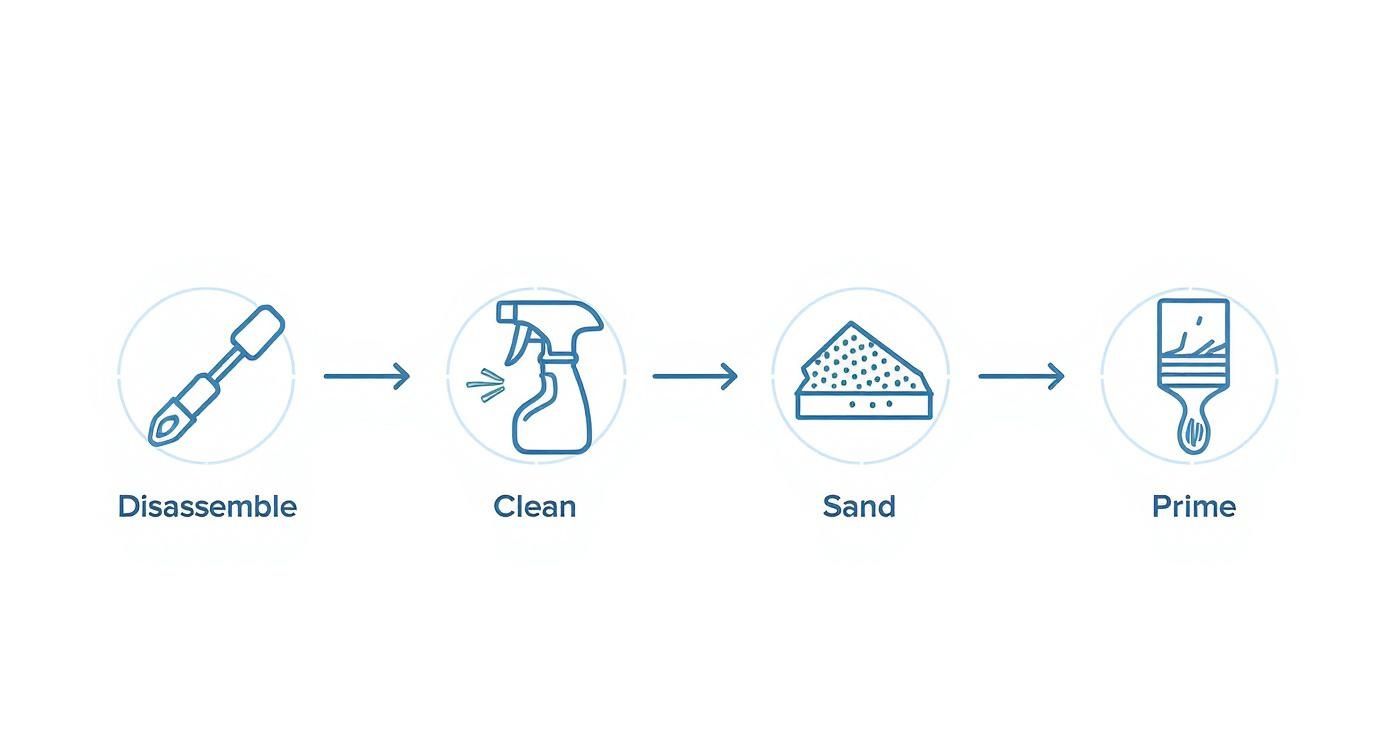
Think of it as a logical sequence. You can't sand a dirty door, and you can't prime an unsanded one. Each stage, from disassembly to priming, plays a vital role in how your painted cabinets will look and hold up over time.
The Value of Thorough Preparation
Putting in the time upfront isn't just for looks—it’s about longevity and makes good financial sense. The global cabinet refinishing market was valued at a whopping USD 100 billion in 2023, which tells you that refinishing is a smart move over replacing.
Here's the kicker: pros estimate that taking the time to prep properly, including multiple sanding stages, can make a paint job last 2-3 times longer. In fact, preparation usually takes up 25-35% of the total labor time on a professional job. That’s a huge investment, but it's what ensures durability. You can dive deeper into these market trends in this detailed analysis.
Key Takeaway: Think of prep work as the foundation of your cabinet painting project. A weak foundation will inevitably lead to a failed structure, no matter how beautiful the paint color is. Every minute spent cleaning, sanding, and priming is an investment in a finish that will withstand daily kitchen life.
A meticulous approach allows the primer and paint to form a powerful chemical bond with the cabinet surface. This bond is what prevents all those common DIY nightmares:
- Chipping and Peeling: This almost always happens from painting over lingering grease or a glossy finish that wasn't sanded.
- Uneven Sheen: If you've ever seen a paint job with weird dull and shiny spots, it's usually because dust or grime got trapped under the paint.
- Bleed-Through: Old wood stains or natural wood tannins can seep right through your new paint if you don't seal them with a good stain-blocking primer first.
By following these steps, you're creating a pristine canvas. It's the only way to guarantee your new paint job not only looks like a pro did it but also stands the test of time.
To help you get organized, here’s a quick rundown of the gear you’ll need for each part of the prep process.
Cabinet Prep Essentials at a Glance
| Prep Stage | Essential Tools | Recommended Materials |
|---|---|---|
| Disassembly | Drill or screwdriver, plastic bags, permanent marker | Painter's tape for labeling |
| Cleaning | Scrub sponges, microfiber cloths, spray bottle | Degreaser (TSP substitute), denatured alcohol, dish soap |
| Sanding & Filling | Sanding block, random orbital sander (optional), putty knife | 120-220 grit sandpaper, wood filler or Bondo, tack cloths |
| Priming | High-quality paintbrush, foam roller, paint tray | Stain-blocking bonding primer, painter's pyramids |
Having everything ready before you start makes the entire workflow much smoother and keeps you from having to run to the hardware store mid-project.
Setting Up Your Workspace for an Organized Project
Any successful cabinet painting project is built on a foundation of good organization. Before you even think about picking up a sander or a primer brush, taking a little time to set up a smart workspace will save you from a world of chaos later. This isn't just about clearing a corner of the garage; it's about creating a system that makes the whole process, from disassembly to the final coat of paint, run like a well-oiled machine.
The first real move is to carefully take apart your cabinets. I can't stress this enough—this is more than just yanking off doors. It's a methodical process that sets you up for a perfect reassembly. For a detailed guide on this crucial first step, check out our post on how to remove cabinet doors to get started on the right foot.
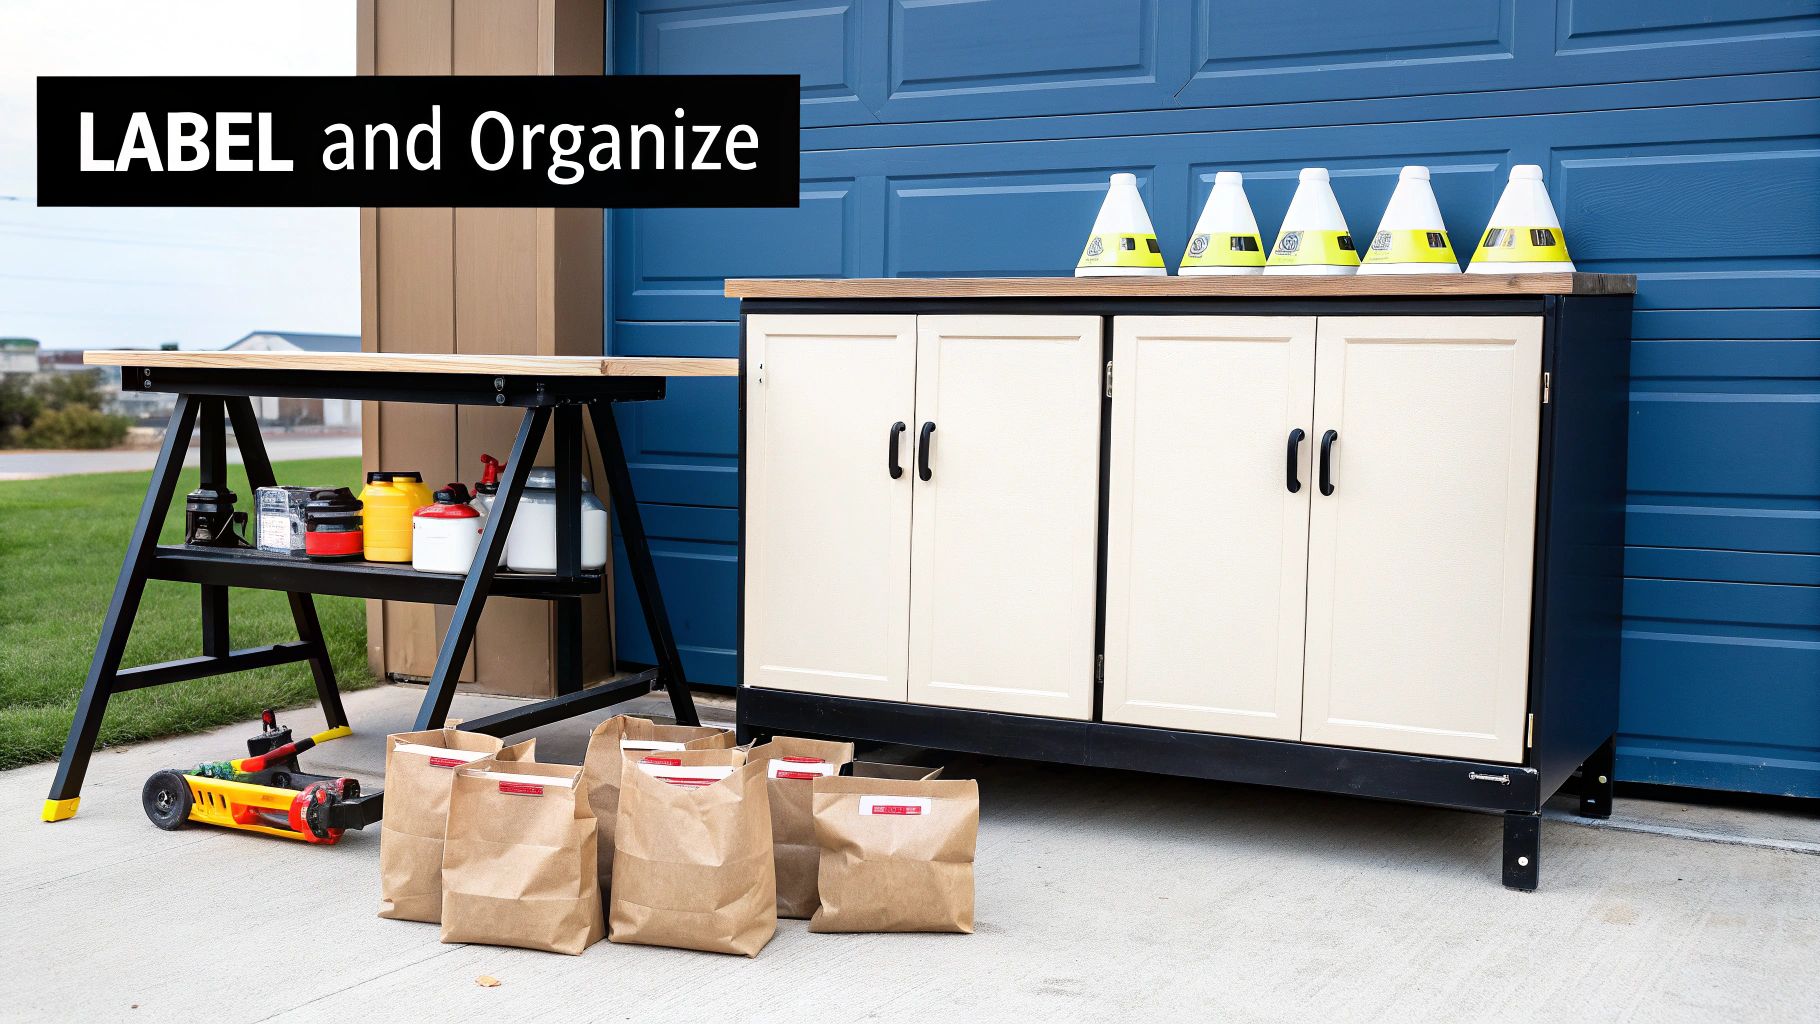
Once the doors are off, it's time to get your labeling system in place. Trust me, this small step is the difference between a frustrating jigsaw puzzle and a project that comes together seamlessly at the end.
Your Foolproof Labeling System
Grab a roll of painter's tape and a permanent marker—that's all you need. Give each cabinet opening a number and write that same number on a piece of tape stuck to the corresponding door. I always try to place the tape somewhere inconspicuous, like in the recess where a hinge will eventually cover it up.
This simple one-to-one mapping is a lifesaver. It guarantees every door goes back exactly where it came from, which is critical for older or custom-fit cabinets where even a slight misalignment can throw everything off.
Next up is the hardware. Get some small plastic baggies and label them. All the hinges, screws, and pulls from "Door #1" go into the baggie labeled "Door #1." Doing this will save you from that frantic, project-stopping search for one tiny, missing screw later on.
Pro Tip: If you're planning to reuse your old hinges, don't mix them up. Hinges wear in unique ways over the years, and keeping them paired with their original doors almost always ensures a much better fit when you put everything back together.
Creating an Efficient Painting Station
Now, let's carve out a dedicated painting zone. A garage, a basement, or even a spare room will work perfectly, as long as it has good ventilation and you've covered the floors. Whatever you do, try to avoid painting in the kitchen itself to keep dust and fumes contained.
Your main goal here is to get the cabinet doors elevated so you can easily paint all sides without smudging your fresh work. A simple setup works best:
- Sawhorses: A pair of sawhorses gives you a stable, elevated base to work from.
- Scrap Wood: Lay a couple of 2x4s across the sawhorses. This creates a long, simple platform for lining up your doors.
- Painter's Pyramids: These little plastic triangles are an absolute game-changer. You can place them on your 2x4s, paint one side of a door, flip it over, and immediately paint the other side without waiting for it to dry. The tiny contact points won't mess up the fresh paint.
By creating this kind of organized, assembly-line-style setup, you build momentum and keep the project moving forward without any major hiccups. This methodical approach is really the secret to learning how to prep cabinets for painting like a pro.
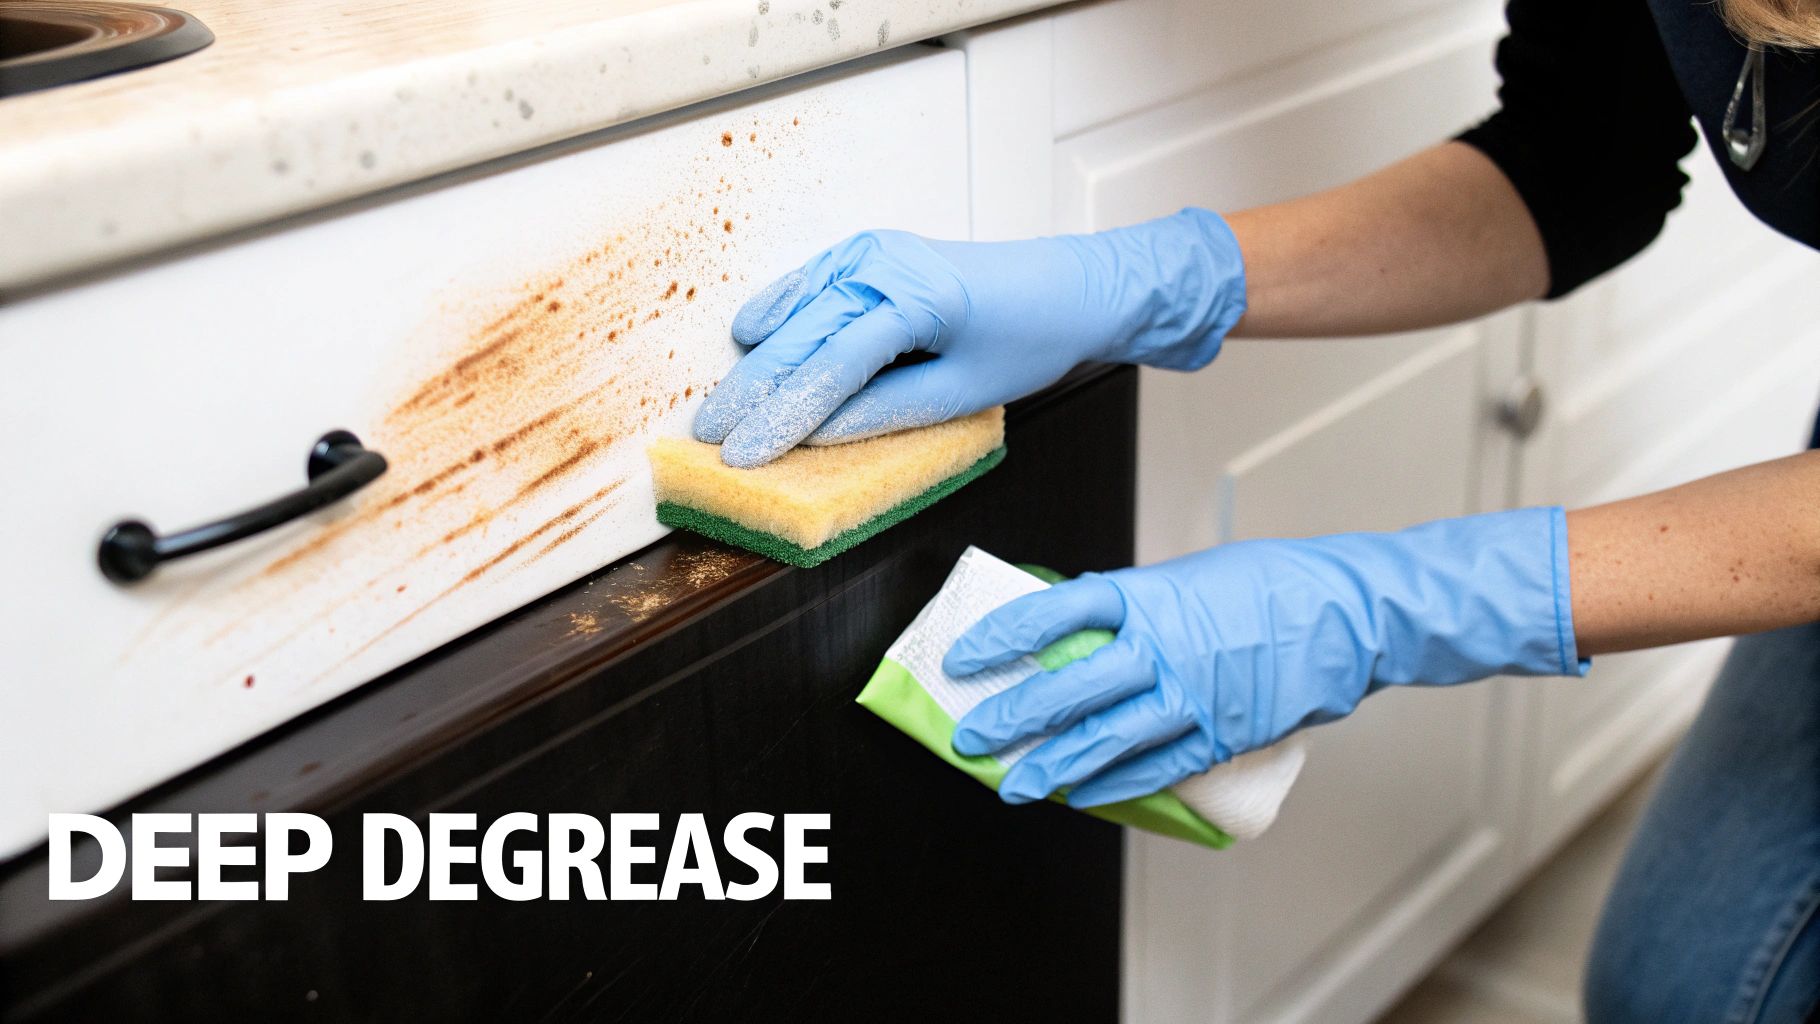
Conquering Years of Kitchen Grease and Grime
Let's be honest: kitchen cabinets are a battlefield. Years of cooking spray, airborne oils, and fingerprints build up into a stubborn, often invisible film that will actively repel new paint. This stage isn't just about a quick wipe-down; it's a deep clean that makes or breaks your entire project.
If you skip this, your primer can't grab hold. This is the single biggest reason for paint failure, leading to peeling and chipping within months. You have to get every last trace of that grease off the surface for your primer and paint to actually stick.
Choosing Your Cleaning Weapon
Your everyday all-purpose cleaner won’t cut it here. You need a dedicated degreaser designed to break down years of tough kitchen grime. The two most effective options I recommend are a Trisodium Phosphate (TSP) substitute or a heavy-duty commercial degreaser.
- TSP Substitutes: These are a safer, phosphate-free alternative to old-school TSP. They are incredibly effective at cutting through grease, but you still absolutely need to wear gloves and eye protection.
- Commercial Degreasers: Products specifically labeled as "degreasers" are formulated to dissolve oil and grease on contact. For particularly nasty kitchen grime, understanding what a degreaser is and how it works can give you a real edge in getting the surface perfectly clean.
Whichever you choose, always follow the manufacturer's mixing instructions and safety precautions to the letter. And make sure the area is well-ventilated—these are powerful cleaners, and you don't want to be breathing in the fumes.
The Deep Scrubbing Process
Start by mixing your cleaning solution in a bucket. Grab a non-abrasive scrub sponge or a few microfiber cloths, dunk one in, and wring it out so it's damp but not dripping. Now, get to work scrubbing every single square inch of the cabinet doors, drawers, and frames.
Pay extra attention to the areas around the cooktop and right around the cabinet pulls—these spots are magnets for grease buildup. Don't forget to dig into the detailed grooves and corners where grime loves to hide.
Expert Tip: After your initial scrub with the degreaser, I always do a final wipe-down with a 50/50 mix of denatured alcohol and water. This extra step zaps any lingering soap residue from the cleaner, leaving a perfectly pristine surface ready for sanding and priming.
Once you’ve scrubbed everything, the rinse is just as critical. Fill a second bucket with clean, warm water and use a fresh cloth to wipe down all the surfaces again. You need to remove every bit of the cleaning solution, as any residue can interfere with paint adhesion.
Change your rinse water often. If it starts looking murky, you're just spreading diluted grime around. Let the cabinets dry completely, which can take several hours. Rushing this is a huge mistake that traps moisture and ruins your finish before you've even picked up a brush.
For more insights on maintaining wood surfaces, our guide on how to clean wood cabinets offers some additional great tips.
Sanding and Repairing for a Flawless Foundation
Now that your cabinets are squeaky clean, it’s time for the step that truly separates a professional-looking job from one that peels in a year: sanding. This is probably the most misunderstood part of the whole process. We’re not trying to strip the cabinets down to bare wood. The real goal is to "scuff sand"—to rough up that slick, glossy finish just enough to give the primer something to bite into.
Think of it like trying to write on a glossy photo versus a piece of matte paper. The ink just sits on top of the slick surface, ready to smudge. But on the matte paper, it sinks in. Sanding turns that glossy cabinet surface into the perfect canvas for your primer and paint.
Don't be tempted to skip this. It's absolutely critical for a finish that lasts. Industry data suggests that a staggering 60-70% of all cabinet painting failures are a direct result of improper surface prep. Cutting this corner can slash paint adhesion by 40-50%, which is exactly why so many DIY jobs start chipping and peeling before their time. It's no wonder that 85% of pros insist on taking all the doors and hardware off to make sure every single inch gets a proper sanding. You can dive deeper into the numbers in this cabinet resurfacing market analysis.
Choosing the Right Sanding Tools and Grit
For this scuff-sanding job, leave the heavy-duty, low-grit sandpaper on the shelf. The sweet spot is a fine-grit paper, somewhere between 120- and 220-grit. This is just abrasive enough to create that microscopic "tooth" we’re after without carving deep scratches into the wood that will haunt you later by showing through the final paint coat.
The tools you use will depend on what your cabinets look like:
- Random Orbital Sander: Your best friend for any large, flat surfaces. Think shaker-style door panels, cabinet sides, and face frames. It gets the job done quickly and, more importantly, evenly.
- Sanding Sponges or Blocks: For all the detailed spots—raised panels, decorative trim, and tight corners—you'll need to sand by hand. Sponges are great because they conform to curves and get into grooves that a power sander would destroy.
The technique here is all about light, consistent pressure. You'll know you're done when the factory sheen is gone and the entire surface has a uniform, dull haze. Run your hand over it. It should feel smooth, but not slick.
Making Imperfections Disappear
Once you've scuffed the entire surface, every little ding, deep scratch, and old hardware hole will stand out. This is your chance to make them vanish for good, ensuring your final paint job looks seamless and brand new.
A good-quality, paintable wood filler is what you need. Grab a flexible putty knife and press a small amount of filler firmly into each imperfection. I always overfill it just a bit, because most fillers shrink as they dry. For bigger problems like damaged corners or areas with rot, you’ll want to step up to a two-part epoxy filler for a rock-solid, permanent fix.
Pro Tip: When filling old hardware holes, don’t just fill them from the front. Push some filler in from the back side of the door, too. This creates a much stronger "plug" that won't crack or pop out down the road when you're drilling new holes.
Give the filler plenty of time to cure—check the instructions on the container, as drying times vary. Once it's hard, sand it perfectly flush with the wood around it. I typically start with a 120-grit paper to knock down the bulk of the filler, then finish with 220-grit to feather the edges so you can't feel the transition at all.
Before you even think about opening a can of primer, there’s one final, non-negotiable task: get rid of every last speck of sanding dust. A shop vac with a brush attachment will pick up most of it, but you have to finish with a tack cloth. These are sticky cheesecloths designed specifically to grab the fine dust that vacuums and rags leave behind. This final wipe-down is what gives you a truly pristine surface, ready for its first coat of primer.
Choosing and Applying the Perfect Primer
With all that cleaning and sanding behind you, your cabinets are now a perfect blank slate. It’s time to bring in the unsung hero of cabinet painting: the primer. Think of primer as the critical handshake between the old cabinet surface and your new paint—it’s what creates a powerful, lasting bond.
Skipping this step, or grabbing the wrong can, is like building a house on a shaky foundation. The right primer doesn't just make paint stick; it seals the surface, blocks ugly stains from bleeding through, and creates a uniform base that makes your final color look richer and more even.
Matching the Primer to Your Cabinets
Not all primers are created equal, and your cabinet material is the deciding factor. Using the wrong one is a recipe for disaster, leading to peeling paint, bleed-through, or a finish that just doesn't hold up.
- For Wood Cabinets (especially oak or cherry): You absolutely need a stain-blocking primer. These woods are full of natural oils called tannins that will leach right through water-based paints, leaving you with frustrating yellow or pink splotches. An oil-based or shellac-based primer is your best defense here, as it creates an impermeable barrier that seals those tannins in for good.
- For MDF or Laminate Cabinets: These slick, non-porous surfaces need a specialized bonding primer. This stuff is formulated with unique chemistry that lets it grip onto surfaces where traditional primers would just peel or scratch right off.
The importance of a quality primer can't be overstated. It’s a non-negotiable step for pros. In fact, professional painters report that at least 90% of high-quality cabinet projects involve using stain-blocking primers, especially on previously finished surfaces. Within the kitchen cabinet market, which was valued at USD 80.72 billion in 2023, the demand for durable, long-lasting finishes is stronger than ever. Advances in prep work, including using the right primers, are key to getting the longevity homeowners expect. You can explore more about these industry standards and market trends on paint.org.
To help you decide, here’s a quick guide to choosing the right primer for your project.
Primer Selection Guide for Different Cabinet Surfaces
| Primer Type | Best For | Pros | Cons |
|---|---|---|---|
| Oil-Based Stain Blocker | Raw or stained wood (especially oak, cherry, mahogany), covering dark paint | Excellent stain blocking, great adhesion, very durable | Strong odor, requires mineral spirits for cleanup, longer dry time |
| Shellac-Based Primer | Knotty woods like pine, severe smoke/water damage, unknown surfaces | Dries super fast, blocks the toughest stains and odors | Strong fumes (requires ventilation), brittle finish, alcohol cleanup |
| Water-Based Bonding Primer | Laminate, melamine, vinyl, glossy surfaces, previously painted cabinets | Low odor, easy soap & water cleanup, flexible finish | Less effective at blocking heavy stains or wood tannins |
| Water-Based Stain Blocker | General purpose, light stains, new drywall or MDF | Low odor, fast-drying, easy cleanup | May not be strong enough for aggressive tannin bleed from woods like oak |
Choosing the right primer from this table sets you up for success and prevents a lot of headaches down the road.
Application for a Glass-Smooth Foundation
How you apply the primer is just as important as which one you choose. You’re aiming for a thin, even coat—not a thick, gloopy layer. Piling it on will only obscure your cabinet details and create a texture that telegraphs right through your final paint job.
For most DIYers, a high-quality angled brush for cutting in the corners and a mini foam roller for the flat surfaces is the winning combination. That foam roller is brilliant for eliminating brush strokes on panels and door fronts, giving you a finish that looks almost like it was sprayed.

Once your first coat is fully dry (always check the can for recoat times), run your hand over the surface. It will probably feel a little gritty. Don't panic! This is completely normal.
Now for the pro move: lightly sand the entire primed surface with a fine, 220- to 320-grit sanding sponge. This quick scuff-sand knocks down any raised wood grain or tiny imperfections, creating that perfectly smooth base you need for your paint.
Wipe away every speck of dust with a tack cloth, then apply a second thin coat of primer if the manufacturer recommends it. This two-step process of priming and sanding is the real secret behind a flawless, professional-grade paint finish. It’s a vital part of learning how to prep cabinets for painting, and it ensures your final color looks absolutely spectacular.
If you're ready to start thinking about color, you can also check out our guide on the best paint for kitchen cabinets.
Your Cabinet Prep Questions Answered
Even with the best game plan, questions always come up once you get your hands dirty. Let’s tackle some of the most common hurdles DIYers run into during cabinet prep. Clearing up the confusion now will save you from headaches down the road and keep your project moving forward.
Can I Skip Sanding if I Use a Liquid De-Glosser?
This is a question I hear all the time, and the short answer is a hard no. While it's tempting to cut corners, a de-glosser (or liquid sandpaper) is not a true substitute for the mechanical bond that good old-fashioned sanding creates.
Think of it this way: a de-glosser is great for chemically dulling an old, glossy finish, but that’s about all it does. Scuff sanding with 120- to 220-grit sandpaper physically etches thousands of microscopic grooves into the surface. These little scratches give your primer something substantial to grab onto, ensuring it won’t peel or chip away under the daily grind of a busy kitchen.
A quick scuff sand is the best insurance policy for all your hard work. Don't skip it.
How Do I Stop Wood Grain from Showing Through My Paint?
If you’re painting over a heavily grained wood like oak, you've probably noticed that the texture telegraphs right through the paint. Just slapping on more primer won't fix it. To get that perfectly smooth, modern look, you need to bring in a dedicated grain filler.
Here’s how you do it:
- Apply the Filler: After your initial cleaning and a light sand, grab a flexible putty knife. Work a thin layer of grain filler across the surface, really pushing it into the wood's pores.
- Scrape and Dry: Scrape off any excess with your knife, pulling against the grain to leave the filler only in the low spots. Let it dry completely—check the manufacturer’s instructions, as this can vary.
- Sand Smooth: Once it's fully cured, sand the surface perfectly smooth with a fine-grit sandpaper. Don't be surprised if you need a second, super-thin coat to get a flawless finish.
Once the grain is filled and smooth, then you can move on to a high-quality, stain-blocking primer. This is the only way to achieve that desirable, glass-smooth factory finish.
Key Takeaway: Patience between steps is non-negotiable. Always let cabinets dry 100% after cleaning before you sand. After priming, check the can for recoat times, which usually range from 1-4 hours. Rushing these drying windows can trap moisture or solvents, leading to bubbles and a failed finish.
As you plan the details of your cabinet project, you might also be thinking about the bigger picture. To help with budgeting, you can find helpful insights by understanding broader kitchen remodel costs.
At Sinclair Cabinetry inc, we believe a beautiful finish starts with flawless preparation. For custom cabinetry designed to last a lifetime, explore our handcrafted solutions at https://sinclaircabinets.com.