
Designing a kitchen island is so much more than just adding a block of counter space to the middle of your room. It’s about creating a true hub for your home—a place that’s as functional as it is beautiful. The whole process is a balancing act, weighing your family’s needs against the physical limits of your kitchen to land on a design that genuinely improves traffic flow and how you live day-to-day.
This guide will walk you through everything you need to know, from figuring out the island's main purpose to getting your final plans ready for a contractor.
Your Roadmap to the Perfect Kitchen Island
A well-designed kitchen island can completely change the feel and function of your home. It’s not just a passing trend; it represents a real shift toward more open, interactive living spaces. You can see this reflected in the market, too. The global kitchen island market was recently valued at around USD 11.41 billion and is expected to climb to nearly USD 16.86 billion, all because homeowners are craving smarter, more efficient designs.
Think of your island as your kitchen’s command center. It's where you'll prep weeknight dinners, where the kids will do their homework, and where friends will inevitably gather with a glass of wine during a party. Since it has to wear so many hats, the design needs some serious thought.
To help you get a clear picture of the journey ahead, here's a quick overview of the key stages involved.
Kitchen Island Design Stages at a Glance
This table breaks down the entire process, from initial brainstorming to the final build-out, giving you a high-level look at what to expect.
| Design Stage | Key Objective | Primary Considerations |
|---|---|---|
| 1. Assess Your Space | Determine if an island is feasible and establish ideal placement. | Kitchen layout, traffic patterns, clearance distances, work triangle. |
| 2. Define the Function | Decide the primary roles the island will serve. | Prep space, cooking, seating, storage, appliances, entertaining. |
| 3. Finalize Dimensions | Lock in the exact height, width, and length. | Countertop height (standard vs. bar), seating overhang, walkway clearance. |
| 4. Plan Utilities | Integrate plumbing, electrical, and ventilation. | Sink/dishwasher hookups, outlets, cooktop/oven wiring, vent hood requirements. |
| 5. Select Materials | Choose countertops, cabinetry, and finishes. | Durability (quartz vs. granite), style (wood vs. painted), budget. |
| 6. Choose Hardware | Pick out knobs, pulls, and other functional details. | Style consistency (modern vs. traditional), finish (brass, nickel, matte black). |
| 7. Integrate Storage | Design custom cabinetry solutions for your needs. | Deep drawers, pull-out shelves, spice racks, open shelving, trash bins. |
| 8. Estimate Costs | Create a realistic budget for the entire project. | Materials, labor, appliances, plumbing/electrical work, contingency fund. |
| 9. Prepare Plans | Develop contractor-ready drawings and specifications. | Detailed measurements, material lists, appliance cutouts, installation notes. |
Each of these stages builds on the last, so taking the time to get each one right is the key to creating an island you'll love for years.
Balancing Function and Aesthetics
The very first question you need to ask is: what is this island for? Defining its primary role will guide every other decision you make. Will it be:
- A Culinary Workstation? If so, you'll want to prioritize a huge, uninterrupted prep surface. Maybe you'll add a second sink for washing veggies, a built-in cooktop, or clever storage for baking sheets and cutting boards.
- A Social Hub? When entertaining and family time are the main goals, comfortable seating is non-negotiable. That means thinking about ample legroom, a durable countertop that can handle spills, and maybe even a multi-level design.
- A Storage Powerhouse? For anyone struggling with clutter, an island is a golden opportunity. Think deep drawers for pots and pans, custom pull-outs for spices and oils, or even open shelving for your favorite cookbooks.
A great island is a problem-solver. It should address a specific need in your kitchen, whether that’s a lack of counter space, insufficient storage, or the absence of a casual dining spot.
Preparing for the Details
Once you've nailed down the big-picture purpose, it's time to get into the technical details. You’ll need to think about running plumbing for a new sink or dishwasher and routing electrical wiring for outlets, pendant lights, and appliances.
As you start looking at what to include, it’s a good idea to consult an essential kitchen appliance buying guide to get a handle on space requirements, budget, and features. Think of this guide as your roadmap—it will demystify each step and help you create an island that's both realistic and perfectly suited to your life.
Figuring Out Your Island's Job and Where It Will Live
Before you get lost in a sea of countertop samples and paint swatches, let's take a step back. The most important part of designing a kitchen island happens long before you pick out materials—it’s about defining its real purpose. A great island isn't just a pretty centerpiece; it's a problem-solver. It should fix something that's missing from your kitchen, whether that's more prep space, better storage, or just a casual spot to eat breakfast.
Think about your daily life. How do you really use your kitchen? An island that looks incredible in a magazine can become a daily annoyance if it doesn't fit the way your family actually lives.
Don't Block the Flow
First things first: take a hard look at the natural pathways in your kitchen. These are the invisible highways people use to get from the fridge to the sink, the pantry to the stove, or the kitchen into the dining room. Plop an island right in the middle of a major traffic route, and you've created a permanent bottleneck.
Here's a simple trick I tell all my clients: grab a big cardboard box or drag a small table into the spot where you imagine the island. Now, live with it for a day or two. Can you still open the oven door all the way? What about the dishwasher? Do you have to turn sideways to squeeze past it on your way to the fridge? This little real-world test is surprisingly effective at revealing flow problems that are impossible to see on a blueprint.
What’s Your Island’s Main Gig?
Every island has a primary job. Is it a chef's workhorse, a social hub for family and friends, or a storage champion? It can definitely wear more than one hat, but one function will always be the priority, and that should drive every design decision you make.
The best kitchen islands feel like they were always meant to be there, not like an afterthought. This comes from a deep understanding of the room's flow and the family's needs, making function the true foundation of form.
Nailing down this main role determines everything from its size to the features you build in. For some great ideas, check out these different kitchen work table designs and considerations—it can spark some valuable insights for creating a space that truly works for you.
Scenario One: The Chef’s Command Center
If you’re the family cook who’s always wishing for more space to chop, mix, and plate, then your island needs to be a dedicated prep zone. The goal here is simple: maximize your usable counter space.
- A Big, Unbroken Surface: Go for a large, single-level countertop. This gives you tons of room to spread out ingredients and tackle multiple recipes at once.
- A Prep Sink is a Game-Changer: Adding a small secondary sink to the island means you can wash vegetables or rinse utensils without having to walk across the entire kitchen. It creates a super-efficient work triangle.
- Smart, Task-Oriented Storage: Think about what you grab most often when you’re cooking. The island is the perfect spot for deep drawers to hold pots and pans, vertical dividers for baking sheets, or even a pull-out spice rack.
For an island like this, the materials really matter. A tough surface like quartz is a great all-rounder, but adding a dedicated butcher block section for chopping can make it even more functional.
Scenario Two: The Family's Social Hub
Maybe your main goal is to create a place for homework, casual weeknight dinners, and catching up over a cup of coffee. If that's the case, seating is the star of the show. This kind of island is less about intense meal prep and more about bringing people together.
The entire design should feel inviting and encourage people to hang out.
- Think About Seating: Don't just line up stools like you're at a diner. Consider wrapping the seating around a corner to create a more conversational, table-like feel.
- Give People Legroom: Make sure the countertop has a generous overhang so people can sit comfortably. A minimum of 12 to 15 inches is the standard for counter-height stools.
- Choose a Forgiving Countertop: This surface needs to handle spilled juice, stray marker scribbles, and daily wear and tear. A non-porous material that’s easy to clean is your best bet.
Little details can make a big difference here, too. Integrating a power outlet with USB ports turns the island into the go-to spot for charging phones and laptops while people hang out.
Finding Your Perfect Balance
Of course, your island doesn’t have to be just one thing. A hybrid design is often the best solution—one that combines a functional prep area on one end with comfortable seating on the other. The key is to be honest about which activities are most important to your family and design the space accordingly.
If you’re looking for some visual inspiration on how to beautifully blend these different functions, browsing through a gallery of kitchen island design ideas can help you picture the perfect layout for your own home.
By thinking through your kitchen's layout and your island's main purpose first, you'll end up with a feature that doesn't just look amazing—it will fundamentally improve how you live in your kitchen.
Getting Your Dimensions and Clearances Right
A poorly sized kitchen island is more than a design mistake—it’s a daily frustration. Getting the dimensions right is where we move from big ideas to the practical numbers that will make or break your new space. It's the difference between a kitchen that flows and one that feels like a constant traffic jam.
Think of the space around your island as invisible pathways. If those paths are too narrow, your kitchen will feel cramped and become a bottleneck, especially when you have more than one cook in the kitchen or guests mingling.
The Golden Rule of Clearances
The non-negotiable starting point for any island is the clearance, or the walkway, on all sides. Industry standards recommend a minimum of 36 inches between the island and any surrounding counters or walls.
But honestly, that's a minimum. In a busy kitchen where oven doors, dishwashers, and refrigerators need to open without blocking someone's path, I always push my clients toward 42 or even 48 inches. That extra space is a game-changer. It ensures two people can pass each other comfortably and work back-to-back without doing an awkward dance.
A great kitchen island isn't just about the island itself; it's about the negative space you create around it. That clearance is what makes the entire room functional and feel welcoming, not obstructed.
A pro tip I always share: before you commit, grab some painter's tape and mark your proposed island's footprint on the floor. Live with it for a day or two. Walk around it, open your appliances, and see how it feels. It’s the best way to test the flow before a single piece of wood is cut.

Finding the Right Island Height
The height of your island is directly tied to its main job. There isn't one "correct" height; it all comes down to how you plan to use the space day in and day out.
- Standard Counter Height (36 inches): This is the most common and versatile choice by far. At 36 inches, the island perfectly matches your perimeter countertops, creating a clean, seamless look. It's also the ideal ergonomic height for food prep.
- Bar Height (42 inches): A taller, 42-inch island creates more of a pub-like vibe. It’s great for entertaining and visually separates the cooking zone from the social area. The downside? It can be less comfortable for everyday meals and isn't very kid-friendly.
- Table Height (30 inches): While less common, dropping a portion of the island to 30 inches creates a comfortable, dining-table-level seating area. This is a fantastic solution for multi-level island designs that need to serve different functions.
For a deeper dive into how all these numbers work together in a cohesive layout, our guide on crucial kitchen design measurements can save you from a lot of common headaches.
Calculating Seating Overhang
If seating is part of your island dream, you absolutely have to get the countertop overhang right. Skimp on this, and your family and guests will be perched awkwardly on their stools, knees banging against the cabinets. No thank you.
To help you get it right, here’s a quick-reference table with the industry standards.
Standard Kitchen Island Dimensions and Clearances
This table breaks down the key measurements for a functional and comfortable kitchen island, from walkways to seating.
| Measurement Type | Recommended Dimension | Reasoning |
|---|---|---|
| Walkway Clearance | 36" (minimum) – 48" (ideal) | Ensures safe movement and allows appliance doors to open fully. |
| Counter Height | 36 inches | Matches standard kitchen counters for a seamless look and ergonomic prep. |
| Bar Height | 42 inches | Creates a separate entertaining zone; pairs with taller bar stools. |
| Table Height | 30 inches | Provides comfortable, dining-table-level seating. |
| Overhang at 36" Height | 15 inches | The standard for counter stools, offering comfortable knee space. |
| Overhang at 42" Height | 12 inches | Less overhang is needed as legs are more extended on taller bar stools. |
Keep in mind these are solid starting points. If you have the space, adding an extra inch or two to your overhang can make a surprising difference in comfort. By planning these details carefully, you ensure your new island will be the stunning, hardworking centerpiece your kitchen deserves.
Planning for Appliances and Utilities
A beautiful island is one thing, but a truly hardworking island needs power and water. This is where we move beyond just layouts and dimensions and get into the technical guts that turn a block of cabinets into a dynamic workstation. Honestly, planning for utilities early is one of the most important things you can do—it saves you from massive headaches and costly changes down the line.
Integrating appliances is really about what’s happening below the floor and behind the drywall. It's less glamorous than picking out countertops, but getting it right is what makes your island a place you'll actually love to use every single day.
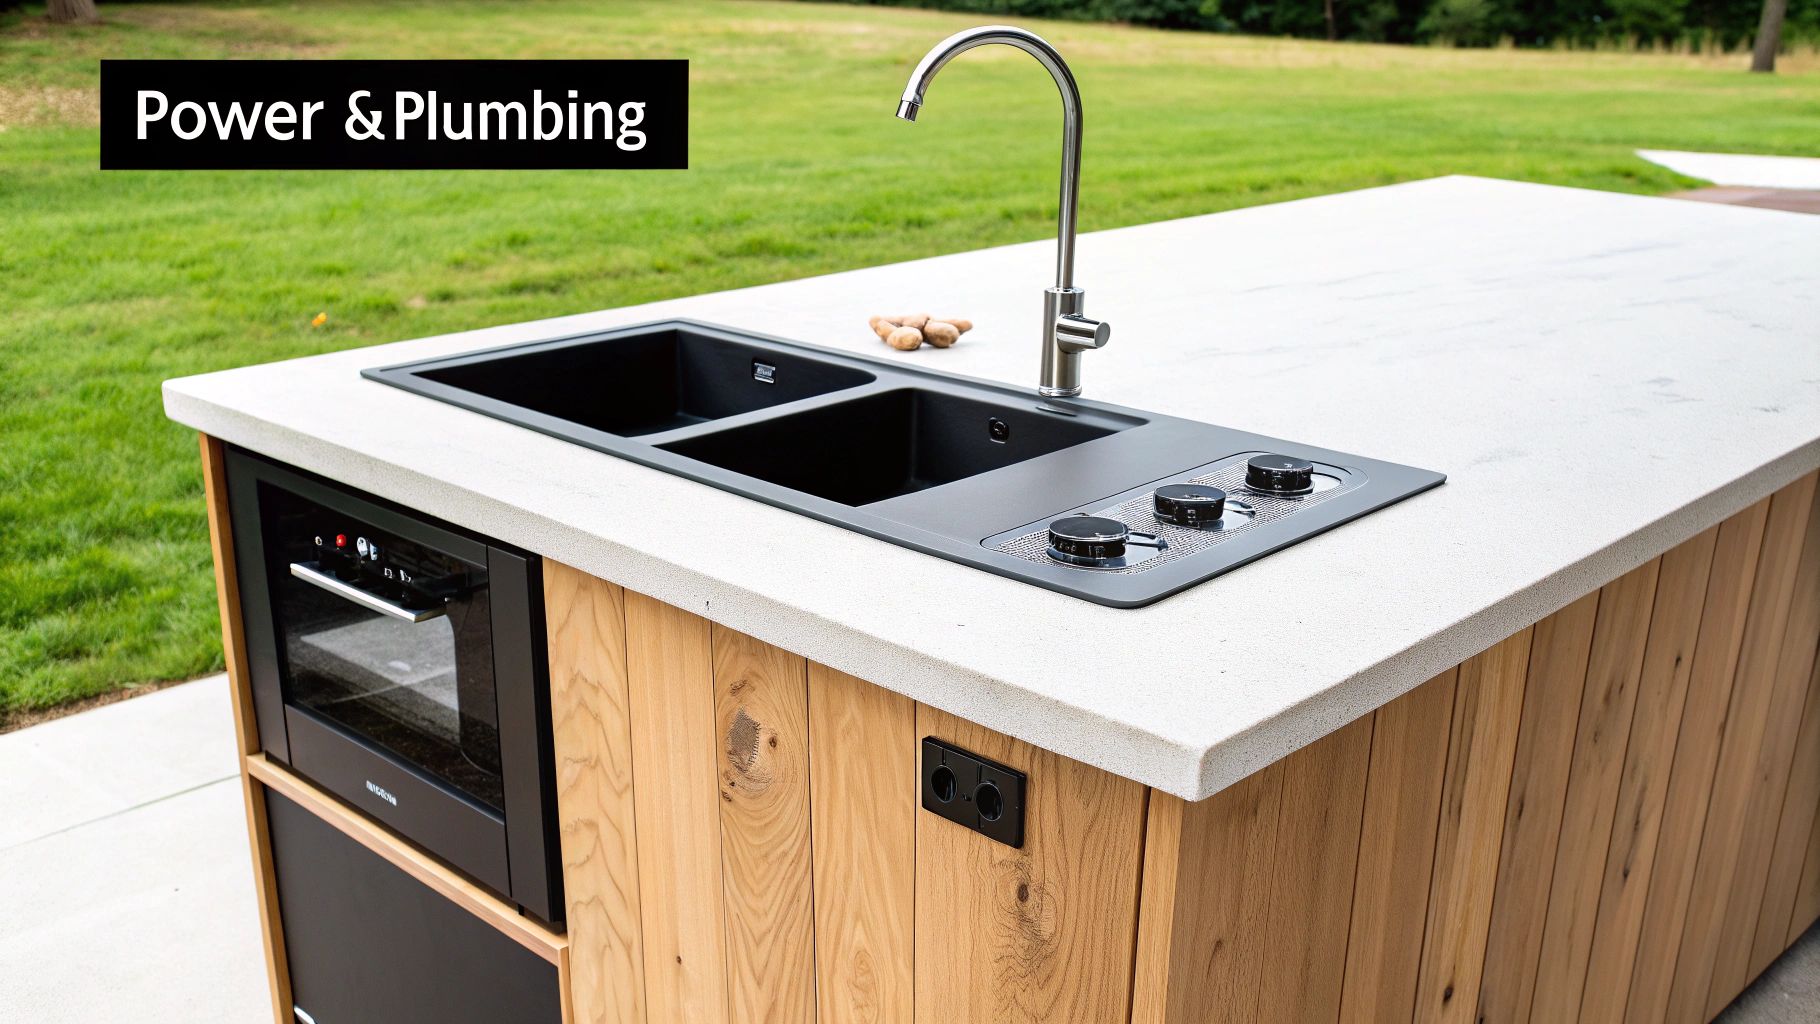
Mapping Out Plumbing Needs
Adding a prep sink or a dishwasher to your island is a game-changer for its functionality, but it takes some serious forethought. You'll need to run both hot and cold water supply lines, plus a drain line, from your home's main plumbing system out to the island.
This usually means opening up the floor to route the pipes. If your home has a basement or crawl space, the job is relatively straightforward. If you're on a concrete slab foundation, however, it's a much bigger deal that involves cutting a channel directly into the concrete.
Don’t underestimate the complexity of island drainage. Your new sink has to be properly vented to drain correctly and keep sewer gases out of your kitchen. This often means installing a special air admittance valve (AAV) or a more complex loop vent, depending on what your local building codes require.
Powering Up Your Island
In today's world, electrical access is non-negotiable. From running a stand mixer to charging a laptop while you follow a recipe, your island needs outlets. Building codes have strict rules about the number and placement of these, so it's critical to plan for them from the get-go.
Beyond just standard outlets, you have to think about the specific appliances you want to build in. Each one has its own power demands that need to be met.
- Small Appliance Outlets: These are your standard 120-volt outlets for everyday gadgets. I've seen some clever placements, like pop-up outlets that recess into the countertop or outlets integrated discreetly into the side panels of the cabinetry.
- Dedicated Circuits: Bigger appliances like a cooktop, under-counter oven, or wine fridge can't just be plugged in anywhere—they need their own dedicated circuit. A standard cooktop, for instance, typically requires a 240-volt circuit, which is a significant electrical job.
- Specialty Appliances: Things like a microwave drawer or a beverage center will also need their own dedicated power source, which has to be planned and wired before a single cabinet is installed.
Don't Forget Ventilation
If your grand plan includes putting a cooktop or range in the island, you absolutely cannot skip ventilation. A good ventilation system is essential for pulling smoke, steam, and cooking odors out of the air and maintaining healthy air quality in your home.
You've got a few different paths you can go down here, each with its own look and performance.
- Overhead Range Hood: This is the classic choice. It's highly effective and can be a stunning focal point, but it can also interrupt the visual flow of an open-plan space.
- Downdraft Ventilation: This system is built right into the cooktop or countertop and pops up when you need it. It’s a fantastic minimalist option, but it's generally not as good at capturing steam and smoke as an overhead hood.
- Ceiling-Mounted (Flush) Ventilator: For a completely unobstructed view, these units are installed flush with the ceiling. They offer a clean, modern look and powerful ventilation, though they often come with a premium price tag.
The demand for these kinds of integrated, high-tech kitchen solutions is exploding. The North American market alone holds about a 42% share, driven by all the new residential construction. At the same time, Europe is seeing huge growth in smart kitchen tech that blends right into island designs. You can dig into more kitchen island trends at Accio.com to see where the market is headed.
Bringing in licensed plumbers and electricians early in the process isn't just a good idea—it's essential for safety and for passing inspections. They can look at your home's existing systems, figure out the best way to run new lines, and make sure every connection is safe, reliable, and up to code.
Choosing Your Materials, Finishes, and Hardware
Now for the fun part. This is where your kitchen island really comes to life and develops its personality. The materials, finishes, and hardware you choose are what you’ll see and touch every day, turning a functional blueprint into a beautiful centerpiece. Your selections should flow with your kitchen's overall vibe, hold up to your family's lifestyle, and, of course, fit within your budget.
Think of it like layering an outfit. The countertop is the main event, the cabinetry is the foundation, and the hardware is the jewelry that ties it all together. Each decision impacts the next, so you'll want to think about them in harmony to create a cohesive look.
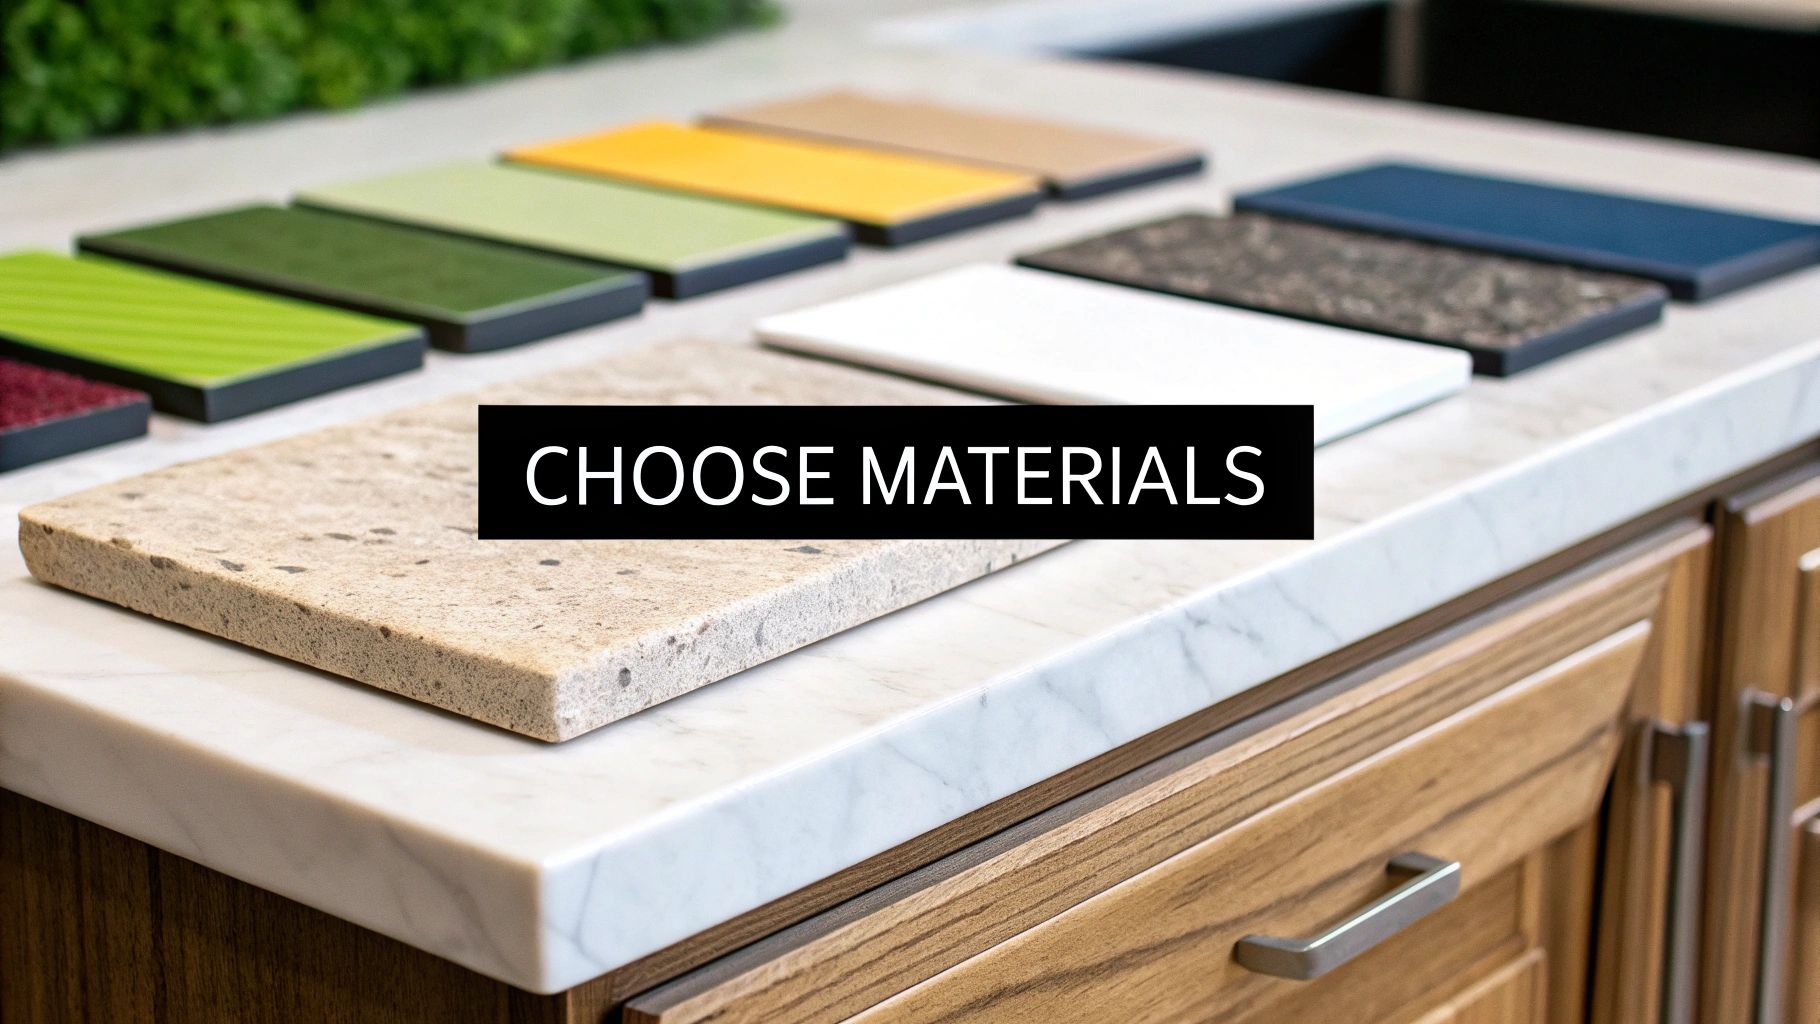
Selecting the Perfect Countertop
The island countertop is arguably the most dominant feature in your kitchen. It's a workhorse that has to endure daily use while making a major style statement. Let’s walk through some of the most popular choices I see homeowners considering.
- Quartz: This engineered stone is a fan favorite for good reason. Because it's non-porous, it won't stain from things like spilled red wine or coffee. It’s also incredibly tough and available in a huge range of colors and patterns, from convincing marble lookalikes to sleek, solid hues.
- Granite: As a natural stone, granite brings a unique, earthy beauty to the table—no two slabs are ever identical. It’s very durable and stands up well to heat, but you’ll need to seal it periodically to keep it stain-resistant.
- Marble: If you're going for pure, timeless elegance, nothing beats marble. But that luxurious look comes at a price. Marble is a softer, more porous stone that can scratch and stain quite easily. Over time, it develops a patina, which some people absolutely love, but it’s not for you if you want a surface that stays flawless forever.
- Butcher Block: A wood countertop immediately adds warmth and a cozy, natural feel. It’s fantastic if you want a built-in chopping area and is generally more affordable than stone. The trade-off is the maintenance—it needs regular oiling to prevent it from cracking and can be damaged by water if you’re not careful.
Your countertop is a long-term commitment. Be realistic about how much upkeep you're willing to handle. For a busy family, a low-maintenance material like quartz can be an absolute lifesaver.
Defining Your Style with Cabinetry
The base of your island is a prime opportunity to make a design statement. You can either match it to your perimeter cabinets for a seamless, integrated look or go with a contrasting color or style to create an eye-catching focal point. The cabinet door style you choose plays a huge role here.
Shaker-style cabinets are a go-to for their timeless versatility. Their simple frame-and-panel design fits right in with both traditional and modern kitchens. For a more minimalist vibe, flat-panel doors offer clean, sleek lines that are modern and super easy to wipe down.
Don't be afraid to mix things up. A huge trend right now is painting the island base a different color from the main cabinets—think of a deep navy island in an otherwise all-white kitchen. It adds so much depth and character. To get a better sense of how different base designs can elevate your island, take a look at these inspiring kitchen island cabinet ideas.
Pulling It All Together with Hardware
Hardware might seem like a small detail, but it has a massive impact on the finished look. Think of it as the final punctuation mark. The knobs, pulls, and faucets you select should complement your countertop and cabinets, tying the entire design together beautifully.
- Knobs vs. Pulls: Traditionally, knobs go on doors and pulls go on drawers (they’re easier to grip). But there are no firm rules. Using all pulls can create a very clean, linear aesthetic. It’s all about the look you’re after.
- Finishes Matter: The finish can completely change the mood. Matte black gives off a modern, almost industrial feel. Polished nickel is classic and elegant. Brushed brass adds a touch of warmth and luxury.
- Coordinating with Faucets: If you have a sink on your island, make sure your hardware and faucet play well together. They don't have to match perfectly, but they should feel like they belong to the same design family. For instance, pairing a matte black faucet with brushed brass pulls can create a sophisticated, layered look.
By taking the time to carefully consider each of these elements—your countertop, your cabinetry, and your hardware—you’ll create a kitchen island that’s not just functional but a true reflection of your personal style.
Budgeting and Finalizing Your Project Plan
With your design vision finally taking shape, it's time to bring it all back down to earth with a solid budget and a concrete plan. This is where your ideas become an actionable roadmap—something clear and concise that you can hand off to a contractor or cabinet maker. Before you even think about getting quotes, you need to be able to communicate exactly what you want.
A simple, hand-drawn sketch of your island is the perfect place to start. It doesn’t need to be a professional blueprint. Just use the dimensions and clearances you've already mapped out to draw the island's footprint in your kitchen.
From there, label the key features. Show where the seating will go, mark the location for the sink or cooktop, and indicate which cabinets will be drawers versus doors. The more detail you include, the better.
Estimating Your Project Costs
Now, let's talk numbers. The cost of a kitchen island can swing wildly, so breaking it down into individual components is the best way to build a realistic budget and see exactly where your money is going.
-
Cabinetry: This is almost always the biggest chunk of the budget. Fully custom cabinets will cost more than stock or semi-custom options, but they give you total control over every inch of storage and style.
-
Countertops: Your material choice is a huge cost driver here. Laminate and butcher block are great budget-friendly options, while high-end quartz or marble can easily double the total cost.
-
Appliances and Fixtures: Don't forget to factor in the price of any new appliances, like a microwave drawer or wine fridge, plus the cost of your sink and faucet. These add up quickly.
-
Labor: This bucket includes the installation of the cabinets and countertops, plus the specialized work of electricians and plumbers if you’re adding utilities. Labor can easily account for 20-35% of your total project cost, so don't underestimate it.
To get an accurate quote, give each potential contractor the exact same detailed sketch and list of materials. This ensures you’re comparing apples to apples and helps you avoid any nasty surprise costs down the road.
When you're ready to learn how to design kitchen island features that truly fit your budget, think about where you can save and where you should invest. You might opt for a more affordable countertop material but splurge on high-quality, soft-close drawer slides that you'll be using every single day.
Having a clear plan and a detailed budget empowers you to manage the project with confidence, ensuring a much smoother process from the first nail to the final polish.
Got Questions About Your Kitchen Island Design?
Even the most buttoned-up plans can leave you with a few lingering questions. When you're in the thick of designing your kitchen island, it’s completely normal for a little uncertainty to creep in. Let's walk through some of the most common sticking points I hear from homeowners.
Can My Small Kitchen Actually Fit an Island?
This is probably the number one question, and for good reason. The short answer? Maybe, but it has to be the right kind of island.
You absolutely must have at least 36 inches of clear walkway around all sides. Anything less and your kitchen will feel cramped and become a traffic jam nightmare. If you're working with a really tight footprint, think outside the box. A narrow, mobile island on casters can be a brilliant solution, giving you that extra counter space when you need it and tucking away when you don't.
Does the Island Have to Match My Perimeter Cabinets?
Definitely not! In fact, creating a contrast is one of the best ways to turn your island into a stunning focal point.
I love seeing clients get creative here. Painting the island base a deep, moody color—like a rich navy or a forest green in an otherwise white kitchen—adds instant sophistication. Another fantastic approach is to switch up the countertop material. Imagine a warm, inviting butcher block on the island paired with sleek quartz counters along the walls. It creates a beautiful, layered look.
Takeaway: Don't be afraid to let your island stand out. Using a different color or countertop material is a go-to designer strategy for making the island the true star of the kitchen.
It's no surprise that kitchen islands have become such a centerpiece in modern homes. The market for them, currently valued at USD 3.5 billion, is expected to nearly double as more people look to create stylish, highly functional kitchens. This boom is all about homeowners wanting more from their space. If you're curious, you can explore more insights into the kitchen island market trends to see where things are headed.
Counter Height or Bar Height for Seating?
This choice really boils down to how you live your life.
- Counter Height (36 inches): This option keeps everything on one level, creating a clean, seamless look. It’s generally more comfortable for everyday dining and a perfect spot for kids to spread out with their homework.
- Bar Height (42 inches): The taller, two-tiered design creates a clear visual separation between the "work" and "social" zones of the kitchen. It has more of a casual, pub-like feel that’s great for entertaining guests while you cook.
Think honestly about how you’ll use the seating day-to-day. If you envision casual family meals and daily use, counter height is almost always the more comfortable and practical choice.
Ready to bring your vision to life with custom cabinetry that perfectly fits your space and style? The experts at Sinclair Cabinetry inc have over 35 years of experience crafting high-quality, real wood cabinets that become the heart of the home. Contact us today to start designing your dream kitchen island.