
Giving your kitchen cabinets a facelift is one of the most impactful DIY projects you can tackle. It’s all about cleaning, stripping or sanding off the old finish, applying a fresh coat of stain or paint, and then sealing it all with a protective top coat.
It’s a project that’s well within reach for most homeowners and can completely change the vibe of your kitchen in about 4-7 days, all for a fraction of what new cabinets would cost.
Why Refinish Instead of Replace Your Cabinets?
Is the thought of a full kitchen remodel giving you a headache? The cost, the dust, the disruption—it’s a lot. But what if you could get a massive transformation without tearing everything out? Refinishing your existing wood cabinets is a smart, strategic move that saves a ton of money, keeps quality materials out of the landfill, and lets you hold on to the solid craftsmanship you already have.
This isn't just a quick cosmetic touch-up. It's a real home improvement project that delivers a high-end look without the high-end price tag. A lot of older cabinets are built like tanks—far more durable than many of the mass-produced options on the market today. By refinishing, you’re not just changing a color; you’re reinvesting in the solid wood construction that gives your kitchen its soul.
The Benefits of a Cabinet Makeover
Jumping into a refinishing project has some serious perks over a full gut job. More and more, homeowners are catching on and choosing to work with what they've got.
- Serious Cost Savings: This is the big one. Refinishing can cost 70-80% less than a full replacement. That's a huge chunk of your budget freed up for that new countertop or fancy appliance you've been eyeing.
- An Eco-Friendly Choice: Why throw perfectly good cabinets into a landfill? Refinishing is a sustainable decision that reduces waste and honors the materials you already own.
- Total Creative Control: You call all the shots on the final look. Want a classic, clean white? A moody, modern dark green? Or maybe a rich stain that brings out the wood grain? The options are limitless. If you need some inspiration, check out our guide on how to update old kitchen cabinets.
And this isn't just our opinion—it's a real trend. Industry reports show that more than 70% of homeowners now prefer to refinish or repaint their kitchen cabinets rather than go through a full demolition. People are starting to appreciate the value of enhancing existing quality. You can dive deeper into these kitchen cabinet painting trends to see just how popular this approach has become.
Learning how to refinish your wood cabinets puts the power in your hands. You can breathe new life into your space, get a modern look, and keep the timeless appeal of real wood. This guide is here to walk you through it, step by step.
Assembling Your Cabinet Refinishing Toolkit
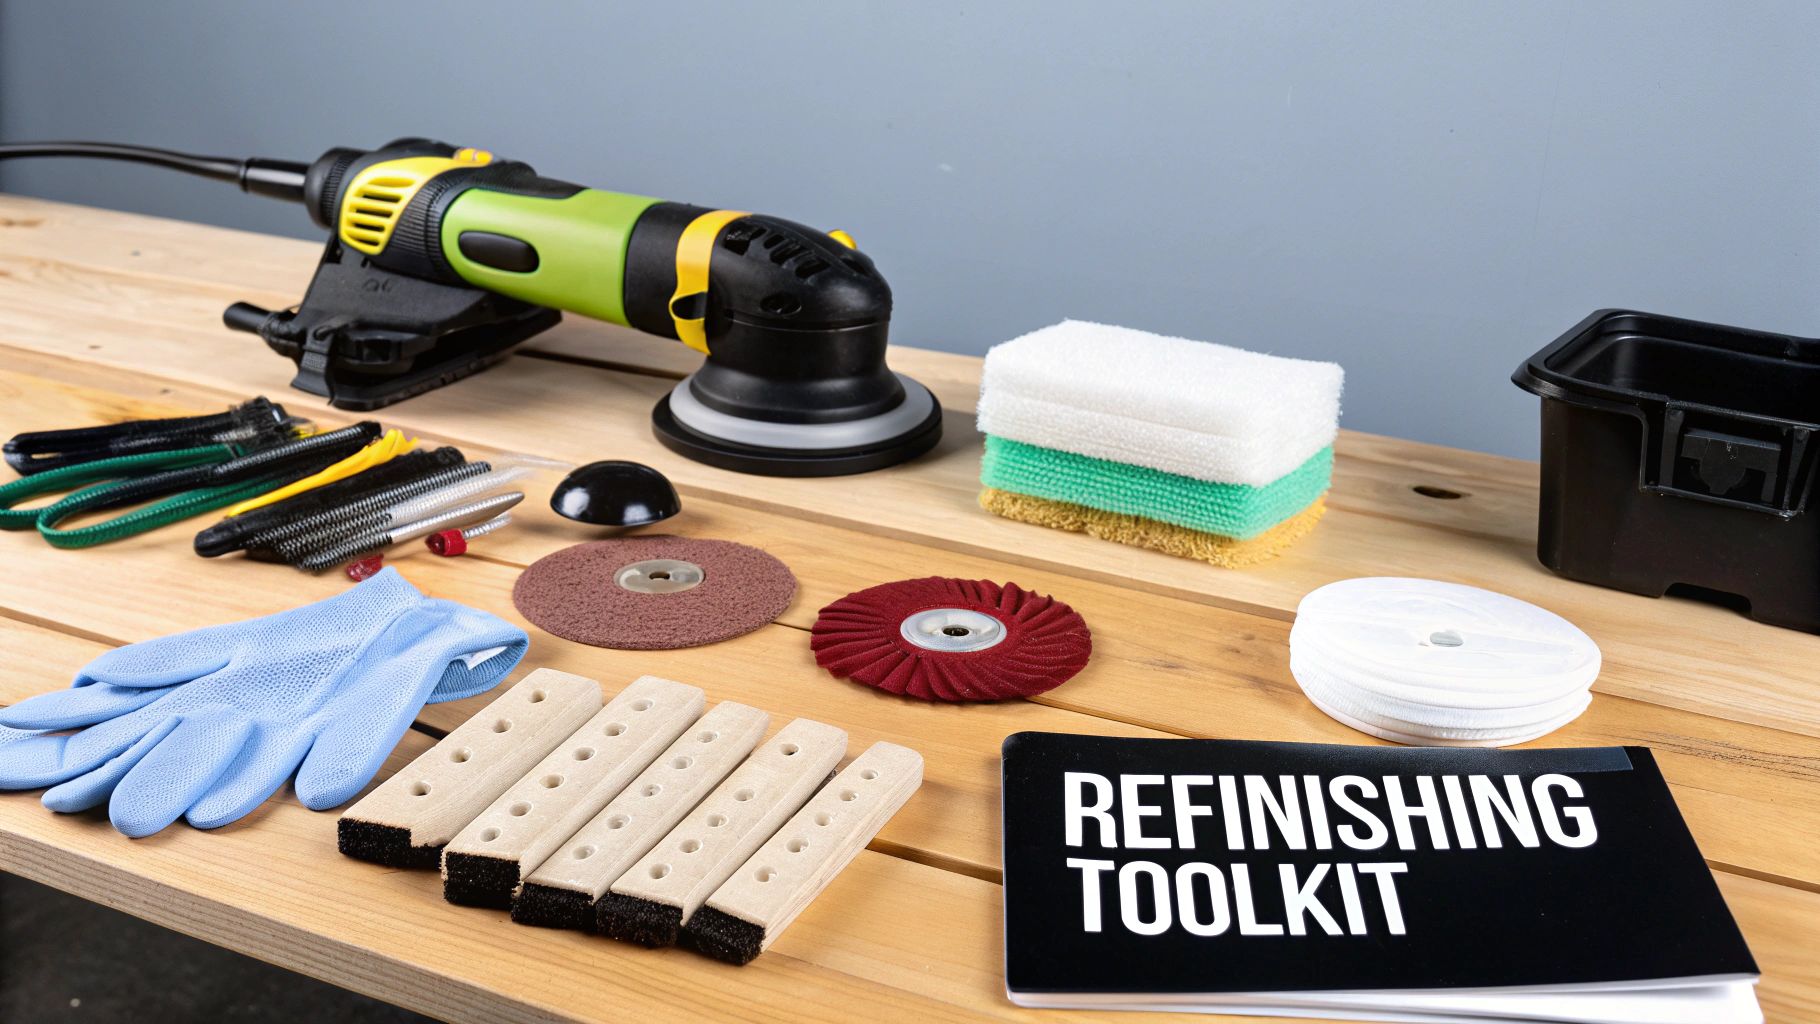
A professional-looking finish doesn't just happen by magic. It's the direct result of having the right tools on hand before you even start. Trust me, nothing kills your momentum faster than a mid-project run to the hardware store for something you forgot.
Think of this list as more than just a shopping list; it’s your game plan. Knowing why you need a certain grit of sandpaper or when to grab a foam roller instead of a brush is what separates a decent DIY job from a truly flawless finish.
Essential Toolkit for Cabinet Refinishing
Here’s a breakdown of everything you'll need, split up by the different stages of the project. Getting organized now will save you a ton of headaches later.
| Category | Essential Item | Pro Tip for Selection |
|---|---|---|
| Safety First | Safety Goggles & Respirator Mask | Don't skimp here. Get a respirator rated for fumes and fine dust, not just a basic paper mask. Your lungs will thank you. |
| Safety First | Chemical-Resistant Gloves | Nitrile or neoprene gloves are your best friends when working with strippers and oil-based products. |
| Preparation | Drop Cloths & Painter's Tape | Canvas drop cloths are more durable and less slippery than plastic, but plastic is great for protecting countertops. |
| Preparation | Degreasing Cleaner (like TSP) | Kitchen cabinets are covered in years of grease, even if you can't see it. This step is non-negotiable for good adhesion. |
| Stripping & Sanding | Power Drill or Screwdriver | For removing all that hardware. Keep labeled baggies for each door's screws—it's a lifesaver during reassembly. |
| Stripping & Sanding | Random Orbital Sander | This tool will save you hours of manual labor on flat surfaces. It’s a worthwhile investment for a project this size. |
| Stripping & Sanding | Sanding Sponges/Blocks | Absolutely essential for getting into those detailed profiles and corners where a power sander can’t reach. |
| Stripping & Sanding | Assorted Sandpaper (80, 120, 220 grits) | Start with a lower grit (80) to remove old finish, move to 120 for smoothing, and finish with 220 for a silky-smooth pre-paint surface. |
| Application | High-Quality Angled Brushes | A good brush makes all the difference for cutting in edges and painting detailed areas without leaving bristles behind. |
| Application | High-Density Foam Rollers | Perfect for getting a smooth, streak-free finish on flat door panels and cabinet frames. |
| Finishes | Primer, Paint/Stain, Top Coat | Always use a high-quality primer designed for adhesion. It's the foundation of a durable finish. |
Having these items ready to go means you can focus on the work itself, creating a smooth and efficient workflow from start to finish.
A Closer Look at Application Tools
Your choice of applicators has a huge impact on the final texture and quality of your finish. For that classic, hand-painted character, nothing beats a good angled brush for getting into corners and navigating detailed trim. When you move to the larger, flat areas, switch over to a high-density foam roller to lay down a beautifully smooth coat without any brush marks.
If you're aiming for that ultra-sleek, factory-like finish, a paint sprayer is the way to go. They take a bit of practice to master, but the results can be stunning. If you're curious about heading in that direction, this guide on Finding the Best Airless Paint Sprayer is a great resource to see if it’s the right fit for your project.
Finally, let's talk finishes. Your primer, paint or stain, and protective top coat are the stars of the show. It's worth noting that the demand for eco-friendly cabinet finishes has been growing, with a 34% increase in consumer preference for brands using sustainable methods. Look for low-VOC (volatile organic compound) paints and stains—they’re much better for your indoor air quality and deliver fantastic results.
Laying the Groundwork: Cabinet Prep for a Flawless Finish
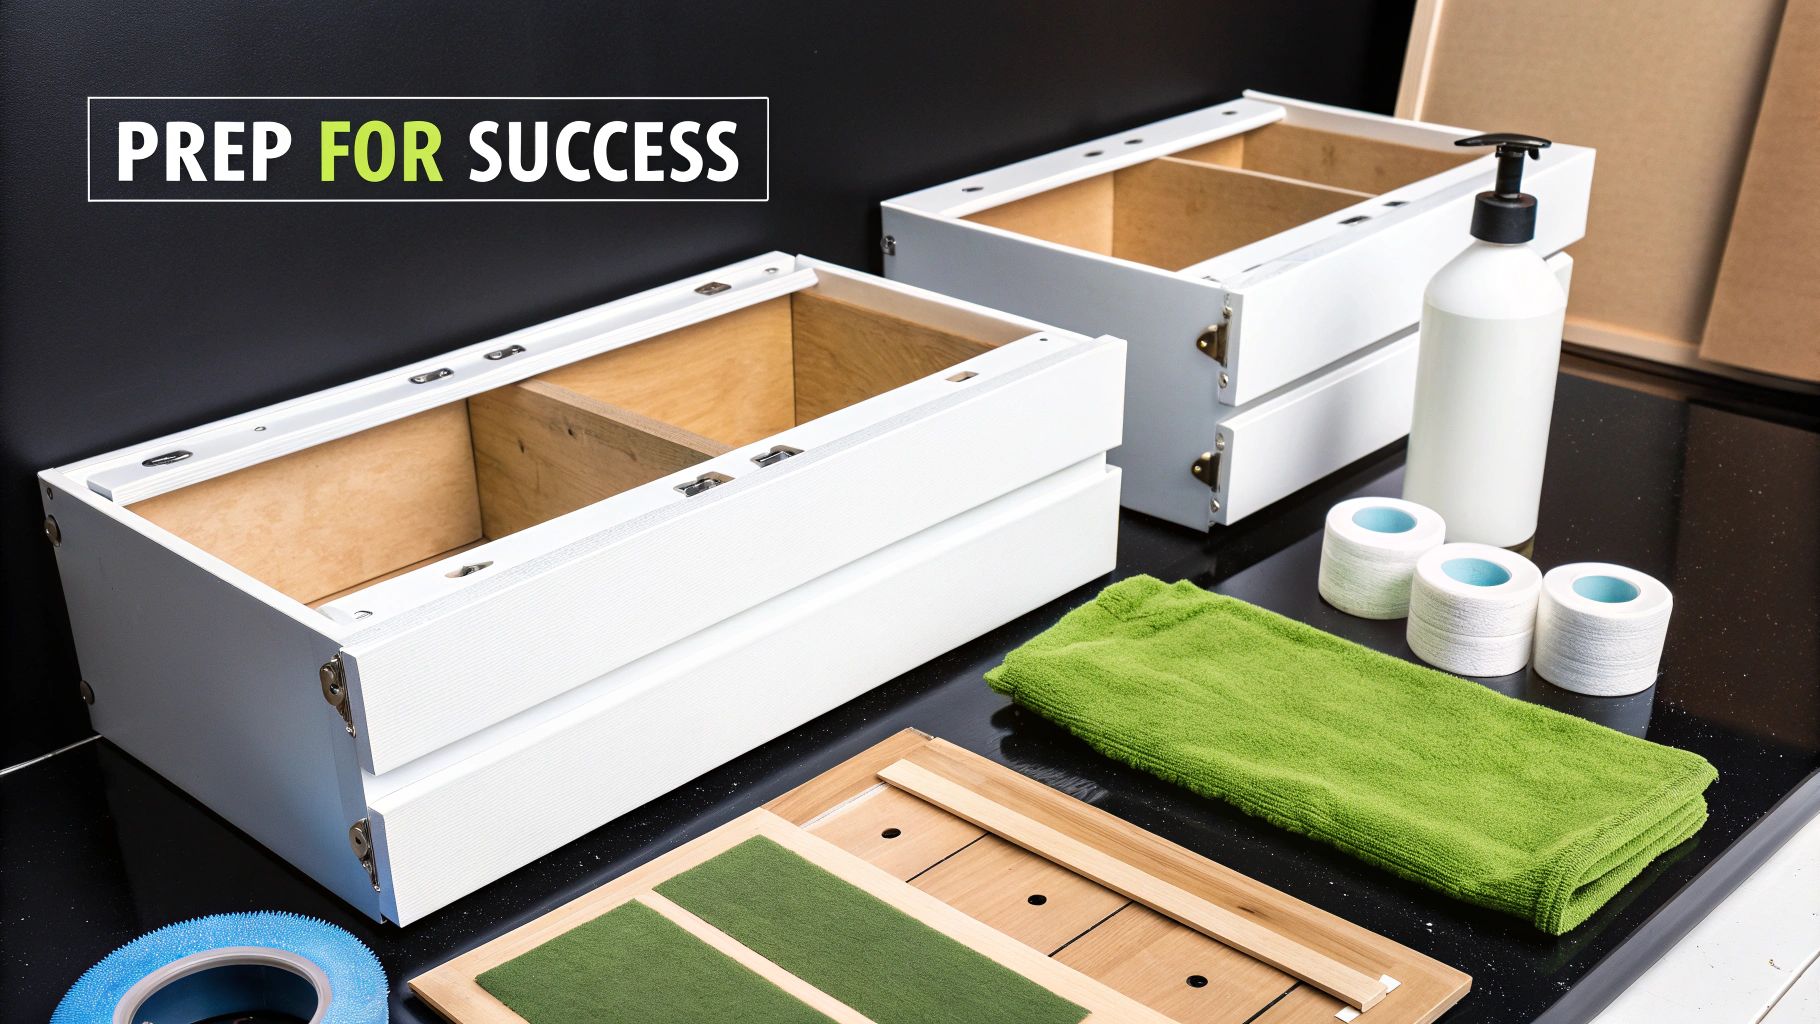
Let’s talk about the single most important stage of your cabinet refinishing project. I've seen it time and time again: people get excited and rush through the prep work. Honestly, it's the biggest mistake you can make. A poor foundation guarantees a disappointing result, no matter how expensive your paint or stain is.
Think of this as setting the stage for a finish that not only looks incredible but also holds up for years. The goal here is simple—create the perfect canvas. That means taking everything apart methodically, deep cleaning every surface to cut through years of grime, and setting yourself up for a painless reassembly down the road.
The Art of Systematic Disassembly
Before you can even think about cleaning, you have to take your cabinets apart. This might feel a little tedious, but trust me, a system now will save you from a massive headache when it’s time to put it all back together.
Start by taking off all the cabinet doors and drawer fronts. As you remove each piece, label it immediately. A simple roll of painter's tape and a permanent marker is your best friend here.
- Doors: Label the door and the inside of the cabinet box it belongs to with a matching number or letter (e.g., "U1" for Upper 1).
- Drawers: Put a corresponding label on the drawer front and inside the drawer box.
- Hardware: Place the hinges, screws, and knobs for each door into a small, labeled baggie. Then, tape that bag to the inside of the cabinet it came from. You’ll thank yourself later.
A can't-fail labeling system is your secret weapon. Taking an extra 30 minutes to label everything meticulously will save you hours of frustrating guesswork during reassembly.
The All-Important Deep Clean
Kitchen cabinets are magnets for grease, food splatters, and just general kitchen grime. Even if they look clean on the surface, there's likely an invisible film that will prevent your new finish from adhering properly. This is what leads to peeling and chipping.
Your mission is to get these surfaces surgically clean. For this, you need a powerful degreasing agent. Trisodium Phosphate (TSP) or a good TSP substitute is fantastic for cutting through that tough, built-up gunk. Always wear gloves and eye protection when working with these types of cleaners.
Scrub every single surface you plan to refinish—the cabinet boxes, both sides of the doors, and all the drawer fronts. Pay extra attention to the areas around the stove and handles.
Tackling Grime Hotspots
Certain spots in a kitchen are just magnets for grime. The cabinets directly above your stove and microwave are usually the worst offenders, often coated in a stubborn, sticky layer of aerosolized cooking oil. These areas are going to need some extra muscle.
You may need to apply your degreaser and let it sit for a few minutes to really break down the heavy buildup before you start scrubbing with a non-abrasive pad. For really tough spots, a second round might be necessary. The goal is a surface that feels completely clean and smooth, with absolutely no sticky or greasy spots left behind. While the context is a bit different, this guide on how to clean teak furniture for a lasting finish really drives home the importance of a thorough cleaning for any wood project.
Once everything is sparkling clean, give all the surfaces a final wipe-down with a clean, damp cloth to remove any leftover cleaner residue. Let everything dry completely—and I mean completely—before you even think about sanding or stripping. This perfectly prepped surface is your starting point for a beautiful, long-lasting finish. For an even deeper dive, check out our complete guide on how to prep cabinets for painting.
Stripping and Sanding Your Way to a Perfect Surface
Alright, with all the prep work done, it's time to roll up your sleeves for the most hands-on part of the job. This is where we get rid of that old finish to create a clean slate, making sure your new paint or stain goes on smooth and lasts for years. The two main ways to get down to bare wood are with chemical strippers or good old-fashioned sanding.
Deciding which route to take isn’t just a whim—it's a strategic move based on your cabinet’s style and the type of finish you're dealing with. Nailing this choice will save you a world of time and elbow grease down the line.
Chemical Strippers vs. Sanding: Making the Right Call
So, which method is the best fit for your project? Let's break it down.
Chemical strippers are your secret weapon for anything with intricate details. If your cabinet doors have deep routered edges, ornate carvings, or complex profiles, trying to get a power sander into every nook and cranny is a fool's errand. A thick, gel-based stripper is perfect here; it clings to those vertical and detailed surfaces and dissolves the old finish so you don’t have to sand every single curve by hand.
On the other hand, sanding is the undisputed champ for big, flat surfaces. For simple shaker-style doors or any flat-panel cabinets, a random orbital sander is an absolute workhorse. It’ll strip an old finish much faster and with way less mess than chemicals. Sanding is also the go-to if you're just looking to scuff up the existing surface for a new coat of paint, rather than taking it all the way down to the wood.
Pro Tip: Don't be afraid to use a hybrid approach—it’s often the most efficient way to go. Use a chemical stripper on the detailed profiles and edges of your doors, then fire up the power sander for the large, flat center panels. You get the best of both worlds.
How to Use Chemical Strippers Like a Pro
When you’re working with chemical strippers, safety is non-negotiable. Always work in a space with great ventilation—your driveway or a garage with the doors wide open is perfect. Make sure you're geared up with chemical-resistant gloves, safety goggles, and a respirator rated for chemical fumes.
Here’s the process:
- Apply It: Use a cheap, disposable paintbrush to lay on a thick, even coat of a gel stripper. Don't brush it back and forth like you're painting. The goal is to apply a heavy layer in one direction and let the chemicals do the heavy lifting.
- Let It Work: Give the stripper time to work its magic, usually 15 to 30 minutes, depending on the product’s instructions. You'll literally see the old finish start to bubble and lift right off the wood.
- Scrape It Off: Grab a plastic putty knife or scraper and gently peel away the now-softened finish. For those detailed spots, an old toothbrush or a soft brass wire brush works great to scrub out the gunk without gouging the wood.
- Clean and Neutralize: This last step is crucial. After scraping, wipe down the surface with a rag soaked in mineral spirits or whatever neutralizer the product recommends. This stops the chemical reaction and gets the wood ready for its new finish.
This will remove the vast majority of the old varnish or paint, leaving you with a surface that just needs a quick, light sanding to be absolutely perfect.
The Art of Sanding: A Guide to Grits
Sanding is more than just grinding away at wood; it’s a systematic process of using progressively finer grits to get a flawlessly smooth surface. Think of sandpaper grits as a scale of aggressiveness: the lower the number, the coarser the grit.
Here’s the progression you’ll want to follow:
- 80-Grit (Coarse): This is your heavy hitter. Use it for stripping stubborn old paint or varnish and for leveling out any minor dings in the wood. It will leave a pretty rough surface behind.
- 120-Grit (Medium): Next up is 120-grit. This will smooth out the coarse scratches left by the 80-grit and is also a good starting point if the original finish on your cabinets is already pretty thin.
- 220-Grit (Fine): This is your finishing touch. A final pass with 220-grit sandpaper creates that silky-smooth surface that’s ideal for stain to absorb evenly or for primer to grab onto tightly.
When you’re using a random orbital sander, keep it moving in overlapping passes to avoid creating swirl marks or uneven spots. For hand-sanding those detailed areas, a sanding sponge that can conform to curves is a lifesaver. And always, always sand with the direction of the wood grain. Sanding against it creates ugly cross-grain scratches that will stick out like a sore thumb under a new coat of stain.
Once you’re done with your final sanding pass, run your hand over the surface—it should feel incredibly smooth. Now for the final, critical step: get rid of every last speck of dust. A vacuum with a brush attachment followed by a good wipe-down with a tack cloth will leave your surface pristine and ready for its transformation.
Getting a Flawless Stain or Paint Finish
Okay, you've survived the prep work. The dust has settled, and now it's time for the part where all that effort pays off. This is where your cabinets really come to life, whether you're going for a rich stain that makes the wood grain pop or a clean, modern coat of paint. How you apply your finish is what separates a decent DIY job from one that looks like it was done by a pro.
The first big choice you'll have to make is what product to use. The old-school debate of oil-based versus water-based is still going strong, and honestly, both have their place.
Oil-Based vs. Water-Based Products
For years, oil-based products (think traditional alkyd paints) were the gold standard for cabinets, and for good reason. They are incredibly durable and level out beautifully as they dry, giving you a tough, almost glass-like surface. That slow dry time means you have more wiggle room to fix brush strokes. The trade-offs? The fumes are intense, you’ll need mineral spirits for cleanup, and they can yellow a bit over time—something to keep in mind for white or light-colored cabinets.
On the other hand, water-based products like acrylics and latex paints have improved dramatically. Their biggest wins are the low odor and ridiculously easy cleanup with just soap and water. Modern cabinet enamels offer fantastic durability, though maybe not quite the rock-hard finish of an old-school oil paint. The fast dry time is both a blessing and a curse; you can recoat faster, but you also have to work quickly to keep a wet edge and avoid lap marks.
If your kitchen is a high-traffic zone with kids and pets, the sheer toughness of an oil-based finish is hard to argue with. But if you value your air quality and want to get the job done faster, a premium water-based cabinet paint will give you beautiful, long-lasting results.
Nailing Your Application Technique
The best paint in the world won't save you if you use a cheap brush. Your tools and technique are every bit as important as the finish itself. Don't sabotage all that prep work with a sloppy application! For a truly smooth finish, I always recommend a combination of a great brush and a mini roller.
- A Solid Angled Brush: Grab a 2- to 2.5-inch angled brush for all the detailed spots—cutting in around the edges, getting into corners, and handling any raised profiles on your cabinet doors. A quality brush holds paint better and lays it down smoothly.
- A Mini Foam Roller: For the big, flat areas like the door panels and cabinet face frames, a small high-density foam roller is your secret weapon. It applies a thin, even coat without leaving behind that fuzzy texture you'd get from a regular nap roller.
The golden rule here is to always maintain a wet edge. This just means you should always be painting from a wet section into a dry one, overlapping your strokes before the paint starts to set. It’s the key to avoiding streaks. Work in smaller, manageable sections so you're not racing against the clock. For a much deeper dive, check out our guide on how to paint kitchen cabinets.
This simple flow chart really breaks down the foundation of a great finish—it all starts with the prep.
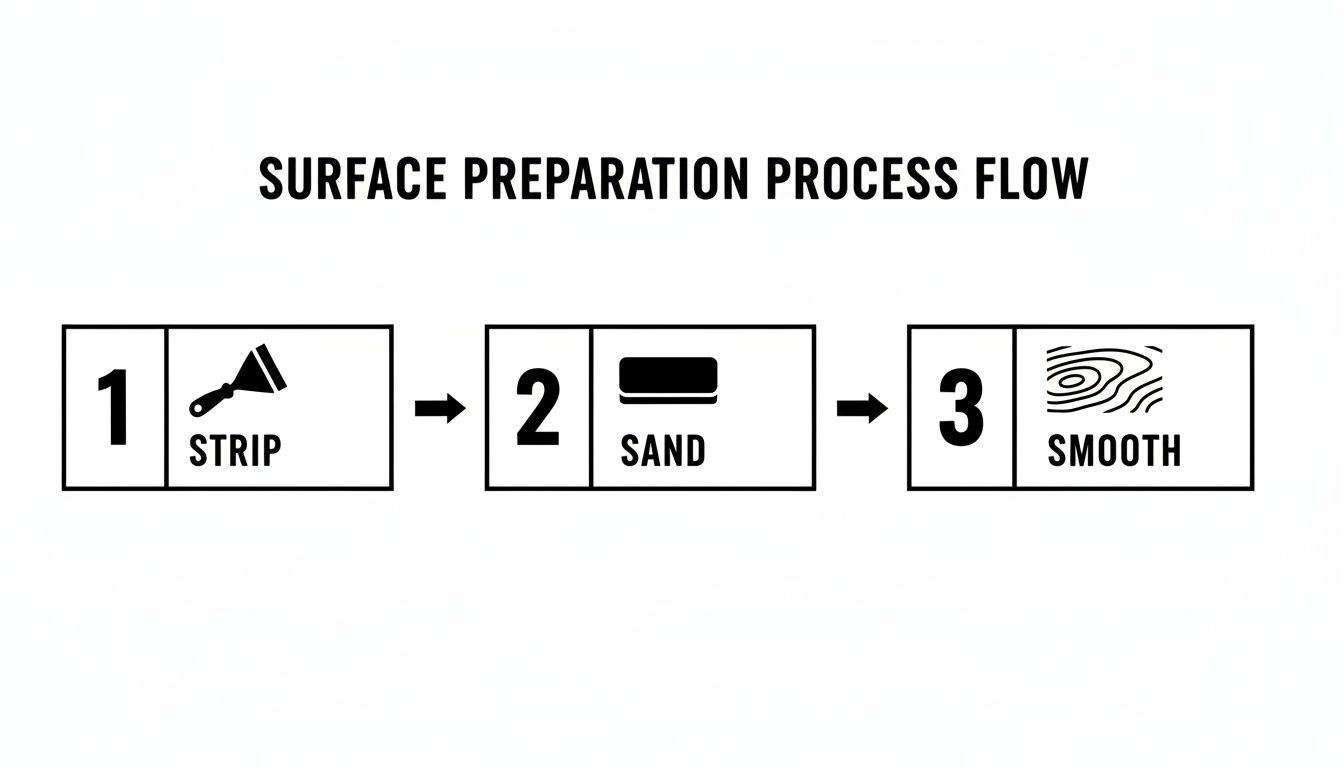
Each of these steps—stripping, sanding, and smoothing—is non-negotiable if you're aiming for that professional look.
Tips for Applying Wood Stain
Staining is a whole different ballgame than painting. You’re not trying to cover the wood; you're trying to enhance it. Once you’ve sanded your cabinets down to bare wood, don't skip the pre-stain wood conditioner. This is especially crucial for porous woods like pine or birch that tend to get blotchy. The conditioner helps the wood absorb the stain evenly.
When it's time to stain, use a clean rag or a foam brush to apply a generous coat, always moving with the grain. Let it soak in for the time listed on the can—usually somewhere between 5 and 15 minutes. The longer it sits, the darker the color will get.
Now for the most important part: wiping it off. Grab a clean, dry rag and wipe away all the excess stain, again, moving with the grain. This step is what defines the final color and lets that beautiful wood grain shine through. If it's not dark enough, no problem. Just let the first coat dry completely and repeat the process.
Applying a Durable Top Coat to Protect Your Work
You’ve put in all that time sanding, staining, and painting, and your cabinets finally look incredible. Now comes the last—and most critical—step to make sure all that hard work lasts. A high-quality top coat is the invisible shield that protects your newly refinished cabinets from the daily grind of moisture, grease, and general wear and tear that’s inevitable in a busy kitchen.
Skipping this step would be a huge mistake. It’s like buying a brand-new car but turning down the clear coat—it might look great at first, but it won’t be long before the elements start to win. This final layer is what gives your cabinets long-term durability and that smooth, professional feel you’ve been working toward.
Choosing Your Protective Top Coat
Diving into the world of sealants can feel a little overwhelming, but for kitchen cabinets, your choice usually boils down to polyurethane, lacquer, or varnish. Each one brings something different to the table in terms of durability, appearance, and how easy it is to work with.
To make it simple, we've broken down the most common cabinet sealants to help you decide what's best for your project based on how it looks, how tough it is, and how you apply it.
| Top Coat Type | Key Benefit | Best For | Consideration |
|---|---|---|---|
| Oil-Based Polyurethane | Extreme durability and scratch resistance. | High-traffic kitchens needing maximum protection. | Can add a slight amber tint over time, which may alter light paint colors. |
| Water-Based Polyurethane | Dries crystal clear and has low odor. | White or light-colored painted cabinets where color purity is key. | Typically requires more coats than its oil-based counterpart for similar durability. |
| Varnish | Excellent moisture resistance. | Cabinets in high-humidity areas, like near a sink or dishwasher. | Can be more challenging to apply smoothly and may require thinning. |
| Lacquer | Dries exceptionally fast and provides a hard finish. | Professionals or experienced DIYers aiming for a factory-smooth finish. | Requires a sprayer for best results and emits strong fumes during application. |
For most DIY projects, water-based polyurethane is the way to go. It offers the best mix of protection, clarity, and user-friendliness, making it an excellent choice if you're just learning how to refinish wood cabinets.
The Art of a Flawless Application
Applying a top coat is all about patience and precision. Your goal here is to build up several thin, even layers—not one thick, goopy one that will never cure properly.
First things first, make sure your surface is perfectly clean and free of any dust. Grab a high-quality synthetic brush and apply your first thin coat, always brushing in the same direction as the wood grain. The trick is to work methodically and keep a wet edge to prevent ugly lap marks from forming.
Let each coat dry completely—this usually takes 2-4 hours for water-based products. Then, lightly sand the entire surface with 220-grit sandpaper. This is a crucial step that knocks down any tiny imperfections and gives the next coat a slightly textured surface to grab onto, which is the secret to an ultra-smooth final product.
After sanding, wipe away every speck of dust with a tack cloth before you even think about applying the next coat. You’ll want to repeat this process for at least three coats to build up a durable, professional-grade finish that will hold up for years.
A Few Common Questions We Hear All the Time
Even with a detailed guide in hand, you’re bound to have questions. It’s only natural when you’re taking on a big project. Here are some quick answers to the things homeowners ask us most often when they’re learning how to refinish their wood cabinets.
How Long Does This Actually Take?
For a standard kitchen, you should probably block off 4-7 days for a DIY job. I know that sounds like a lot, but this timeline gives you breathing room for all the steps: taking everything apart, a thorough cleaning, the intense sanding or stripping phase, and then the actual staining or painting.
The real time-eaters are the prep work and waiting for multiple coats of sealer to fully cure before you can put it all back together. Don't rush the drying times—it’s the secret to a finish that lasts.
Can I Do This on My Laminate or Veneer Cabinets?
Unfortunately, no. This refinishing process is strictly for solid wood cabinets. Laminate and veneer are made with a very thin top layer that you can easily sand right through or damage beyond repair.
Those materials need a completely different approach, usually involving special bonding primers and paints made specifically for slick, non-porous surfaces. No matter what, always test any product on a small, hidden spot first before committing to the whole kitchen.
If your cabinets have a lot of damage, intricate details that would be a nightmare to sand, or if you’re just after that flawless, spray-booth quality finish, it might be time to call in a professional. A pro can deliver superior results when you’re short on time, space, or the right tools.
When a DIY project starts to feel like too much, or you simply demand a perfect, durable finish, it's best to trust the experts. Sinclair Cabinetry inc has been crafting and refinishing bespoke cabinetry for over 35 years. Contact us for a professional consultation today!