
Ready to finally silence those slamming drawers for good? Upgrading to soft-close drawer slides is one of the most satisfying DIY projects you can tackle. It’s a straightforward swap: you replace your old, noisy hardware with a modern mechanism that gently and quietly pulls the drawer shut on its own.
This single improvement does more than just quiet your home. It adds a touch of daily convenience and actively protects your cabinetry from years of wear and tear.
Why Upgrade to Soft Close Drawer Slides?
We all know that jarring thud of a slammed drawer. While it might seem like a minor annoyance, it’s a constant reminder of outdated hardware. Moving to soft-close slides is about more than just peace and quiet; it’s a functional upgrade that brings a high-end feel to your kitchen, bathroom, or bedroom.
The Everyday Benefits
Think about your morning routine—rummaging for a coffee mug or grabbing utensils. Soft-close slides completely change these small, everyday interactions. No more accidentally slamming a drawer shut or worrying about waking up the rest of the house.
The controlled, gentle closing motion also protects whatever is inside your drawers, preventing items from shifting around and getting damaged. It’s a small change that brings a noticeable sense of calm and order to your daily life.
Protecting Your Investment
Beyond the quiet convenience, soft-close hardware plays a huge role in preserving your cabinetry. Every time a standard drawer slams shut, the impact puts stress on the drawer box, the cabinet frame, and the hardware itself. Over the years, this repeated force leads to misalignment, loosening screws, and premature wear.
Upgrading to soft-close slides is a practical enhancement that directly protects the longevity and structural integrity of your cabinets, making it a smart long-term investment.
It's no surprise that the demand for these solutions is growing. The global drawer slides market was valued at USD 6.21 billion in 2023 and is projected to climb to USD 10.77 billion by 2030, which shows a clear trend toward higher-quality home hardware.
Considering their impact on daily convenience and home value, soft-close slides are a wise investment during any home improvement, especially an expert kitchen remodeling. This choice fits right in with other hardware decisions, and you can dive deeper by checking out our guide on the best hardware for kitchen cabinets. This simple project doesn’t just boost your home’s feel—it adds real, tangible value.
Choosing the Right Slides for Your Drawers

Before you can even think about installation, you’ve got to pick the right hardware. It’s the first—and most critical—decision you’ll make. It’s easy to assume all drawer slides are created equal, but the subtle differences in type, length, and capacity can make or break your project.
Getting this choice right from the start saves a ton of frustration down the line and guarantees your drawers will glide perfectly for years.
The two main players you’ll encounter are side-mount and undermount slides. Each has its own set of perks and requires a slightly different approach when it comes to installation.
Side-Mount vs. Undermount Soft Close Slides
So, what's the real difference between side-mount and undermount slides? It really comes down to aesthetics, installation requirements, and your budget. This quick table breaks down the key distinctions to help you figure out which is the right fit for your project.
| Feature | Side-Mount Slides | Undermount Slides |
|---|---|---|
| Visibility | Visible on the sides of the drawer when open | Completely hidden beneath the drawer for a clean look |
| Drawer Width | Requires side clearance, slightly reducing drawer width | Allows for maximum drawer width as they don't use side space |
| Installation | Generally more straightforward and forgiving for DIYers | Requires precise measurements and can be more complex |
| Cost | Typically the more budget-friendly option | Often a higher-end, more expensive choice |
| Aesthetics | Utilitarian look, best for functional spaces | Sleek, modern appearance that showcases cabinetry |
At the end of the day, side-mounts are the workhorses—strong, reliable, and easier on the wallet. Undermounts are all about that high-end, seamless look that lets your custom cabinet work really shine. If you want to dive deeper, our guide on cabinet drawer slide types covers all the details you’ll need.
What used to be a premium, luxury feature is now pretty much standard in modern cabinetry. You can thank manufacturers like Blum, Hettich, and Häfele for that—they control about 35% of the global market and have pushed the innovations that make these systems so accessible.
Getting Your Measurements Right
This part is non-negotiable. I can’t stress this enough: measure twice, cut once. An error of just an eighth of an inch can be the difference between a smooth-gliding drawer and one that sticks, scrapes, or closes unevenly.
Here's how to get it right every time:
- Slide Length: Measure the depth of your drawer box itself, from the very front to the back. Your slides should match this measurement exactly. If you can't find an exact match, go with the next size down. For a 21-inch deep drawer, you need 21-inch slides. Never, ever buy slides that are longer than your drawer.
- Cabinet Depth: Now measure the inside of the cabinet, from the back of the front face frame all the way to the back wall. This just confirms you have enough physical space for the slide mechanism to operate without hitting anything.
- Drawer Clearance: This is where the slide type matters. For side-mount slides, you need to know the gap between the drawer side and the cabinet opening. Undermount slides, on the other hand, have specific clearance requirements underneath the drawer. Always, always check the manufacturer’s spec sheet for these numbers.
Don't Forget Weight Ratings
Finally, think about what you're actually going to put in these drawers. Most standard slides are rated for 75-100 pounds, which is plenty for everyday stuff like clothes, utensils, or bathroom supplies.
But if you're building a kitchen drawer that's going to hold heavy pots, pans, or a stand mixer, you absolutely need to upgrade to heavy-duty slides. These are typically rated for 150 pounds or more. Trying to overload a standard slide is a recipe for disaster—it will sag, bind, and eventually fail. Choosing the right weight rating from the get-go is key to long-term durability.
Essential Tools and Workspace Preparation
A smooth installation for your new soft-close slides starts way before you drive the first screw. Getting your tools and workspace ready is the foundation for a professional-quality job, and it’s the best way to sidestep the little frustrations that turn a simple upgrade into a weekend-long headache.
Think of it this way: spending a few minutes now to get organized saves you from constantly interrupting your workflow. It's the difference between a project that feels under control and one that feels completely chaotic.
Gathering Your Must-Have Tools
Every project has its quirks, but there's a core set of tools you’ll absolutely need to get this done right. Don't just guess—lay everything out so it's ready to grab.
Here’s a quick checklist of the basics you can't work without, plus a couple of game-changers:
- Tape Measure: This is non-negotiable. Accuracy is everything.
- Drill with Phillips Head Bit: You'll be driving a lot of screws. A self-centering drill bit is also a fantastic addition for getting perfectly centered pilot holes.
- Level: Absolutely crucial. Your slides have to be perfectly horizontal, because even a tiny angle will cause the drawer to bind or drag.
- Pencil or Marker: For making clear, visible marks for your guidelines and drill points.
- Combination Square: This is your secret weapon. It’s perfect for making sure your slides are set back the exact same distance from the cabinet face every time.
One of the best investments a DIYer can make is a drawer slide jig. Seriously. It takes all the guesswork out of alignment by holding the slide in the perfect spot while you drill. It’s like having an extra pair of expert hands.
Setting Up Your Workspace for Success
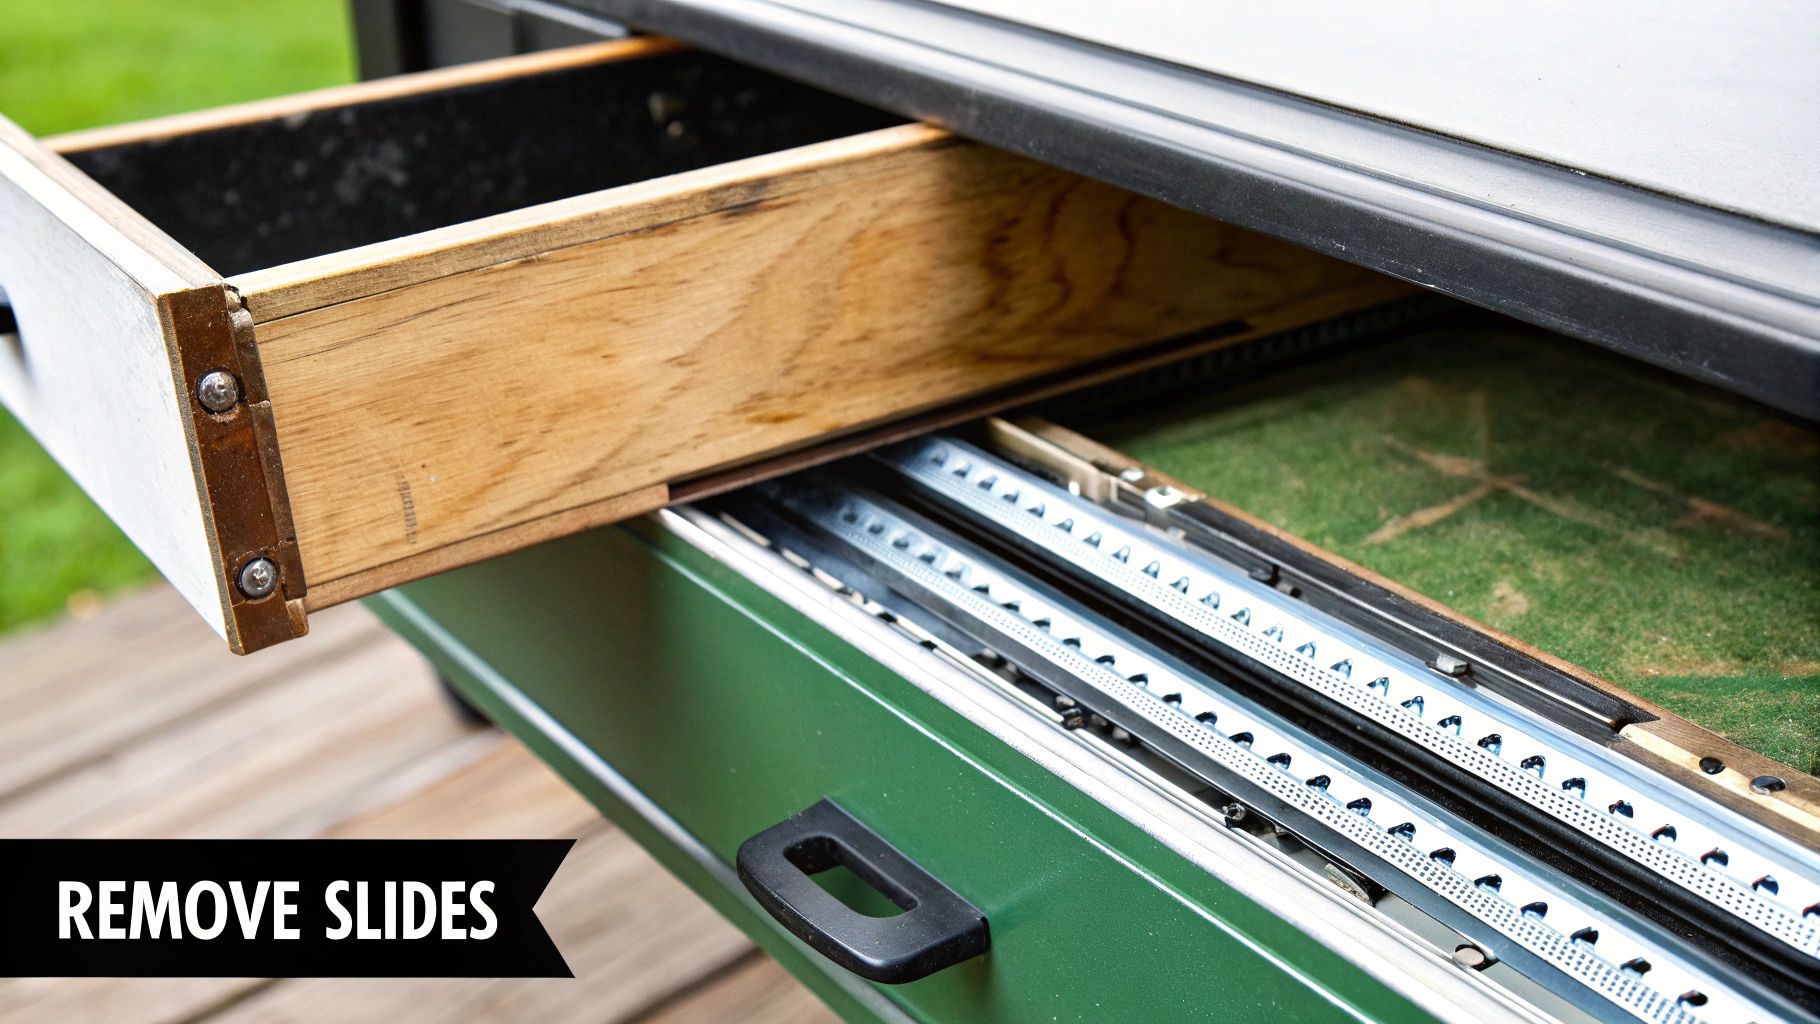
Once your tools are lined up, take a look at your work area. A cluttered, messy space is just asking for mistakes. Your first move is to carefully pull out the old drawers and remove all the old hardware. Go slow here to avoid scratching or chipping your cabinet frames.
With the drawers out, you’ve got a blank canvas. This is the perfect time to give the inside of your cabinets a good cleaning. Dust, grime, and wood shavings can get into the ball bearings of your new slides and mess with their smooth operation, so a quick wipe-down is a smart move.
Organizing for a Smooth Workflow
Now, let's get your new hardware organized. Separate the slides for each drawer and keep the matching screws with them. A lot of kits include different screw sizes for the cabinet member and the drawer member—mixing them up will cause major headaches.
Set up a dedicated spot to work on the drawers themselves, like a workbench or even a large piece of flattened cardboard on the floor. This protects your flooring and keeps all your small parts from disappearing. A well-organized setup is a key part of any successful project, a principle we cover in more detail in our complete cabinet installation guide. By creating an efficient environment now, you're paving the way for a flawless installation.
A Practical Guide to Mounting Your New Slides
Alright, your workspace is clean, your tools are laid out, and you're ready to tackle the main event: mounting your new hardware. This is where a little bit of precision goes a long way, turning that box of metal parts into a drawer that glides like a dream. We'll walk through this step-by-step, focusing on getting the alignment perfect from the start.
First things first, let's make life easier. Most side-mount and undermount slides come in two main pieces: the cabinet member (which, you guessed it, attaches to the cabinet) and the drawer member (which mounts to the drawer box). Look for a small release lever or tab on the slide—a quick press should be all it takes to separate them. Trying to install the whole assembly at once is just asking for a headache, so separating them is the way to go.
This graphic breaks down the basic flow for a successful install. Notice how much of the work is about measuring and marking before you ever touch a screw.
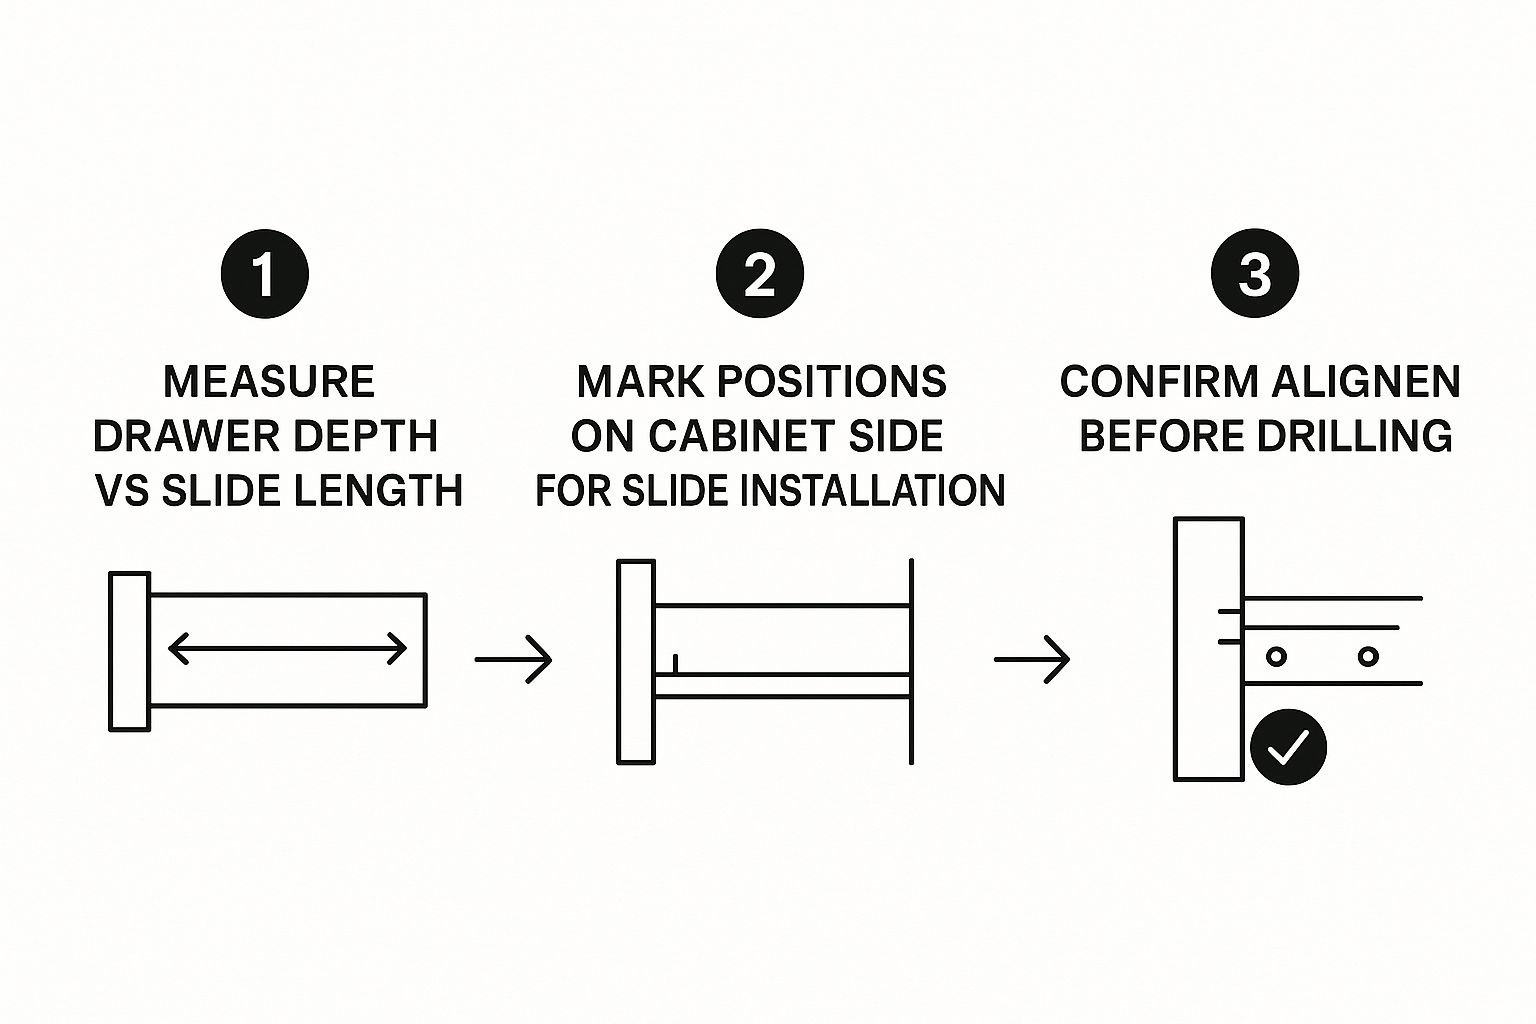
Getting this prep work right is what separates a smooth project from a frustrating one. It helps you catch any potential mistakes before they're screwed into place.
Positioning the Cabinet Members
Your first real task is to attach the cabinet members inside the cabinet. This step is the foundation for the entire installation, so don't rush it. A slide that's even slightly off-level is the #1 reason for a drawer that sticks, rubs, or just refuses to close properly.
Grab your level and combination square. You'll want to draw a perfectly horizontal guideline on the inside of the cabinet wall where the bottom of the slide will rest. Check the manufacturer's instructions for how far to set this line back from the front edge of the cabinet frame—it's typically around 1/8 inch for a standard overlay drawer.
Pro Tip: If you plan on doing more than a few drawers, a drawer slide jig is worth its weight in gold. It holds the slide perfectly steady against your guideline, freeing up your hands to drill pilot holes and drive in the screws. It almost completely removes the risk of the slide slipping at the last second.
Once you’re happy with the placement, drill your pilot holes and secure the cabinet member with the screws that came with the slides. Now, repeat the exact same process on the other side. Double-check that both slides are perfectly level and parallel with each other.
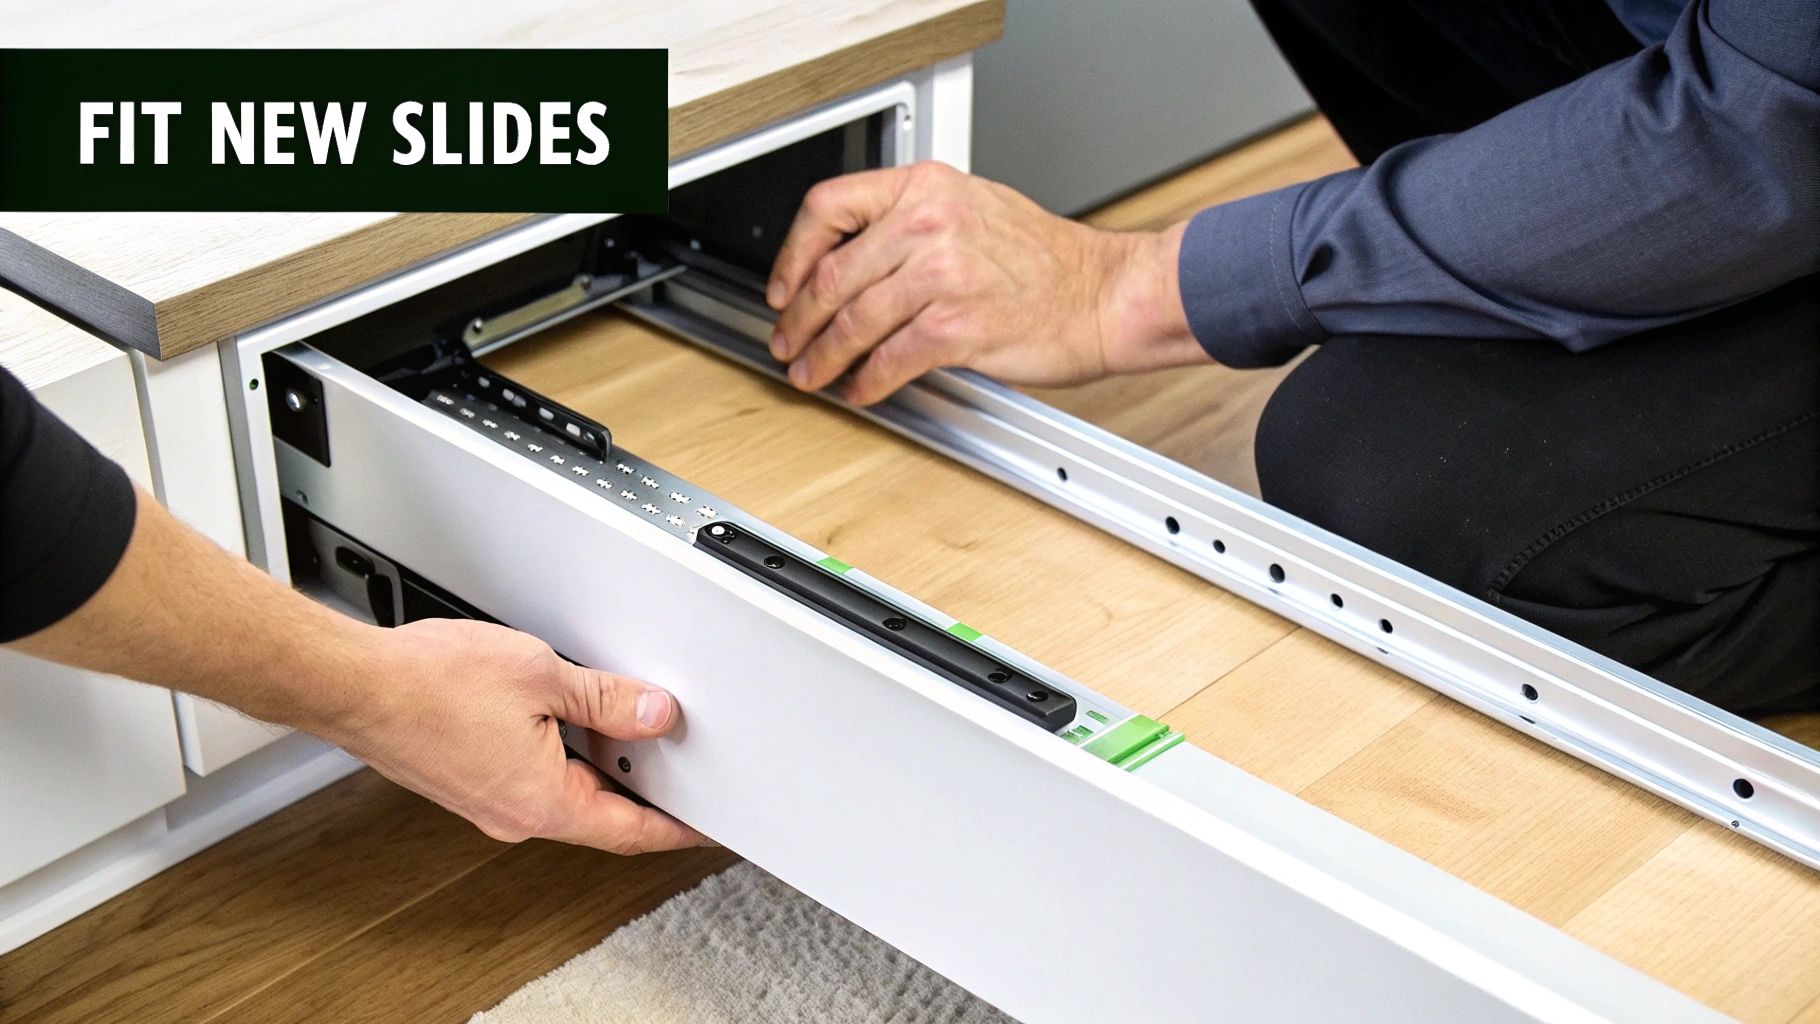
Attaching the Drawer Members
With the cabinet members installed, it's time to work on the drawer box. The process here is pretty similar. You're going to align the drawer member with the bottom edge of the drawer side, making sure it's flush with the front of the drawer box itself (not the drawer face, which usually overhangs a bit).
Again, pull out your level to make sure the slide is perfectly parallel to the bottom of the drawer. If it's crooked, the drawer will sit askew in the cabinet opening. Mark your holes, drill your pilot holes, and screw the drawer member on securely.
The Final Test and Adjustments
This is the moment of truth. Carefully lift the drawer, align the drawer members with the tracks inside the cabinet, and slide it in. You should hear a satisfying click as the locking mechanisms engage.
Now, give it a test run. Pull the drawer open and push it closed a few times. Is the glide smooth? Does that soft-close feature kick in nicely for the last few inches? If so, congratulations, you nailed it!
If something feels a little off—maybe it sticks, rubs, or closes crookedly—don't panic. This is completely normal, and it's what the built-in adjustments are for. Most modern slides have small screws or cams that let you fine-tune the fit:
- Up/Down: This lets you adjust the height, which is crucial for getting the gaps just right between stacked drawers.
- Left/Right: Use this to center the drawer in the opening for even spacing on both sides.
- In/Out: This adjustment fine-tunes how flush the drawer front sits against the cabinet frame.
Making these little tweaks is a standard part of how to install soft close drawer slides. That careful planning and attention to detail are great skills to have. As you get comfortable with DIY home installation projects, you'll find that the same principles of planning and careful execution apply whether you're installing drawers or a new security system.
Troubleshooting Common Installation Hiccups
So you've measured twice, followed every step, but the drawer still isn't gliding like it should. Don't sweat it. This happens to everyone, and it's a totally normal part of learning how to install soft close drawer slides. Think of this final stage as fine-tuning, not a failure.
Nine times out of ten, the culprit is a tiny alignment issue that's surprisingly easy to fix. Whether the drawer is sticking, sitting crooked, or the soft-close mechanism just isn't kicking in, a small tweak is usually all it takes. Let's walk through the most common snags I've run into over the years.
The Drawer Sticks Or Binds
If you feel that tell-tale scraping or resistance as you pull the drawer, it’s almost always a leveling or spacing problem. Even a barely perceptible angle on one of the slides is enough to cause friction.
To diagnose this, pull the drawer completely out and set your level on each of the cabinet members. If one isn't perfectly horizontal, you’ve found your problem. You'll have to loosen the screws, get that slide perfectly level, and then cinch everything back down. While you're at it, grab your tape measure and check the distance between the two cabinet slides at the front and back to make sure they're perfectly parallel.
One of the most common oversights I see is forgetting to account for cabinet face frames. If your slides aren't shimmed out to be flush with the cabinet opening, the drawer box itself is going to bind against the frame every time.
The Soft Close Feature Fails To Engage
This is a classic. The drawer glides smoothly but just won’t pull itself shut for that last couple of inches. More often than not, the solution is simple: the drawer needs just enough momentum for the soft-close mechanism to "catch" and take over.
If a firm push doesn't do the trick, here are a few other things to check:
- Run It Through: Pull the drawer all the way out, then push it all the way in with a solid motion. Sometimes, this is all it takes to properly seat the mechanism in its track.
- Look for Obstructions: Get a flashlight and check inside the slide's track. A stray wood shaving or a screw head that isn't perfectly flush can be enough to block the damper.
- Weight Matters: An extremely light drawer might not have enough mass to activate the mechanism. On the flip side, an overloaded, heavy drawer can overwhelm it.
The Drawer Closes Crooked
A crooked drawer is a dead giveaway that something is out of alignment, but the fix is usually built right into the slides themselves. Most modern soft-close slides have small cams or screws designed specifically for making these micro-adjustments.
Take a close look at the drawer members or, if you have them, the undermount locking devices. You'll find the adjustment points that let you tweak the drawer's final resting position up and down or left and right. It's a game of small, patient changes. Adjust a little, close the drawer, check the gaps, and repeat until it sits perfectly flush.
Common Questions About Soft-Close Slides
Even after you've tightened the last screw, a few questions might still be floating around. It’s totally normal, especially when you’re aiming for that perfect, professional finish. Let's tackle some of the most common things people ask after installing new soft-close slides.
Can I Just Add a Soft-Close Gadget to My Old Slides?
You’ll see aftermarket soft-close adapters out there, and while the idea is tempting, they just don't deliver the same experience. These are usually little plastic dampers that you screw into the cabinet frame to catch the drawer at the last second. Frankly, they often feel clunky and can break the smooth motion you were hoping for.
For a truly seamless and satisfying glide, replacing the entire slide is the only way to go. Integrated soft-close slides are engineered as a complete system, where the slide and the damper work in perfect harmony. It’s the secret to that quiet, effortless close, every single time.
What's the Easiest Mistake to Make During Installation?
Hands down, the single biggest culprit is inaccurate measurements. I’ve seen it countless times—being off by just 1/16 of an inch can lead to a drawer that binds, sits crooked, or completely misses the soft-close mechanism. This is one of those projects where "eyeballing it" will come back to bite you.
Always, and I mean always, double-check your measurements. Use a level to draw your guidelines and make absolutely sure the slides are perfectly parallel.
A simple drawer slide jig is probably the best tool you can buy for this job. It holds the slide in the exact right spot while you drill, taking all the guesswork and human error out of the equation. It's a game-changer for getting perfect alignment.
How Do I Figure Out the Right Weight Rating?
This one is all about thinking ahead—what’s actually going to live in this drawer? Choosing a slide that’s too weak is a recipe for a sagging drawer and, eventually, a failed slide.
Here’s a quick rule of thumb to help you choose:
- Standard Duty (75-100 lbs): This is your go-to for most household drawers. Think clothes, bathroom items, kitchen utensils, and office supplies. For the average drawer, this is plenty.
- Heavy-Duty (150+ lbs): Don’t even think about using standard slides for the heavy stuff. This rating is a must for deep drawers holding pots and pans, tool chests, or filing cabinets.
And don't forget to factor in the weight of the drawer box itself! It’s an easy detail to overlook, but that wood adds up and can be the difference that pushes a standard slide past its limit. Getting the weight rating right from the start means your drawers will glide smoothly for years.
At Sinclair Cabinetry inc, we believe high-quality hardware is the foundation of cabinetry that is both beautiful and built to last. For custom solutions that bring timeless craftsmanship to your home, explore our work at https://sinclaircabinets.com.