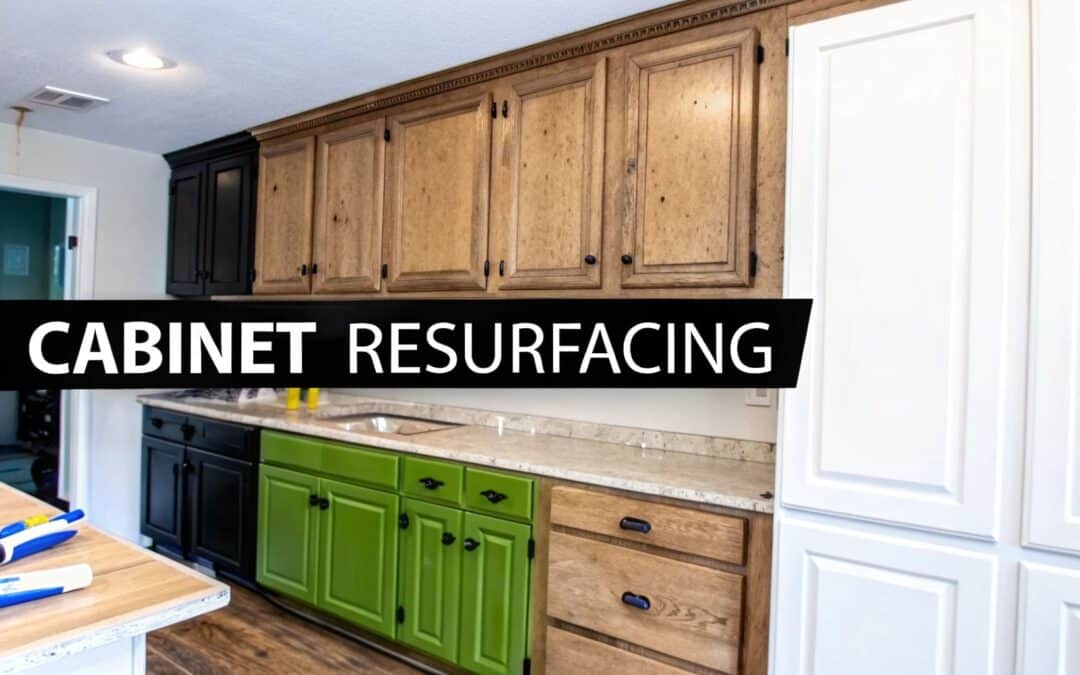
If your kitchen is starting to look a little tired, your first thought might be to grab a sledgehammer and start tearing out the old cabinets. But before you go full-on demo mode, there's a smarter, less chaotic alternative worth considering: kitchen cabinet resurfacing.
This isn't just a quick paint job. Resurfacing involves replacing all your old cabinet doors and drawer fronts with brand-new ones and then applying a matching veneer to the exterior of your cabinet boxes. The result is a kitchen that looks completely new, without the massive expense and disruption of a total remodel. It's a fantastic option for anyone whose cabinets are still in good shape structurally.
Why Cabinet Resurfacing Is a Smart Kitchen Upgrade
Let’s be honest, a full-scale kitchen remodel can be a nightmare. It often means weeks of dust, disruption, and eating takeout. Resurfacing, on the other hand, delivers that dramatic "wow" factor without turning your life upside down. For many homeowners, it’s simply the most practical and savvy choice.
The biggest win here is the cost. You can expect to save up to 50% of the cost compared to ripping everything out and starting from scratch. That's a huge chunk of change you can put toward other things you've been dreaming of, like those quartz countertops, a new backsplash, or a high-end appliance package.
Time and Convenience
Think about the timeline of a typical cabinet replacement. It can easily knock your kitchen out of commission for weeks, between the demolition, potential plumbing or electrical work, and the lengthy installation process.
Cabinet resurfacing is a world apart. Most projects are wrapped up in just a few days. This means far less disruption to your daily routine, and in many cases, you can even continue using your kitchen while the work is being done.
The real beauty of resurfacing is achieving a high-end, custom look without the high-end price tag or the prolonged inconvenience of a major renovation. It’s about working smarter, not harder, with your existing kitchen layout.
Environmental and Value-Added Benefits
Choosing to resurface is also a decision you can feel good about. By keeping your existing cabinet boxes, you're preventing a significant amount of material from ending up in a landfill. It’s a sustainable approach that cuts down on waste and the demand for new lumber, which aligns perfectly with modern, eco-conscious home improvement.
This isn't just a niche trend; it's a rapidly growing market. In 2024, the global kitchen cabinet resurfacing market was valued at around USD 1.5 billion and is expected to more than double by 2033. This boom is fueled by homeowners who want cost-effective upgrades that are also environmentally friendly.
Finally, this isn't just about looks—it's an investment that adds real value to your home. A beautifully updated kitchen is one of the biggest selling points for potential buyers. Resurfacing gives you that fresh, modern appeal and a great return on investment, all without over-capitalizing on a massive renovation. To see a detailed comparison, our guide on cabinet refacing versus replacement breaks down all the factors to help you decide.
Choosing Your Tools and Materials Wisely
Kicking off a cabinet resurfacing project is a bit like getting ready to cook a fantastic meal—having all the right ingredients and tools ready to go makes all the difference. The choices you make now will have a direct line to how smooth the process goes and how well your new finish holds up. This isn't just about grabbing some paint and a few brushes; it's about knowing why you need one type of sandpaper for the initial scuffing and a different one to get that glass-smooth surface between coats.
Getting the right supplies from the start saves a ton of frustration later. It’s what ensures all your hard work pays off with a finish that looks sharp and can handle the daily chaos of a busy kitchen. For instance, picking the right primer for your specific cabinets—whether they're solid wood, laminate, or thermofoil—is a non-negotiable step. It’s the key to making sure the paint actually sticks and doesn’t start chipping in a year.
The Foundation of a Durable Finish: Primer and Paint
Primer is the unsung hero of any good cabinet paint job. For most wood cabinets, a quality oil-based or shellac-based primer is your best bet for blocking stains and getting superior adhesion. But if you're working with tricky surfaces like laminate or thermofoil, you'll need a specialty bonding primer. These are specifically designed to grab onto slick, non-porous materials that would otherwise shrug paint right off.
When you get to the main event—the paint—you’re basically looking at two options: oil-based or water-based enamels.
- Oil-Based Enamel: This stuff gives you a rock-hard, durable finish that levels out beautifully, which means fewer visible brush strokes. The downside? It has a pretty strong smell, needs mineral spirits for cleanup, and can yellow a bit over time, which is most noticeable on lighter colors.
- Water-Based Acrylic Enamel: Modern acrylics have come a long way. They're low-odor, clean up with simple soap and water, and dry much faster. High-end cabinet paints, like acrylic urethane blends, are formulated to cure into an incredibly hard, non-yellowing finish that easily rivals the durability of old-school oils.
For most DIYers, a top-shelf water-based acrylic enamel is the way to go. It hits that sweet spot between high performance and user-friendliness, making the whole process much more manageable without cutting corners on durability.
Resurfacing your cabinets is a huge money-saver, and this visual breaks down just how significant those savings can be.
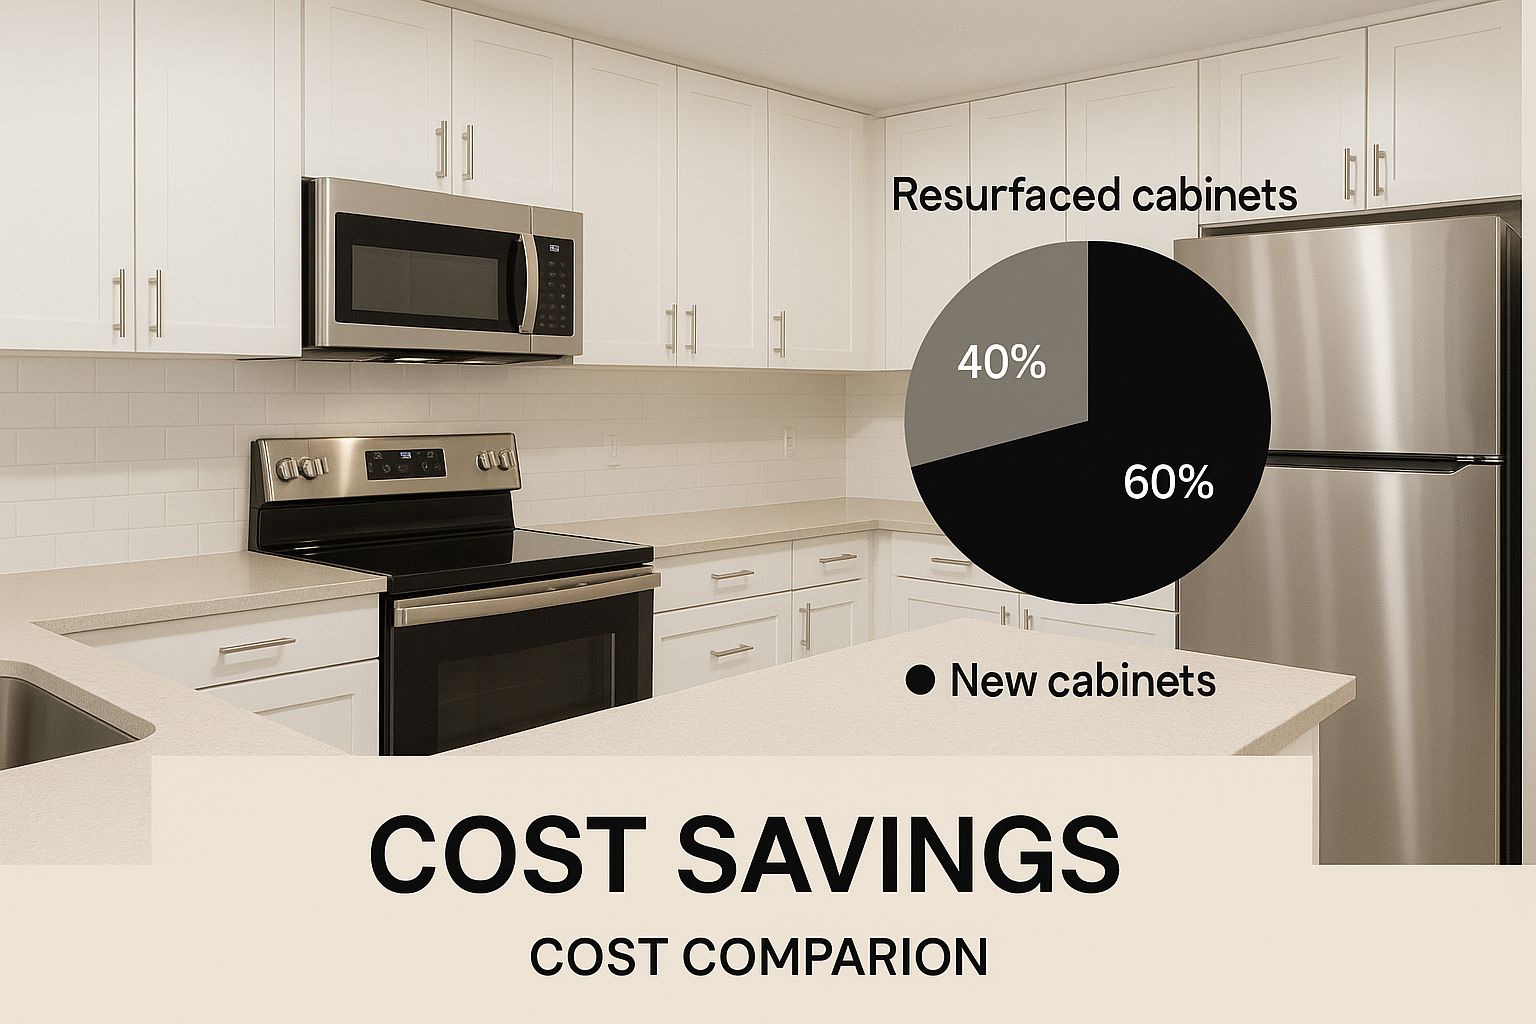
As you can see, tackling this yourself can save up to 50% compared to a full cabinet replacement. That frees up a nice chunk of change for other kitchen upgrades you've been dreaming about.
Sanding Supplies and Essential Tools
Sanding is absolutely critical, and having the right sandpaper grits on hand is a must. You don't need a whole workshop's worth, just a couple of key players to get you through the project.
- Medium Grit (100-120): Think of this as your workhorse for the initial scuff sanding. It’s abrasive enough to knock the shine off the old finish and create a nice, grippy surface for the primer, but it’s not so coarse that it leaves deep, ugly scratches.
- Fine Grit (180-220): This is what you’ll use for a quick, light sanding between your coats of primer and paint. It effortlessly smooths out any tiny imperfections, dust nibs, or raised wood grain without messing up the fresh coat, leaving you with a buttery-smooth surface ready for the next layer.
Beyond sandpaper, the tools you use to apply the paint matter immensely. A high-quality angled brush is your best friend for cutting in around detailed areas and on the cabinet frames. For the big, flat surfaces like door panels, a mini foam roller is the secret weapon for a smooth, spray-like finish with almost no texture.
To give you a clearer picture of what to expect, I've put together a quick breakdown of the essential tools and materials. This should help you budget and choose the right gear for the job.
Material & Tool Cost and Performance Comparison
| Item | Type/Options | Estimated Cost | Best For | Pro Tip |
|---|---|---|---|---|
| Primer | Oil-Based, Water-Based Bonding | $25 – $50 per gallon | Oil-based for wood stain blocking; bonding for slick surfaces. | Always match your primer type to the cabinet material for the best adhesion. |
| Paint | Acrylic Urethane, Oil-Based Enamel | $50 – $90 per gallon | Acrylics for ease of use and low odor; oils for maximum hardness. | Invest in premium cabinet paint. The higher cost is totally justified by its superior durability. |
| Sandpaper | 120-grit, 220-grit sponges/sheets | $10 – $25 pack | Initial scuffing (120-grit) and smoothing between coats (220-grit). | Sanding sponges are great because they conform to detailed trim better than flat sheets. |
| Applicators | Angled Brush, Foam Roller | $15 – $30 total | Brushes for frames and details; foam rollers for flat panels. | Don't skimp on brushes. A quality brush holds more paint and won't leave bristles behind in your finish. |
This table should get you started, but remember to accurately estimate how much you'll need. Nobody wants to make a frantic, last-minute run to the hardware store. A good rule of thumb is that one gallon of primer and one gallon of paint will cover an average-sized kitchen. Still, always check the coverage info on the can and do a quick measurement of your cabinet surface area just to be safe. It’s always better to have a little extra for future touch-ups than to run out halfway through.
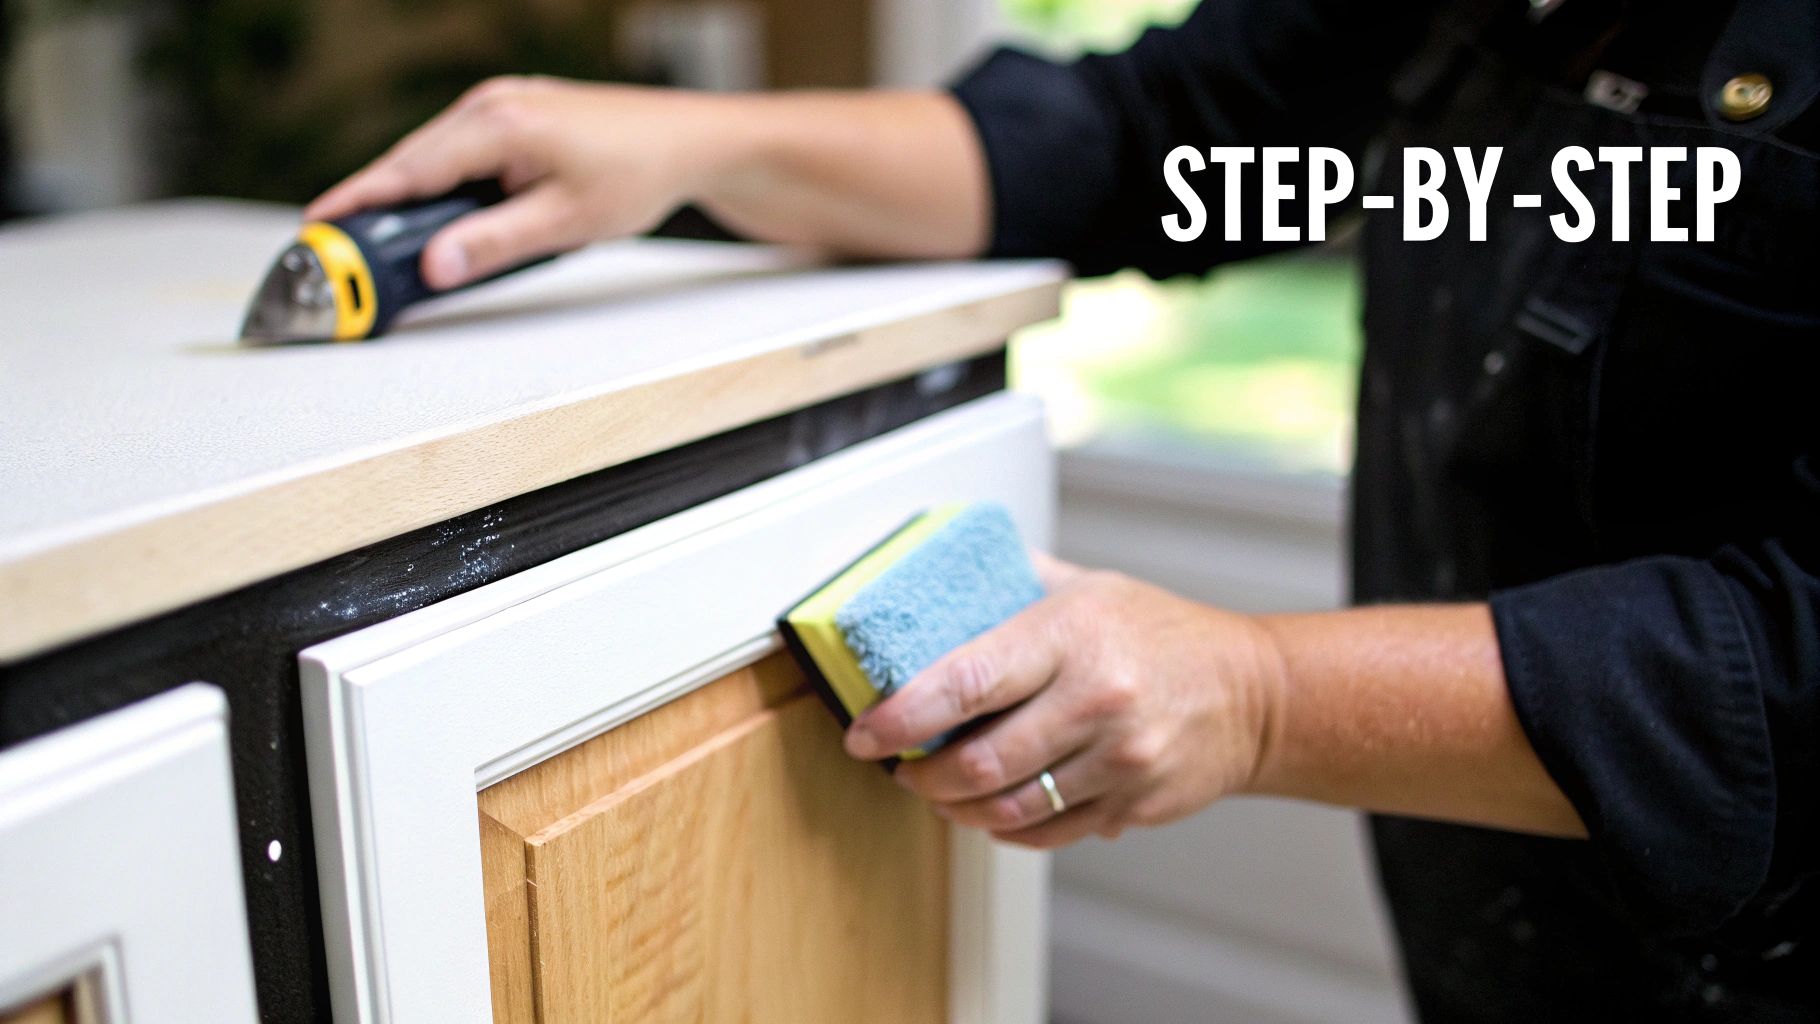
The Preparation Work Behind a Flawless Finish
The real secret to a professional-grade kitchen cabinet finish isn’t in the final coat of paint—it’s in the meticulous prep work you do beforehand. This is where you truly earn that smooth, durable look. In my experience, rushing this stage is the single biggest mistake people make, and it almost always leads to peeling paint and a result you’ll regret.
Think of it like building a house. You wouldn’t put up walls without a solid foundation, right? The same logic applies here. Proper disassembly, cleaning, and sanding create the perfect canvas for your primer and paint, ensuring your newly finished cabinets can stand up to the daily chaos of a busy kitchen for years.
Setting Up for Success
Before you even think about picking up a paintbrush, you need to methodically disassemble your kitchen. This means carefully taking off all the doors, drawer fronts, and every piece of hardware. I know it sounds tedious, but trying to paint cabinets vertically while they're still attached is a recipe for drips and missed spots. Working on flat, horizontal surfaces is infinitely easier and gives you a much better result.
Once everything is off, the key to a stress-free reassembly is a good labeling system. Grab some painter's tape and a marker, and label each door and its corresponding cabinet opening (e.g., "Top Left," "Under Sink Right"). Toss the hardware for each door into a small, labeled baggie. This little bit of organization now will save you from a massive headache later.
Next up, create an efficient workspace. A garage, basement, or even a spare room with good ventilation is perfect. Lay down drop cloths to protect your floors and set up some painter’s pyramids or even just scrap wood blocks to elevate the doors. This lets you paint one side and all the edges, let it dry, and then flip it without smudging your fresh work.
The Deep Clean and Repair Phase
Over the years, kitchen cabinets get coated in a thin, invisible layer of grease, grime, and cooking oils. Let me be clear: paint will not stick to a dirty surface. A deep clean isn't just a suggestion; it's non-negotiable.
For this job, you'll need a powerful degreaser like Trisodium Phosphate (TSP) or a TSP substitute. Mix it up according to the directions on the box and get scrubbing. Using a sponge or cloth, wash every single surface you plan to paint—frames, doors (front and back), and drawer fronts. Afterward, wipe everything down with a clean, water-dampened cloth to get rid of any residue and let it dry completely.
Now it's time for inspection. Get a bright, angled light and look over every surface for imperfections.
- Minor Dents & Scratches: Use a high-quality, stainable wood filler. Apply it with a small putty knife, overfilling the dent just slightly.
- Old Hardware Holes: If you’re upgrading your hardware and the new handles don't match the old holes, fill them with the same wood filler.
Let the filler cure completely. This can take a few hours, depending on the product and how deep the repair was. Once it's rock hard, you're ready for the most critical step: sanding.
The Art and Science of Sanding
Sanding isn't about stripping the old finish down to bare wood. The goal is simply to "scuff" the surface, knocking down the glossy sheen and creating thousands of microscopic grooves. This is what gives the primer something to really grab onto, creating a strong mechanical bond that's essential for a long-lasting finish.
Using a medium-grit sandpaper (100 to 120-grit) on a sanding block or random orbital sander, go over all your surfaces. Give extra attention to the areas you patched with wood filler, sanding them until they are perfectly flush and smooth with the rest of the cabinet. When you're done, the surface should feel smooth but look dull.
Pro Tip: Don't just wipe the sanding dust away with a dry rag. You'll never get it all. Use a shop vac with a brush attachment, followed by a tack cloth, to remove every last particle. Any dust left behind will get trapped in your primer and create a gritty, unprofessional texture.
Taking your time with this prep work is what sets the stage for a flawless kitchen transformation. It's tempting to jump straight to the fun part—painting—but this foundational work is what separates a good DIY job from a great one. This meticulous, waste-reducing approach is a big reason why sustainable options are gaining ground. In fact, the cabinet refacing market, which is part of this industry, was valued at USD 4.5 billion in 2023 and is expected to hit nearly USD 7.8 billion by 2032. It’s clear that homeowners are leaning into smarter, less wasteful remodels. You can explore the full cabinet refacing report for a deeper dive into these trends.
For a detailed walkthrough on getting started, be sure to check out our complete guide on how to remove cabinet doors to ensure your project begins on the right foot.
Achieving a Professional Paint Application
This is where the magic happens. All that sanding, cleaning, and priming has laid the perfect foundation, and now it’s time to bring your vision to life with color. Getting that smooth, almost factory-like finish is totally within reach, even if you've never done this before. The secret is all in the tools and your technique.
The applicator you choose—whether it's a brush, a roller, or a paint sprayer—is going to have a huge impact on the final texture and how quickly the job gets done. Each one has its pros and cons, but with a bit of practice, you can get stunning results with any of them.
Choosing Your Painting Method
The tool you use to lay down the paint is just as critical as the paint itself. Let's break down the common choices so you can figure out what works best for your skills, budget, and the look you're going for.
- A High-Quality Brush: You absolutely need a good quality angled brush. It’s a must-have for "cutting in" around the edges of cabinet frames and getting into those detailed spots. You get maximum control, but you have to be careful to avoid leaving obvious brush strokes.
- A Foam Roller: For big flat areas like your door panels and drawer fronts, a high-density foam roller is a DIYer's secret weapon. It puts down a beautifully thin, even coat of paint with very little texture, getting you impressively close to a sprayed-on look.
- An HVLP Sprayer: If you want a flawless, professional-grade finish in the shortest amount of time, an HVLP (High Volume, Low Pressure) sprayer is the way to go. The trade-off? It has a much steeper learning curve, you'll spend more time masking everything off to control overspray, and the cleanup is a serious chore.
For most people, the sweet spot is using a combination of a high-quality brush for the frames and a foam roller for the doors and drawers. This approach gives you that perfect balance of professional results without the hassle of a sprayer. The type of paint you select is also a huge piece of the puzzle. For a deep dive into your options, you can learn more about the best paint for kitchen cabinets in our comprehensive guide.
The Art of Applying Thin Coats
If you remember only one thing about painting cabinets, make it this: multiple thin coats are always better than one thick coat. It’s tempting to load up your roller to get it done faster, but a thick coat is the number one cause of drips, runs, and that clumpy, amateur look. It also takes forever to dry and cure properly.
The real goal is to build the color up gradually. Your first coat of paint will probably look a little streaky and uneven. That's perfectly normal! Don't panic and try to fix it by going back over it while it’s still wet. Just let it dry completely.
By applying two to three thin, even coats, you give the paint a chance to level out on its own, which creates a much harder, more durable surface. This patient, layered approach is the true secret to a finish that looks like it came straight from a workshop.
Giving the paint enough time to dry between coats is just as critical. If you rush it, the fresh paint can actually pull up the semi-dry layer underneath, ruining your finish and forcing you to sand it all down again. Always check the paint can for the recommended recoat times, but also pay attention to your environment—high humidity or cool temps will mean you need to wait even longer.
Sanding Between Coats for a Flawless Surface
Want to take your finish from "good" to "wow"? Lightly sand between each coat of primer and paint. I know it sounds like a tedious extra step, but trust me, the payoff is huge. This is what creates that incredibly smooth, glass-like feel when you run your hand over the finished door.
Once your primer or paint coat is completely dry, grab a fine-grit sanding sponge or a piece of sandpaper (220-grit is perfect) and just gently scuff every surface. You aren't trying to remove the paint you just applied; you’re just knocking down any tiny imperfections that have popped up.
This quick sanding pass smooths out:
- Dust Nibs: Tiny specks of dust that inevitably land on wet paint.
- Raised Grain: Wood fibers that can swell up a bit when they get wet.
- Minor Blemishes: Any slight texture left behind by your brush or roller.
The process should be fast and requires almost no pressure. Afterward, the surface should feel silky smooth. The next part is non-negotiable: you have to remove every single speck of sanding dust. Use a vacuum with a brush attachment and follow it up with a tack cloth to make sure the surface is perfectly clean. This step is what separates a good DIY job from a truly top-tier, professional result.
Putting It All Back Together (and Upgrading Your Hardware)
This is the moment where all that painstaking prep work finally pays off. You’re about to turn a pile of beautifully painted doors and drawers back into a stunning, functional kitchen. But hold on—before you grab the drill, there’s one final step you absolutely cannot skip if you want your finish to last.
I’m talking about a topcoat. This is the invisible shield that seals your new paint job, protecting it from the realities of a busy kitchen—spills, fingerprints, dings, you name it. Think of it as the armor that keeps your hard work looking factory-fresh for years, not just a few months.
Choosing the Right Protective Topcoat
When it comes to topcoats, you’re basically looking at two main options: polyurethane and water-based polycrylic. They both offer protection, but they behave very differently, especially in a kitchen.
- Polyurethane (Oil-Based): This stuff is known for being incredibly tough. It creates a hard shell that’s super resistant to heat and chemicals. The downside? It has a pretty strong smell while it cures and tends to give everything a slight amber tint. That yellowish hue is a deal-breaker if you’ve just painted your cabinets a crisp white or a light gray.
- Polycrylic (Water-Based): For kitchen cabinets, this is almost always the way to go. Polycrylic has a low odor, dries way faster, and cleans up with just soap and water. Most importantly, it dries crystal clear and is non-yellowing, so the paint color you spent so much time choosing stays true.
For most projects, I recommend a water-based polycrylic in a satin or flat finish. Brush on two or three very thin coats, letting each one dry completely before starting the next.
If there’s one place to practice patience, it’s here. Rushing to reassemble before the topcoat has fully cured is the fastest way to ruin a perfect finish with smudges and dings. Curing can take several days, so fight the urge to hang those doors too soon.
Seamless Reassembly and Perfect Alignment
Once the final topcoat has cured (check the can for the manufacturer’s specific timeline), it’s time for the fun part. This is where that labeling system you set up during prep becomes your best friend.
Grab your labeled bags of hinges and hardware and match them up to the corresponding doors and drawers. I always find it easiest to reattach the hinges to the doors first, then hang each door on its correct cabinet box. This methodical approach saves a ton of time and eliminates the frustrating "which-door-goes-where" guessing game.
Now, even with a perfect system, you might notice some doors don't hang quite right. Don’t panic! Most modern cabinet hinges are designed to be adjusted. Look for the small screws on the hinge itself—they let you make tiny adjustments in three different directions:
- Up and Down: Loosening the mounting screws lets you slide the door vertically.
- In and Out: A screw in the middle of the hinge adjusts how close the door sits to the frame.
- Side-to-Side: The screw at the front will shift the door left or right, letting you create perfect, even gaps.
Upgrading Hardware to Elevate the Look
New hardware is like the jewelry for your kitchen. Swapping out old, dated knobs and pulls is a relatively cheap update that delivers a huge visual punch. It’s the final detail that takes your project from a simple paint job to a renovation that looks professionally done.
This small investment also boosts the project’s overall value. Upgrades like cabinet resurfacing offer a fantastic return, with most homeowners recouping between 65% and 80% of what they spend in increased home value. With DIY costs often falling between $1,645 and $6,570, that strong ROI makes it a smart financial move. You can see a more detailed breakdown of cabinet refacing costs on angi.com to get a better idea of the numbers.
When picking out new hardware, think about style and the existing holes. If you fall in love with handles that have a different screw spacing, you’ll need to fill the old holes and drill new ones before you paint. Taking the time to get every door and drawer perfectly aligned with beautiful new hardware is the final, rewarding step to a kitchen you’ll be proud of for years.
Common Questions About Cabinet Resurfacing
Deciding to resurface your kitchen cabinets is a big step, and naturally, it comes with a lot of questions. From wondering how long your hard work will actually last to figuring out if your specific cabinets are even a good candidate, getting clear answers is key. Let's tackle some of the most common queries I hear from homeowners.

How Long Does a Resurfaced Cabinet Finish Really Last?
The lifespan of a new cabinet finish comes down to two things: how well you prep and the quality of the materials you use. There’s a myth that DIY finishes just don't hold up, but that’s not the case when you do the job right.
If you put in the time for meticulous cleaning, sand everything properly, and use a high-quality primer and paint, your new finish can easily last 8 to 15 years. The secret to that kind of durability is getting perfect paint adhesion right from the start.
Using a paint specifically made for cabinets is non-negotiable. These formulas are built to resist chipping, stand up to grease, and handle the daily abuse of a kitchen far better than your standard wall paint.
Can I Resurface Any Type of Kitchen Cabinet?
The good news is that most cabinet materials are great candidates for resurfacing. The best-case scenario is solid wood or wood veneers. Their porous surfaces give the paint something to really grab onto, which always yields the best results.
But that doesn't mean other materials are off the table. Laminate and thermofoil cabinets can absolutely be painted, but they have a special requirement: a bonding primer. This stuff is designed to grip onto slick, non-porous surfaces that would make standard paint peel right off.
The crucial first step is to figure out exactly what your cabinets are made of. While most materials are fair game, cabinets made from severely damaged or water-warped particle board are often a lost cause. The compromised foundation just won't hold a new finish for long.
What Are the Biggest DIY Mistakes to Avoid?
Even with the best intentions, a few common slip-ups can completely derail a cabinet resurfacing project. Knowing what they are ahead of time is the key to a finish you’ll be proud of.
I see three mistakes more than any others:
- Rushing the Prep: This is the big one. Skipping a deep degreasing or doing a lazy sanding job is the #1 cause of paint failure. Paint simply cannot stick to a dirty or glossy surface.
- Applying Paint Too Thickly: Trying to get it all done in one coat is a recipe for drips, a bumpy texture, and a cure time that feels like forever. Multiple thin coats will always give you a better result.
- Not Allowing Enough Curing Time: Paint might feel dry in a few hours, but it takes days—sometimes weeks—to fully harden, or "cure." Putting doors and hardware back on too soon is a surefire way to get instant nicks, scratches, and smudges.
Ultimately, your most important tool for this project is patience. Taking your time on every step, especially the boring prep work, is what guarantees a beautiful and durable kitchen transformation.
Ready to transform your kitchen with custom cabinetry that stands the test of time? The experts at Sinclair Cabinetry inc have over 35 years of experience crafting bespoke solutions that bring your vision to life.