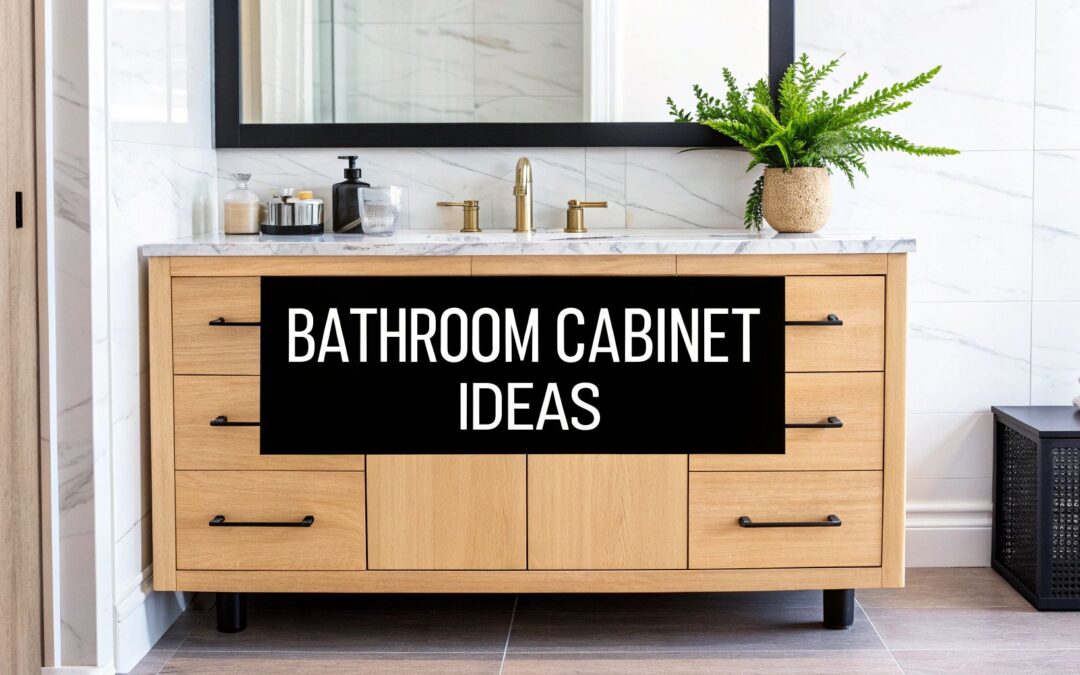
Your bathroom cabinets are more than just storage; they define the room's character and functionality. A well-executed cabinet refresh can single-handedly elevate the entire space, transforming a dated or uninspired bathroom into a modern sanctuary. However, moving beyond a generic coat of paint requires creativity and a solid plan. This guide provides a comprehensive look at specific, actionable bathroom cabinet renovation ideas designed to deliver significant impact.
We will explore seven distinct approaches, ranging from budget-friendly updates to complete custom overhauls. You will find practical details on everything from painting techniques and hardware selection to installing floating vanities and creating custom built-in storage. As you begin to breathe new life into your bathroom, effective organization is key; consider general tips for decluttering your home to maximize your renovated space and ensure it remains a functional retreat.
By focusing on the cabinets first, you can achieve a high-impact renovation that enhances both aesthetics and daily use. This curated list offers the detailed insights you need to make informed decisions, setting the stage for a truly revitalized bathroom that reflects your personal style.
1. Paint and Refinish Existing Cabinets
Perhaps the most impactful and budget-friendly of all bathroom cabinet renovation ideas is to give your existing units a fresh coat of paint or a new stain. This approach allows you to completely transform your bathroom's aesthetic without the cost and complexity of a full replacement, keeping the original layout and structure intact. It’s an ideal solution for homeowners with solid, functional cabinets that simply look dated.
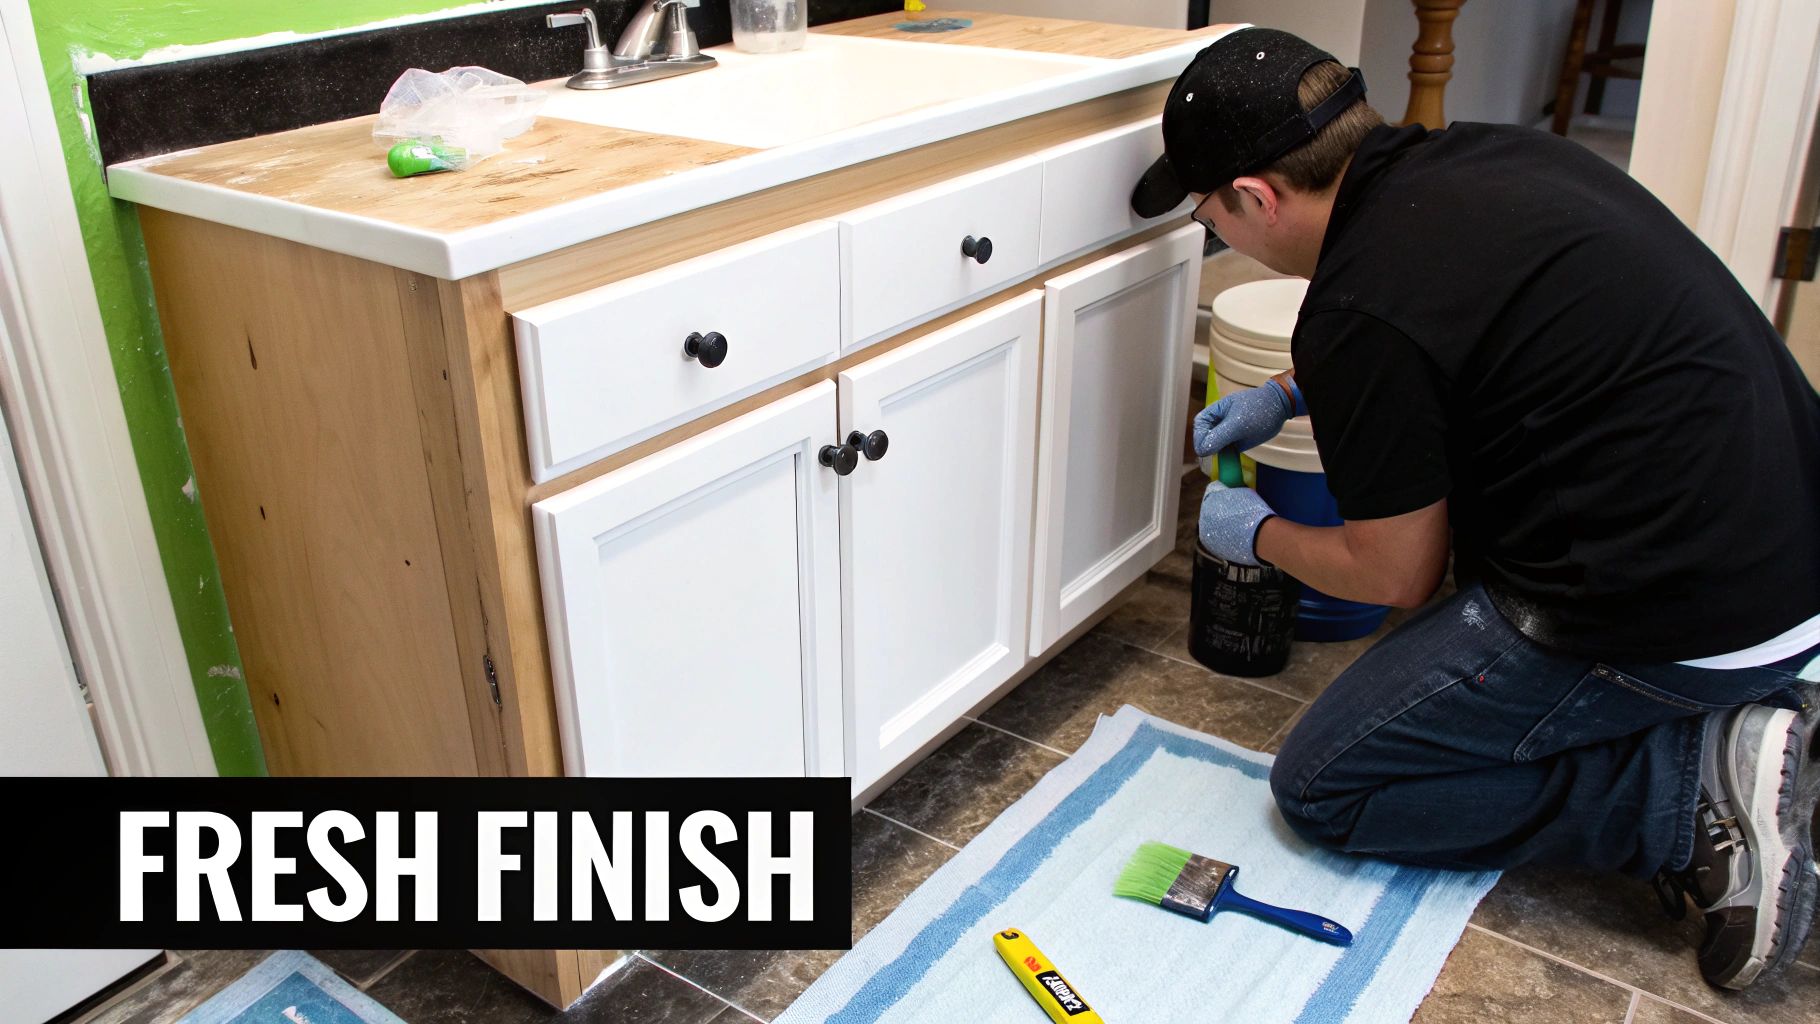
This method involves stripping the old finish, thoroughly sanding the surfaces, applying a high-quality primer, and finishing with several coats of durable paint or stain. The results can be dramatic, turning tired, builder-grade honey oak cabinets into a sleek, modern white shaker style or a bold, dramatic navy blue focal point.
Implementation Tips for a Flawless Finish
To ensure your painted cabinets look professional and last for years, proper preparation is non-negotiable. Follow these essential steps for a successful DIY project:
- Disassemble First: Always remove cabinet doors, drawers, and all hardware before starting. This extra step ensures clean lines and complete coverage without drips or missed spots.
- Invest in Quality Primer: Use a high-adhesion primer specifically designed for high-humidity environments like bathrooms. This prevents moisture from seeping into the wood and causing the paint to peel or bubble over time.
- Choose the Right Sheen: A semi-gloss or satin finish is highly recommended for bathroom cabinets. These sheens are more durable and much easier to wipe clean than matte or eggshell finishes.
- Be Patient with Drying: Rushing the process is a common mistake. Allow ample drying time between each coat of primer and paint as recommended by the manufacturer. This is crucial for proper curing and a hard, durable final finish.
Key Insight: Achieving a factory-smooth finish requires meticulous prep work. Don't skimp on cleaning with a degreaser and thorough sanding; these steps are more critical than the painting itself for long-term durability.
While this is a popular DIY project, the process is labor-intensive and requires precision. For those seeking an immaculate, long-lasting result without the hassle, consider hiring professional painting and refinishing services to ensure the job is done to perfection.
2. Install Floating Vanity Cabinets
For those seeking a distinctly modern and airy feel, replacing traditional floor-standing cabinets with a wall-mounted floating vanity is a game-changing bathroom cabinet renovation idea. This design lifts the cabinetry off the floor, creating an illusion of a larger, more open space. It simplifies floor cleaning and introduces a sleek, contemporary aesthetic popularized by Scandinavian and minimalist design trends.
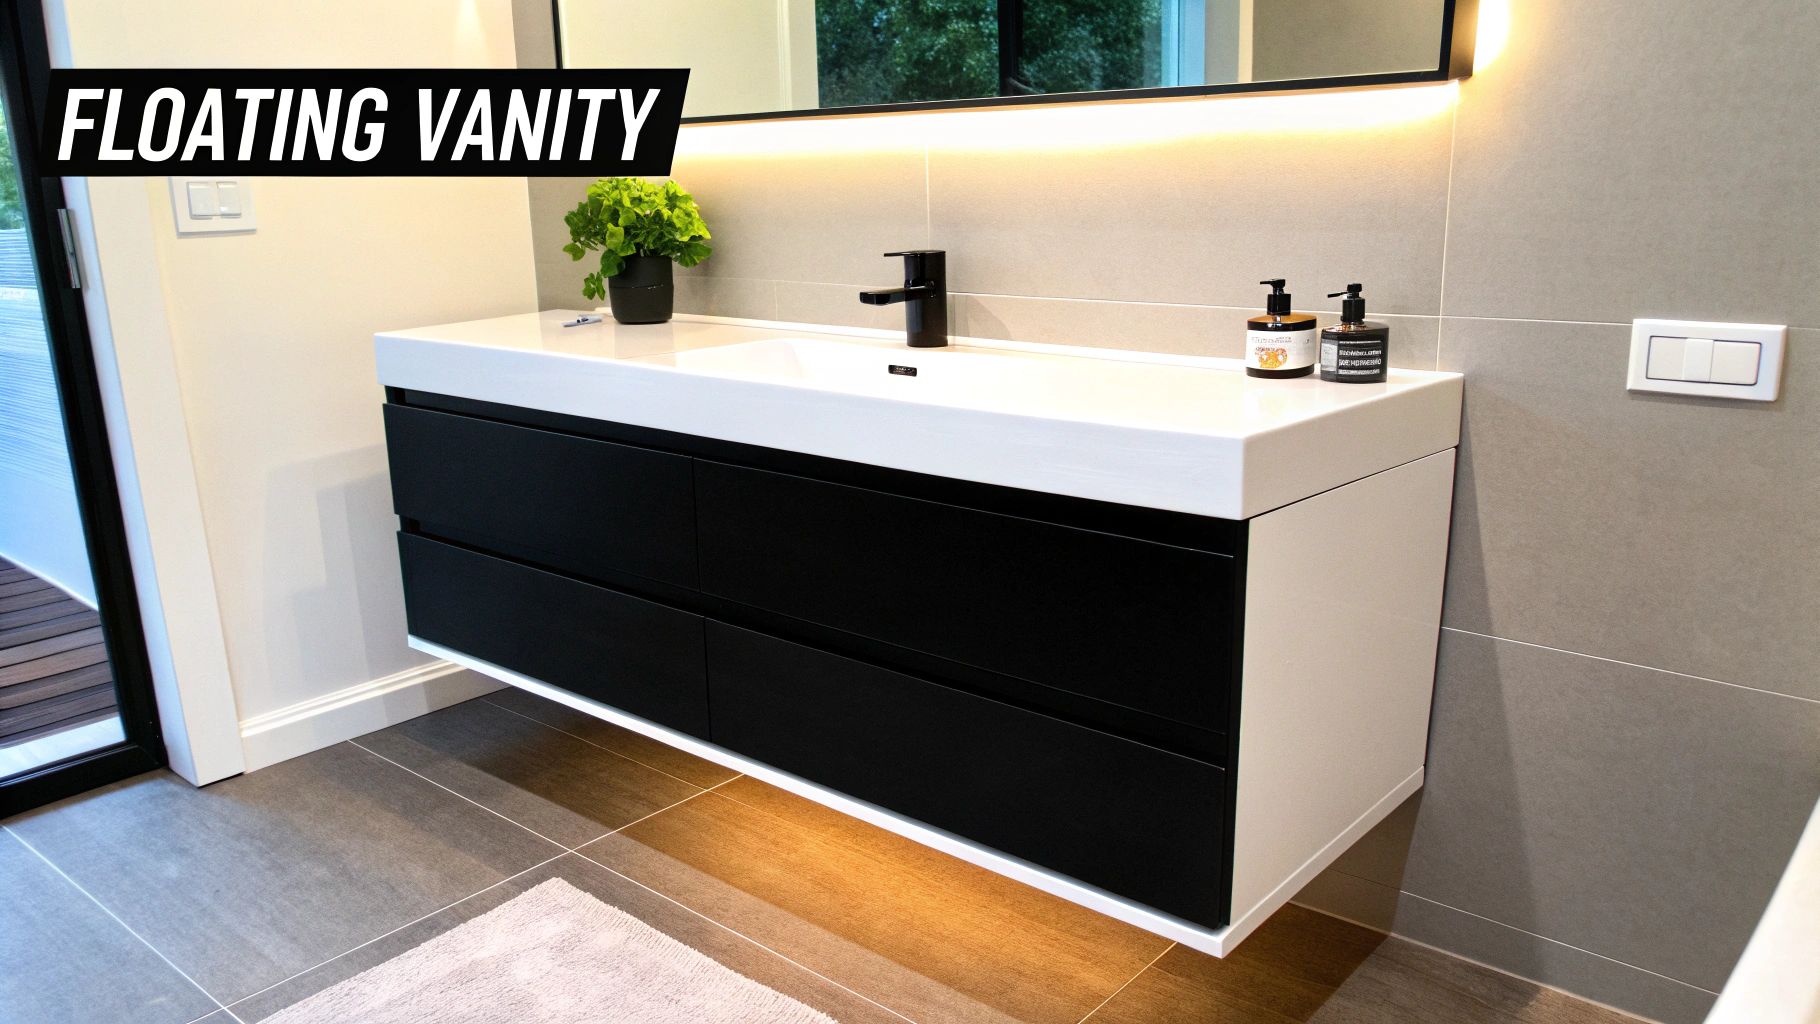
This approach swaps bulky, floor-to-ceiling vanities for a streamlined, horizontal profile that appears to float against the wall. It's particularly effective in small bathrooms or powder rooms where every inch of visual space matters. Popular examples range from the accessible IKEA Godmorgon series to higher-end pieces like the West Elm Mid-Century floating vanity, showcasing its versatility across different budgets and styles. The result is a clean, uncluttered look that feels both luxurious and highly functional.
Implementation Tips for a Secure Installation
A floating vanity’s success hinges on proper installation and structural support. Unlike floor models, all the weight is carried by the wall, so meticulous planning is essential.
- Secure to Studs: You must anchor the vanity's mounting hardware directly into wall studs. Never rely on drywall anchors alone, as they cannot support the combined weight of the vanity, countertop, sink, and its contents.
- Plan Plumbing Carefully: The plumbing (water supply and drain lines) needs to be positioned correctly within the wall to be concealed by the vanity. This often requires a plumber to "rough-in" the new plumbing locations before drywall is installed or patched.
- Add Ambient Lighting: Enhance the floating effect by installing an LED light strip on the underside of the cabinet. This provides soft, indirect ambient light that can double as a nightlight and adds a sophisticated, high-end touch.
- Choose Water-Resistant Materials: Bathrooms are high-moisture zones. Opt for materials like marine-grade plywood, thermofoil, or solid surface composites that resist swelling and water damage, ensuring the vanity’s longevity.
Key Insight: The space created underneath a floating vanity is not just for show. It's a perfect spot to tuck away a stylish basket for extra towels or a bathroom scale, keeping the floor clear while adding functional storage.
While many floating vanities come ready-to-install, a custom-built unit allows you to perfectly tailor the size and finish to your space. You can explore stunning luxury bathroom vanity designs on sinclaircabinets.com for inspiration on how to elevate your bathroom with a custom floating installation.
3. Add Open Shelving and Display Areas
Incorporating open shelving is a fantastic bathroom cabinet renovation idea that balances aesthetics with functionality. This approach breaks up the visual weight of solid cabinet doors, creating an open, airy feel while providing a stylish platform to display decorative items or keep everyday essentials within easy reach. It's a perfect way to add personality and a custom-designed look to your bathroom, moving beyond purely utilitarian storage.
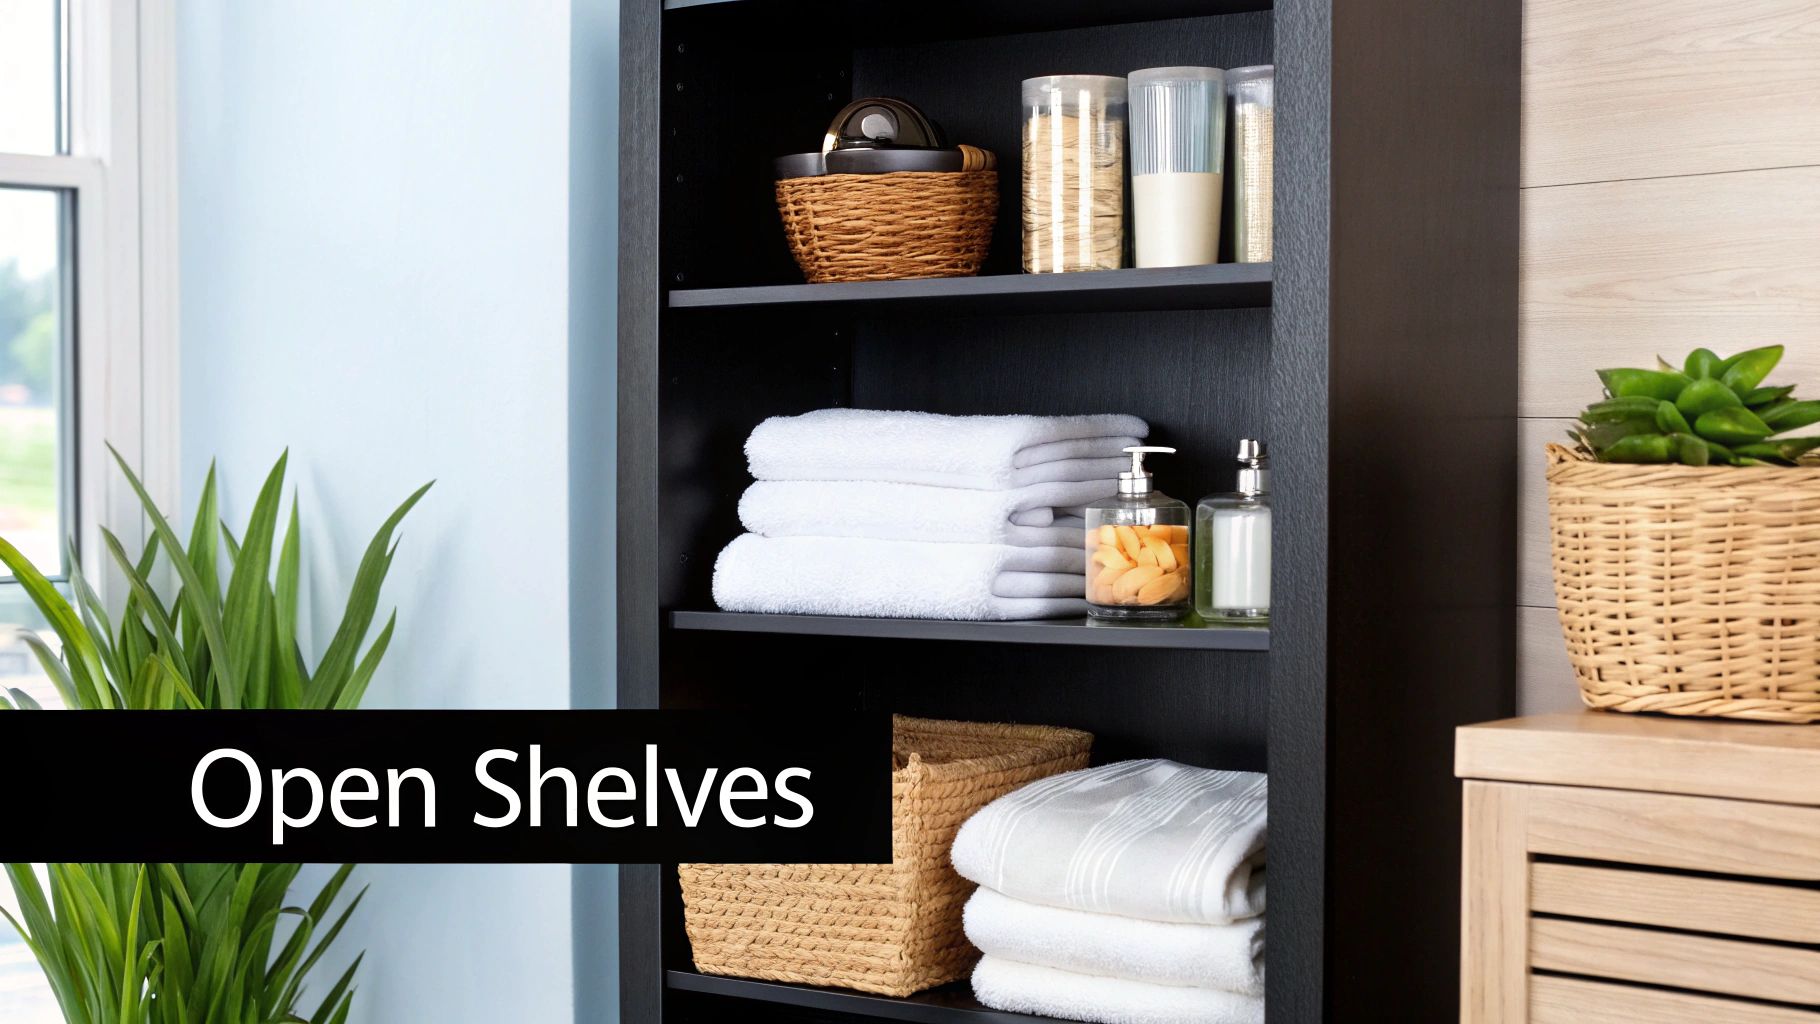
This design strategy can be implemented in various ways. You might replace a set of upper cabinets with floating shelves flanking the vanity mirror, integrate open cubbies into the vanity design itself, or even remove the doors from an existing cabinet section for a quick conversion. The goal is to create a blend of concealed and open storage that feels both organized and visually interesting.
Implementation Tips for Stylish and Practical Shelving
To make your open shelving both beautiful and durable, focus on material selection and thoughtful styling. Here are a few key tips for a successful integration:
- Choose Water-Resistant Materials: Bathrooms are high-humidity zones. Opt for materials that can withstand moisture, such as glass, metal, or properly sealed woods like teak or treated pine. This prevents warping and damage over time.
- Style with Intention: Curate what you display. Use attractive containers, rolled towels, small plants, and decorative objects. Group items in odd numbers (threes or fives) and vary their height and texture to create a dynamic, magazine-worthy look.
- Maintain Visual Lightness: Glass or acrylic shelving is an excellent choice for smaller bathrooms as it doesn't obstruct light, making the space feel larger and more open.
- Combine with Baskets and Bins: Keep clutter at bay by using stylish baskets or bins on your open shelves. This allows you to store less-attractive necessities like extra toilet paper or cleaning supplies while maintaining a neat, cohesive appearance.
Key Insight: Open shelving is as much about what you don't show as what you do. Reserve these spaces for your most-used or most attractive items, and keep the bulk of your less-sightly toiletries tucked away behind closed cabinet doors for a balanced, uncluttered look.
By thoughtfully integrating open storage, you can transform your bathroom cabinets from simple boxes into a sophisticated design feature. It's a versatile approach that adds character and a sense of curated style to any bathroom renovation project.
4. Upgrade Cabinet Hardware and Fixtures
Often overlooked, the hardware on your cabinets is like the jewelry of your bathroom; a small detail that can define the entire look. Upgrading handles, knobs, and hinges is one of the most accessible and cost-effective bathroom cabinet renovation ideas. This simple swap can instantly elevate your space, taking cabinets from builder-grade basic to custom-designed chic without any major demolition or expense.
This strategy involves unscrewing the old hardware and replacing it with new pieces that better reflect your desired style. For example, replacing small, dated chrome knobs with sleek matte black bar pulls can modernize a vanity overnight. Similarly, switching to warm brass hardware can inject a sense of luxury and pair beautifully with marble or quartz countertops.
Implementation Tips for a Seamless Upgrade
While changing hardware seems straightforward, a few key considerations will ensure a polished and professional result. Follow these tips for a successful update:
- Measure First, Buy Second: Before you fall in love with new pulls, measure the center-to-center distance between the existing screw holes on your drawers and doors. Buying hardware that matches this measurement will save you from having to drill new holes and patch old ones.
- Create a Cohesive Look: Choose a hardware finish that complements other metallic elements in the room, such as your faucet, showerhead, and light fixtures. This creates a harmonious and intentionally designed aesthetic.
- Invest in Functionality: Beyond looks, consider upgrading to soft-close hinges and drawer slides. This is a relatively inexpensive addition that eliminates slamming, reduces wear and tear, and adds a high-end, functional touch to your daily routine.
- Consider Scale and Style: Don't be afraid to go bold. Oversized pulls can make a dramatic statement on plain cabinet doors, while unique knobs can add a touch of personality to a minimalist design. Explore a complete guide to cabinet hardware finishes to find the perfect match for your vision.
Key Insight: The finish and feel of your hardware significantly impact the perceived quality of your cabinets. A heavy, solid brass knob feels more luxurious than a lightweight, hollow alternative. Invest in quality materials for a tactile upgrade that you will appreciate every day.
This quick and easy project offers a high return on investment, making it a perfect weekend DIY for anyone looking to refresh their bathroom's appearance and functionality with minimal effort and cost.
5. Install Custom Built-in Storage Solutions
For homeowners seeking the ultimate in organization and a seamless, high-end look, installing custom built-in storage is one of the most transformative bathroom cabinet renovation ideas. This approach moves beyond standard vanities, utilizing every available inch of your bathroom to create storage solutions perfectly tailored to your space and lifestyle. It’s the ideal choice for maximizing functionality in oddly shaped or compact bathrooms while achieving a clean, integrated aesthetic.
Unlike off-the-shelf units, custom built-ins are designed to fit your room's exact dimensions and your specific needs. This could mean a floor-to-ceiling linen tower with pull-out drawers, a vanity with an integrated laundry hamper, or a recessed medicine cabinet with hidden electrical outlets for charging devices. The result is a highly efficient, clutter-free space that feels both luxurious and intentional.
Implementation Tips for Perfect Customization
To ensure your built-in storage meets your expectations, thoughtful planning and professional collaboration are key. Follow these guidelines for a successful custom project:
- Partner with a Specialist: Work with an experienced cabinet maker or designer who understands the unique challenges of bathroom environments, such as high humidity and moisture. Their expertise is crucial for material selection and construction quality.
- Plan for Ventilation: Proper airflow is essential to prevent mold and mildew growth behind and inside built-in units. Ensure your design includes adequate ventilation, especially for large tower cabinets or units near showers.
- Design for Your Items: Before finalizing plans, take inventory of what you need to store. Plan for specialized compartments for hair styling tools, dedicated drawers for makeup, and adjustable shelving for towels and taller bottles.
- Consider Future Needs: Design for flexibility. Adjustable shelves and modular drawer organizers will allow your storage to adapt as your needs change over time.
Key Insight: The true value of custom built-ins lies in their ability to solve specific storage problems. Think beyond standard drawers and shelves to incorporate smart features like pull-out columns for toiletries or hidden compartments that make daily routines effortless.
While a significant investment, custom solutions offer unparalleled value in terms of efficiency and design cohesion. For more inspiration on optimizing your storage, you can learn more about how to maximize cabinet space and make every square inch count.
6. Create Two-Tone or Multi-Color Cabinet Schemes
Break away from the single-color standard by introducing a two-tone or multi-color scheme to your bathroom cabinets. This sophisticated design trend adds visual depth, defines different zones, and infuses your space with custom character. It's an excellent way to implement bold colors without overwhelming the room, creating a balanced and visually engaging look.
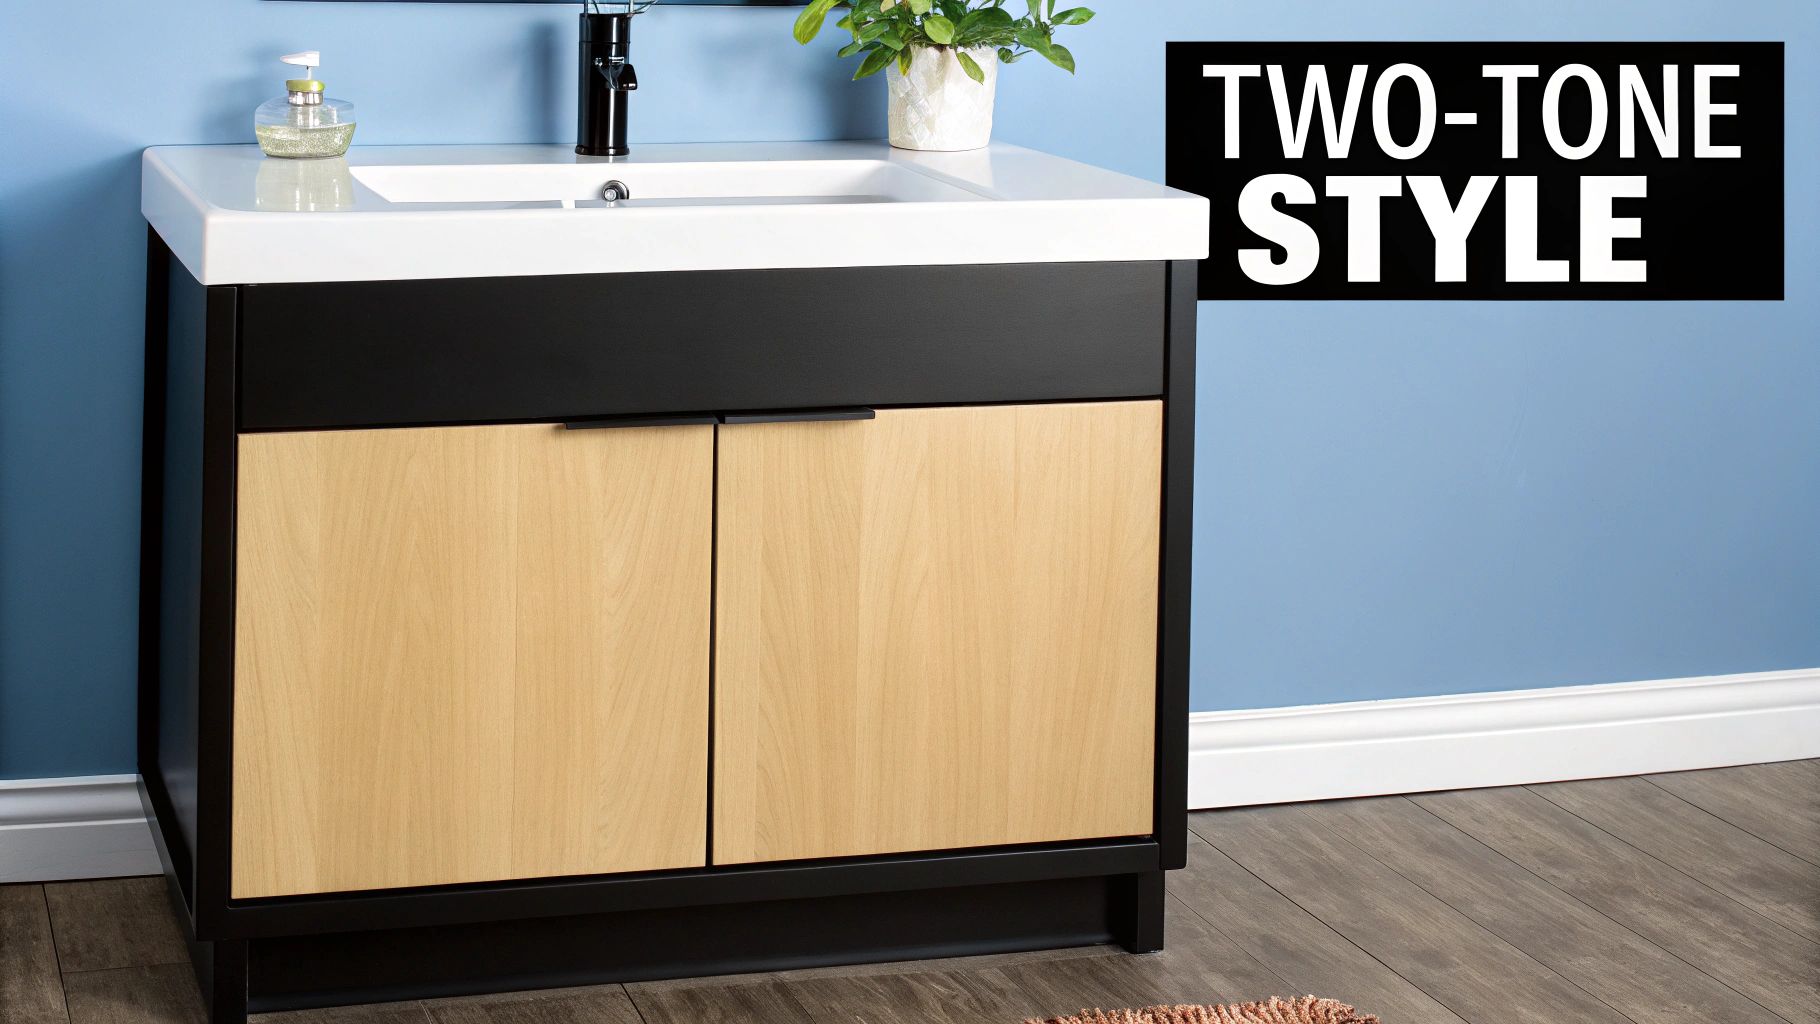
This bathroom cabinet renovation idea involves using one color for the main vanity base and another for upper cabinets, a tall linen tower, or an accent piece. For instance, you could pair classic white upper cabinets with a rich navy blue or deep charcoal gray vanity base. Another popular approach is to mix finishes, such as combining painted lower cabinets with the organic warmth of natural wood floating shelves above.
Implementation Tips for a Harmonious Design
A successful two-tone scheme relies on thoughtful color pairing and balance. To ensure your design looks intentional and high-end, consider these tips:
- Anchor with Darker Tones: Generally, place the darker or bolder color on the lower cabinets. This grounds the space and prevents the room from feeling top-heavy, while the lighter color on top helps the room feel more open and airy.
- Test Colors in Your Space: Always get paint or finish samples and view them in your bathroom's specific lighting conditions at different times of the day. Colors can look drastically different under artificial vanity lights versus natural daylight.
- Unify with Hardware: Maintain a consistent hardware finish across all cabinets. Using the same pulls and knobs in matte black, brass, or chrome will tie the different colored sections together for a cohesive and polished look.
- Consider Room Size: In smaller bathrooms, stick to a more subtle contrast between your two chosen colors to avoid making the space feel choppy or cramped. High-contrast combinations work best in larger bathrooms with ample light.
Key Insight: The 60-30-10 design rule can be a great guide. Use your dominant color (e.g., light gray uppers) for 60% of the cabinetry, a secondary color (e.g., charcoal base) for 30%, and an accent (like wood tones or hardware) for the final 10%.
7. Incorporate Glass Front or Mesh Panel Doors
A fantastic way to break up the visual monotony of solid cabinetry is to incorporate doors with glass fronts or decorative mesh panels. This bathroom cabinet renovation idea introduces texture and depth, making the space feel lighter and more open. It provides a unique opportunity to display attractive toiletries, folded towels, or decorative items while keeping them protected behind a stylish barrier.
This method involves swapping out one or more solid cabinet doors for frames fitted with an insert. The effect can be subtle or dramatic depending on the material chosen, from elegant frosted glass for a spa-like feel to rustic wire mesh for an industrial or farmhouse aesthetic. This approach is especially effective in smaller bathrooms where large banks of solid wood can feel heavy and overwhelming.
Implementation Tips for a Stylish Look
To ensure your new cabinet fronts are both beautiful and practical, focus on the details of material selection and installation.
- Prioritize Safety with Glass: Always use tempered glass for any bathroom application. It's much stronger than standard glass and shatters into small, dull pieces if broken, significantly reducing the risk of injury.
- Balance Display and Privacy: If you don't want the contents fully visible, opt for frosted, reeded, or seeded glass. These options obscure the details of what's inside while still reflecting light and adding visual interest.
- Consider Mesh or Cane for Texture: For a coastal, boho, or farmhouse vibe, cane or rattan webbing is a popular choice. For industrial or modern farmhouse designs, a fine wire or decorative metal mesh adds a unique, utilitarian-chic element.
- Add Interior Lighting: Enhance the display by installing small, low-profile LED puck lights or strip lighting inside the cabinet. This turns the cabinet into a true focal point and provides soft, ambient light in the evening.
Key Insight: The success of this idea hinges on curating the contents. Only use glass or mesh on cabinets where you plan to store visually appealing items; use solid doors to hide everyday clutter.
This is an excellent project for a custom cabinet maker who can perfectly match the new frames to your existing cabinetry. However, it's also a manageable DIY upgrade if you're comfortable with precise measurements and basic woodworking.
Bathroom Cabinet Renovation Ideas Comparison
| Item | Implementation Complexity 🔄 | Resource Requirements ⚡ | Expected Outcomes 📊 | Ideal Use Cases 💡 | Key Advantages ⭐ |
|---|---|---|---|---|---|
| Paint and Refinish Existing Cabinets | Low – DIY friendly, 2-3 days | Low cost materials and tools | Fresh, updated look; preserves cabinet structure | Budget renovations; DIY upgrades; quick refresh | Cost-effective; environmentally friendly; fast turnaround |
| Install Floating Vanity Cabinets | Medium – requires strong wall support, often pro installation | Moderate to high cost; professional tools | Modern, spacious feel; easier floor cleaning | Small bathrooms; modern design; minimalist spaces | Enhances space perception; flexible height; sleek aesthetics |
| Add Open Shelving and Display Areas | Low to medium – simple installation, some styling needed | Low to moderate depending on materials | Open, airy feel; decorative and functional storage | Adding style and storage; breaking monotony | Visual interest; easy access; cost-effective |
| Upgrade Cabinet Hardware and Fixtures | Very low – simple DIY with minimal tools | Low – hardware cost varies | Enhanced cabinet look and improved functionality | Quick updates; cost-conscious upgrades | Dramatic impact for minimal cost; improved use |
| Install Custom Built-in Storage Solutions | High – professional design and installation needed | High cost + skilled labor | Maximized storage and seamless integration | Luxury renovations; maximizing storage; tailored needs | Maximizes space; increases home value; custom fit |
| Create Two-Tone or Multi-Color Cabinet Schemes | Medium – requires careful color coordination and painting | Moderate – paint + labor if hired | Sophisticated, layered look; defines zones | Design-forward spaces; adding visual depth | Trendy, sophisticated; defines functional areas |
| Incorporate Glass Front or Mesh Panel Doors | Medium – door replacement or retrofit | Low to moderate depending on materials | Lighter, open cabinetry; display capability | Small spaces needing lightness; display storage | Visual lightness; customizable; complements lighting |
Crafting Your Perfect Bathroom Cabinet Solution
Embarking on a bathroom cabinet renovation is an exciting opportunity to redefine one of the most functional spaces in your home. We've explored a wide spectrum of possibilities, from budget-friendly updates to complete custom transformations. The journey from an outdated or impractical setup to a stylish and efficient one is paved with creative decisions that reflect your personal taste and daily routines. By now, you've seen how a simple change, like a fresh coat of paint or new hardware, can breathe new life into existing units, while more ambitious projects, such as installing a floating vanity or custom built-ins, can fundamentally alter your bathroom's layout and atmosphere.
The true success of any of these bathroom cabinet renovation ideas lies in the thoughtful intersection of aesthetics, functionality, and budget. Whether you're drawn to the modern, airy feel of open shelving, the classic elegance of glass-front doors, or the bold statement of a two-tone color scheme, the goal is always the same: to create a space that not only looks stunning but also serves you perfectly. Each choice, from material to finish, contributes to a cohesive design that can elevate your home's value and your daily enjoyment.
Key Takeaways for Your Renovation Journey
To ensure your project is a resounding success, keep these core principles at the forefront of your planning:
- Functionality First: Before falling in love with a specific look, analyze your storage needs. Do you need more counter space, better organization for small items, or hidden storage for bulkier supplies? Let your functional requirements guide your design choices.
- Balance Budget and Impact: A beautiful renovation doesn't always require a complete overhaul. Identify the changes that will deliver the most significant impact for your investment. Sometimes, upgrading hardware and lighting can be just as transformative as replacing the entire vanity.
- Cohesion is Crucial: Your cabinets are a major visual element, but they exist within a larger ecosystem. Ensure your chosen style, color, and materials complement your bathroom's existing tiles, fixtures, and overall decor to create a harmonious environment.
Planning Your Next Steps
With these inspiring ideas in hand, your path forward is clear. Begin by assessing your current bathroom, taking measurements, and creating a wishlist of features. Develop a realistic budget and a project timeline. Gather inspiration from various sources and create a mood board to solidify your vision. As you refine your design, remember that a beautiful renovation extends beyond the cabinets. Maintaining the entire space is key to its longevity and health. To protect your investment, it's wise to explore the top grout cleaning strategies to halt mold growth and ensure your beautiful new bathroom remains pristine and hygienic for years to come.
Ultimately, mastering these bathroom cabinet renovation concepts empowers you to make informed, confident decisions. You are no longer just choosing a cabinet; you are crafting a personalized solution that enhances your home and simplifies your life.
Ready to transform your vision into a stunning, high-quality reality? For custom, real wood cabinetry that perfectly captures your style, connect with the master craftsmen at Sinclair Cabinetry inc. Explore their gallery and schedule a consultation to begin designing the bathroom of your dreams.