
Ready to Maximize Your Small Kitchen?
Working with limited square footage doesn't mean sacrificing style or function. A small kitchen can be efficient, beautiful, and feel surprisingly spacious with the right design choices. This list explores eight innovative small kitchen remodel ideas to help you transform your compact cooking space into a highly functional and inviting area. These concepts matter because they offer practical solutions to maximize usability and visual appeal in tight quarters. Discover how open shelving, multi-functional islands, hidden storage, light-enhancing colors, vertical solutions, compact appliances, unique backsplashes, and multi-level lighting can revolutionize your kitchen. Let's dive into the ideas.
1. Open Shelving Installation
When exploring small kitchen remodel ideas, replacing traditional upper cabinets with open shelving is a transformative strategy. This design approach involves mounting exposed shelves directly onto the walls, foregoing the visual bulk of closed cabinetry. The result is an immediate sense of airiness and light, making confined kitchens feel significantly more spacious and open while offering highly accessible storage.
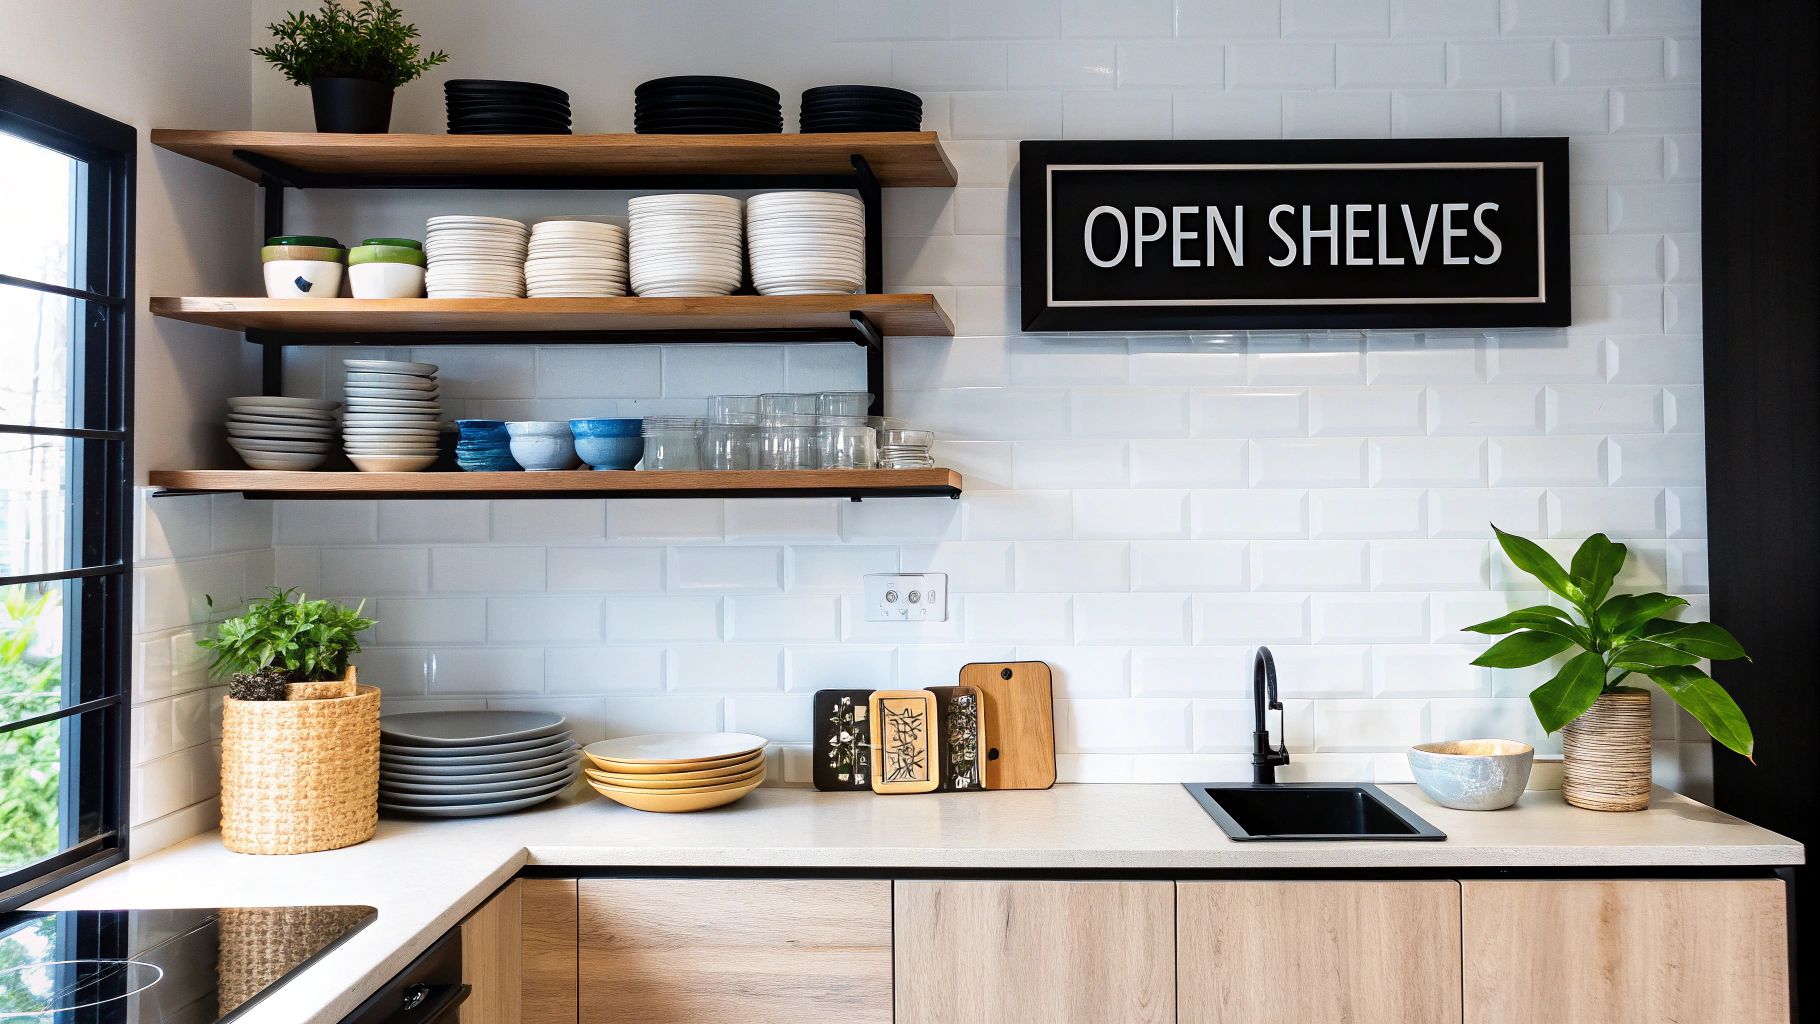
Open shelving earns its place on this list because it directly tackles the primary challenge of small kitchens: limited space and the potential for feeling cramped. By removing solid upper cabinet doors and boxes, sightlines extend further, bouncing more light around the room and creating an illusion of greater depth. This visual expansion is coupled with practical benefits, making it a favored choice for many modern kitchen designs.
Key Features & Benefits:
Open shelving systems offer considerable flexibility and distinct advantages:
- Features:
- Mounting: Often utilize "floating" shelves for a clean, minimalist look, mounted directly to wall studs or using robust bracket systems.
- Materials: Available in a wide array of materials to suit any aesthetic, including warm woods (like white oak or reclaimed timber), sleek metal, modern glass, or durable laminates.
- Customization: Shelf spacing, length, and overall arrangement can be fully customized to fit the specific dimensions of the kitchen and the items being stored.
- Hybrid Approach: Can be strategically combined with traditional lower cabinets or a few select upper cabinets to balance display space with concealed storage.
- Pros:
- Visual Openness: The most significant benefit for small kitchens; it prevents the "boxed-in" feeling upper cabinets can create.
- Cost-Effective: Generally less expensive than purchasing and installing full upper cabinet units, making it a budget-friendly element in small kitchen remodel ideas.
- Enhanced Perception of Space: Makes the kitchen feel larger, brighter, and more inviting.
- Accessibility: Frequently used items like plates, glasses, and spices are always visible and within easy reach – no more digging through deep cabinets.
- Decorative Display: Provides a platform to showcase attractive dishware, glassware, cookbooks, or decorative objects, adding personality and style to the kitchen.
Considerations (Cons):
While visually appealing, open shelving isn't without its drawbacks:
- Maintenance: Exposed shelves and their contents collect dust and cooking grease more readily than items behind closed doors, requiring frequent cleaning.
- Organization is Key: Items must be kept tidy and thoughtfully arranged; clutter becomes highly visible and can make the kitchen look messy.
- Reduced Storage Volume: Open shelves typically offer less overall storage capacity compared to traditional upper cabinets.
- Exposure: Not ideal for hiding mismatched, chipped, or less aesthetically pleasing kitchenware.
Successful Implementations & Inspiration:
Open shelving has been successfully integrated into countless small kitchen designs. Notable examples include:
- Emily Henderson: Known for designs like her small kitchen featuring crisp white oak shelves against classic white subway tile, creating a bright, Scandinavian-inspired look.
- IKEA: The affordable EKBY series (and similar systems) are frequently spotted in compact urban apartments, demonstrating the versatility and accessibility of the concept.
- Joanna Gaines (Magnolia): Often incorporates substantial reclaimed wood shelving in her signature modern farmhouse style, adding warmth and character. Designs popularized through Fixer Upper have heavily influenced this trend.
Design firms like Studio McGee and retailers such as West Elm and Pottery Barn frequently feature open shelving in their styling, showcasing its adaptability across various aesthetics from modern to traditional.
Actionable Tips for Installation & Styling:
- Clearance: Ensure adequate workspace below the shelves. A standard minimum is 18 inches of clearance between the countertop and the bottom shelf.
- Weight Capacity: Always use shelves and mounting hardware (brackets or internal supports for floating shelves) rated for the weight of the items you plan to store, especially heavy dishware. Consult manufacturer guidelines and ensure secure mounting into wall studs where possible.
- Visual Cohesion: Arrange items thoughtfully. Group similar colors or types of items together (e.g., all white plates, a section for glassware). Avoid overcrowding.
- Personalize: Mix functional items with decorative elements like small plants, framed art, or unique pottery to add personality.
- Consider Lighting: Installing under-shelf LED strip lighting can enhance visibility on the countertop below and add ambiance, highlighting the displayed items.
In summary, open shelving is a powerful tool in the small kitchen remodel ideas toolkit. When implemented thoughtfully, it can visually enlarge the space, improve accessibility, inject personality, and potentially save on budget compared to traditional cabinetry, making it a stylish and functional choice for homeowners and designers aiming to maximize compact kitchen areas.
2. Multi-Functional Kitchen Island
One of the most impactful small kitchen remodel ideas involves introducing a multi-functional kitchen island. This versatile piece acts as a compact command center, cleverly addressing the common challenge of limited counter space and storage in smaller kitchens. Unlike large, permanent installations, these islands are specifically designed for tighter quarters, offering significant functionality without overwhelming the layout. They serve as a freestanding hub for food preparation, storage, and sometimes even casual dining.
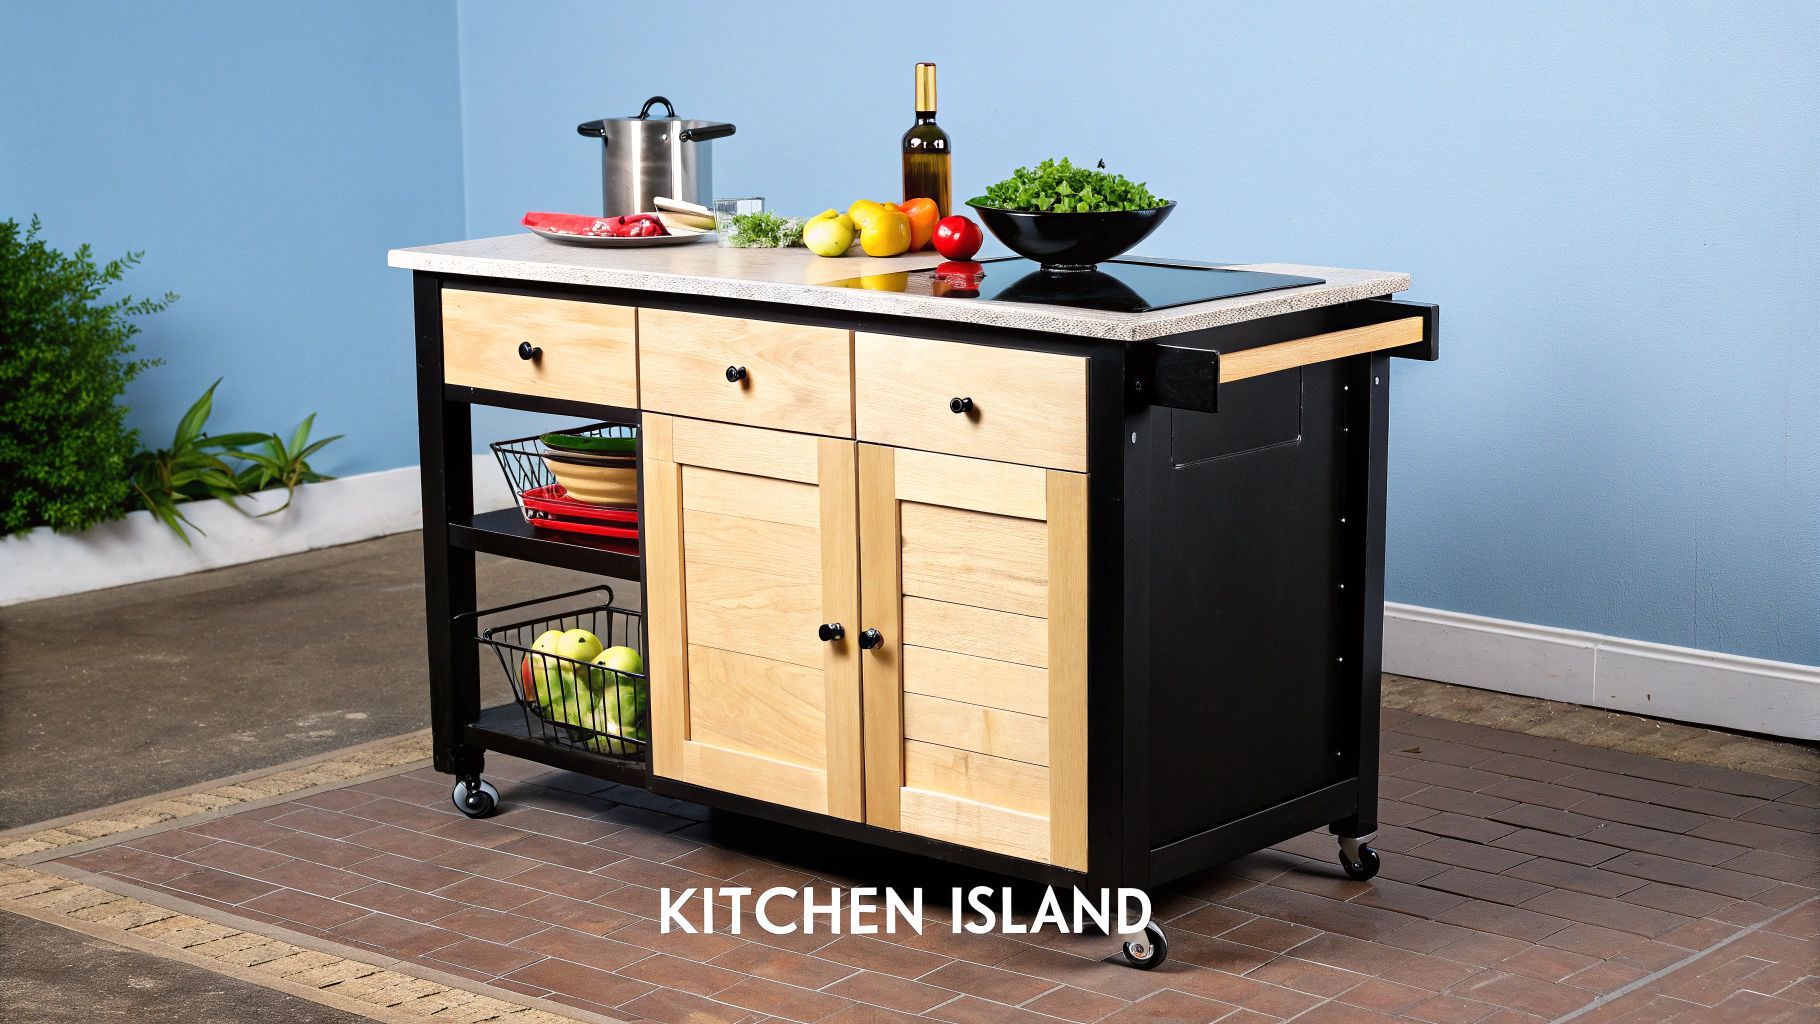
This item deserves its high rank on the list because it provides a substantial upgrade in utility and flexibility, often without the need for major construction or permanent changes – a key consideration in many small kitchen remodels. It directly tackles the lack of workspace and storage, which are primary pain points in confined kitchen areas.
How It Works & Key Features:
Multi-functional islands for small kitchens maximize utility within a modest footprint, typically ranging from 24 to 36 inches wide. Their effectiveness stems from clever design features:
- Compact Footprint: Designed explicitly not to dominate the room or obstruct walkways.
- Multiple Storage Options: They often incorporate a mix of drawers for utensils, open shelves for cookbooks or bowls, and closed cabinets for hiding less sightly items, helping to declutter countertops.
- Mobility: Many models come equipped with wheels (casters), allowing you to easily reposition the island for different tasks, move it out of the way for cleaning, or shift the flow of traffic as needed. Some wheels lock for stability during use.
- Extendable/Foldable Surfaces: Features like drop-leaves or pull-out extensions can instantly increase the available workspace or create a small dining nook when needed, then fold away to save space.
- Built-in Power: Some higher-end models include integrated electrical outlets, perfect for plugging in small appliances like mixers or blenders directly at your prep station.
Pros and Cons:
Like any remodeling solution, multi-functional islands come with their own set of advantages and disadvantages:
- Pros:
- Adds significant counter space without permanent renovation costs or commitments.
- Provides crucial, easily accessible storage for kitchen essentials.
- Can function as a casual dining spot or breakfast bar if designed with an overhang for stools.
- Offers unparalleled workspace flexibility, adapting to different needs within a tight kitchen.
- Creates a natural gathering point, making even small kitchens more social.
- Cons:
- Can potentially impede movement if the kitchen is extremely narrow or the island is poorly placed.
- Good quality mobile islands, especially those with durable materials and features, can represent a notable investment.
- Naturally offers less surface area and storage compared to a full-sized, built-in island.
- Some portable models might lack the robust durability and longevity of permanent cabinetry installations.
Examples of Implementation:
These versatile pieces are popular across various styles and budgets. You might see IKEA's affordable STENSTORP kitchen cart used effectively in space-savvy Swedish apartment renovations, adding practical charm. In more high-end urban settings like New York lofts, Crate & Barrel's Belmont islands offer a blend of style and function. For homeowners prioritizing quality and specific needs, custom butcher block islands by specialists like John Boos are often incorporated into professional or serious home chef's kitchens, demonstrating their adaptability even in compact luxury spaces.
Actionable Tips for Selection and Use:
- Measure Carefully: Ensure you maintain at least 36 inches of clear walkway space around all sides of the island for comfortable movement and appliance access.
- Match Heights: Ideally, choose an island with a counter height that matches your existing countertops (standard is typically 36 inches) for a cohesive look and ergonomic workflow.
- Prioritize Adaptability: Look for models with fold-down or extendable surfaces if you anticipate needing extra space occasionally for dining or larger cooking projects.
- Choose Durable Surfaces: Opt for work surfaces that are tough and easy to clean, such as stainless steel, butcher block (which can be refinished), or granite/quartz composites.
- Maximize Utility: Consider islands with built-in towel bars, spice racks, or hooks on the sides for hanging utensils or linens, adding extra functionality without taking up more floor space. The storage possibilities are vast, from open shelving for display to concealed cabinets. For further exploration of different island cabinet configurations and styles, Learn more about Multi-Functional Kitchen Island.
When and Why to Use This Approach:
A multi-functional kitchen island is an excellent choice when:
- You desperately need more counter and storage space but lack the room or budget for a full renovation involving built-in cabinetry.
- You are renting and cannot make permanent changes to the kitchen layout.
- You value flexibility and the ability to reconfigure your kitchen space for different occasions or tasks.
- You want to create a defined food prep zone or a casual spot for quick meals without undertaking major construction.
- You aim to enhance the functionality and flow of your existing small kitchen layout significantly.
The widespread appeal of these islands has been amplified by their visibility on Food Network kitchen sets, in aspirational catalogs like Williams-Sonoma Home collections, through features on HGTV shows like "Small Space, Big Style," and via modular kitchen solutions offered by retailers such as West Elm. Their proven utility makes them a smart and enduring element in small kitchen remodel ideas.
3. Pull-Out and Hidden Storage Solutions
When tackling a small kitchen remodel, maximizing every square inch is paramount. Pull-out and hidden storage solutions are ingenious methods designed specifically for this challenge, transforming often-overlooked or awkward areas into highly functional storage zones. This approach utilizes specialized hardware and clever cabinet design to unlock potential in narrow gaps, deep corners, the space beneath cabinets (toe kicks), and even the backs of cabinet doors, significantly boosting your kitchen's storage capacity without physically expanding its footprint. These systems are a cornerstone of smart small kitchen remodel ideas, offering practical ways to combat clutter and improve usability.
At its core, this concept works by bringing the stored items to you. Instead of reaching into the dark recesses of a deep cabinet or struggling with a blind corner, pull-out mechanisms allow shelves, drawers, or entire pantry units to slide out smoothly, granting full access and visibility. Hidden storage operates similarly, revealing storage compartments in unexpected places like the toe kick area, perfect for flat items like baking sheets or serving platters.
Key Features and Benefits:
- Pull-Out Pantry Systems: These tall, narrow units (often 6-12 inches wide) slide out vertically, perfect for storing spices, canned goods, or oils next to a stove or refrigerator. They turn otherwise unusable slivers of space into high-capacity storage.
- Toe-Kick Drawers: Installed beneath base cabinets in the recessed toe-kick area, these shallow drawers are ideal for items you don't need daily access to but want readily available, like extra linens, baking pans, or even pet bowls.
- Vertical Dividers: Simple yet effective, vertical dividers installed within deep drawers or cabinets create organized slots for baking sheets, cutting boards, and large platters, preventing them from becoming a jumbled stack.
- Cabinet Door Organizers: Racks and small shelves mounted on the inside of cabinet doors can hold spices, cleaning supplies, wraps, or utensils, freeing up valuable shelf space.
- Corner Cabinet Solutions: Awkward corner cabinets are notorious space-wasters. Solutions like Lazy Susans (rotating shelves), Magic Corners, or kidney-shaped pull-outs swing or slide items from the blind corner into easy reach.
- Hydraulic Lift Systems: Often used in upper cabinets or appliance garages, these systems allow heavy appliances like stand mixers to be lifted effortlessly to counter height and stored away just as easily, reducing countertop clutter.
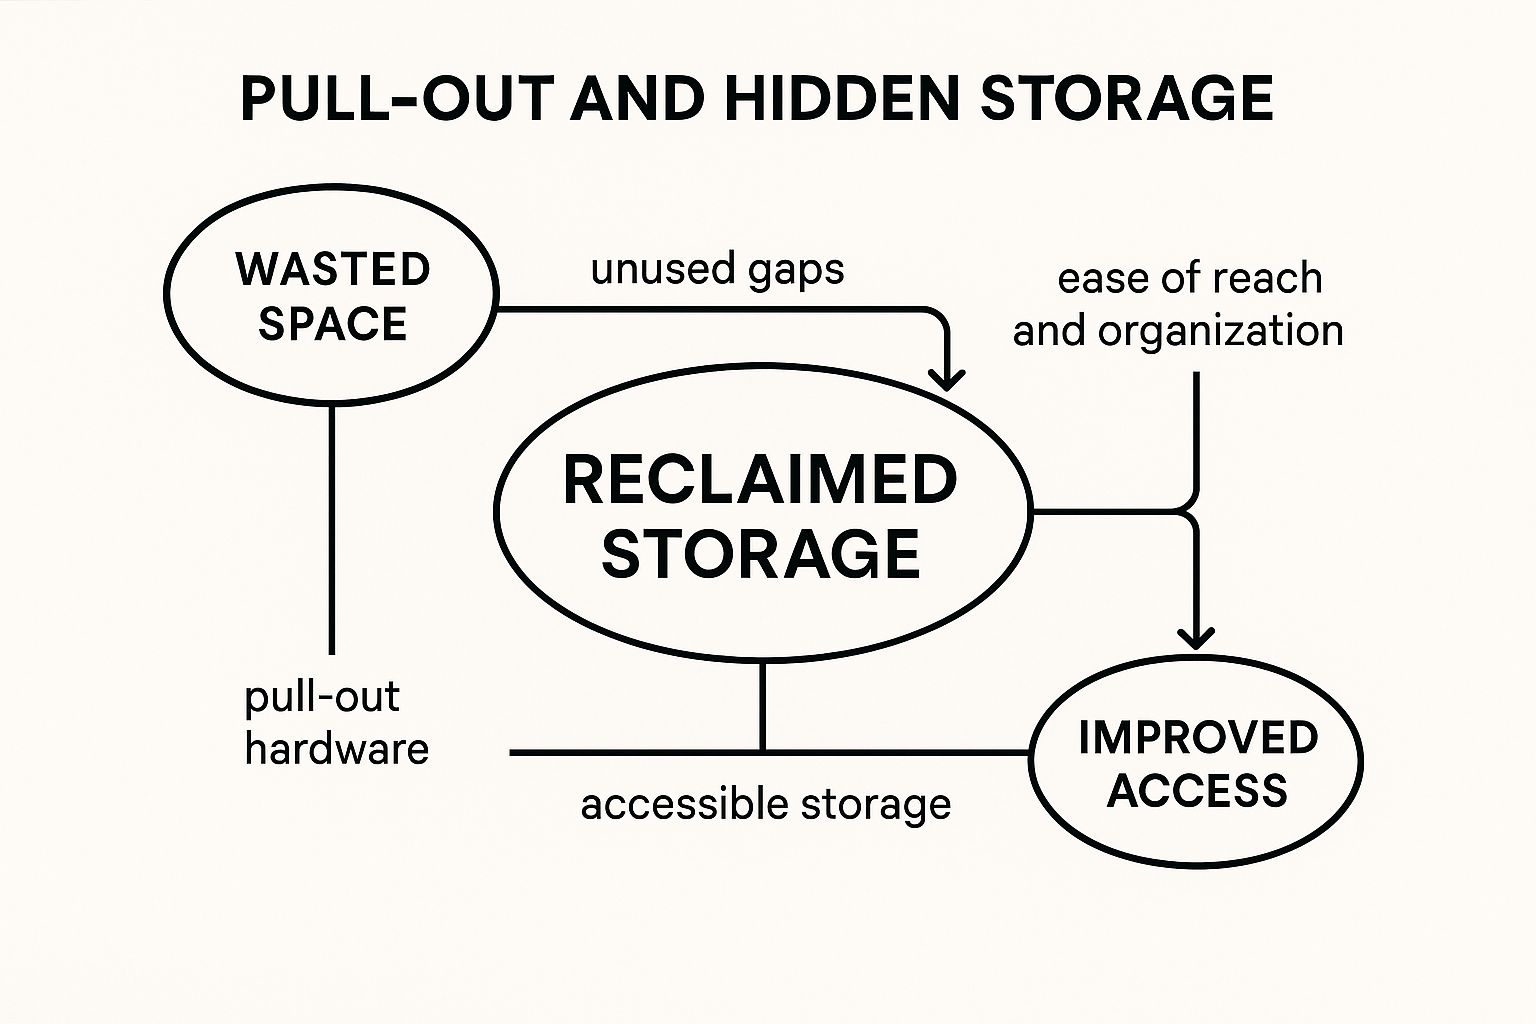
The following concept map visualizes the interconnected elements of pull-out and hidden storage solutions, illustrating how various features contribute to the overall goals of space maximization and organization in small kitchens.
As the infographic highlights, the central concept of 'Pull-Out & Hidden Storage' directly connects to core benefits like 'Space Maximization', 'Improved Accessibility', and 'Enhanced Organization'. These benefits are achieved through specific solutions targeting 'Awkward Corners', 'Narrow Gaps', 'Toe Kicks', and 'Deep Cabinets', ultimately leading to 'Reduced Countertop Clutter' and a more functional kitchen environment – key objectives for any small kitchen remodel ideas.
Pros:
- Maximizes storage capacity within the existing kitchen footprint.
- Significantly improves accessibility, especially for items stored at the back of deep cabinets or in corners.
- Helps reduce countertop clutter by providing dedicated homes for appliances and frequently used items.
- Creates highly organized systems tailored to specific items (e.g., spices, baking sheets).
- Makes previously unusable or awkward spaces (like narrow gaps or toe kicks) functional.
Cons:
- High-quality hardware and mechanisms can be a significant investment.
- Some complex systems may require professional installation for proper function and longevity.
- The hardware itself can slightly reduce the total internal volume of a cabinet compared to a simple shelf.
- Retrofitting these systems into existing, older cabinetry can sometimes be challenging and may require modifications.
When and Why Use This Approach:
This strategy is particularly effective during a full kitchen remodel when cabinets are being replaced or significantly modified, allowing for seamless integration. It's an essential consideration for anyone with a genuinely small kitchen, galley kitchens, or layouts with challenging corners and limited wall space. Homeowners, designers, and builders should prioritize these solutions when the primary goals are to drastically increase storage efficiency, improve workflow, and create a clean, organized look by minimizing clutter. Luxury homeowners and developers often incorporate high-end versions of these systems (like those from Blum or Hafele) for their smooth operation and sophisticated feel. For those seeking more information on specific types, you can Learn more about Pull-Out and Hidden Storage Solutions.
Examples and Popularization:
These solutions have become mainstream thanks to specialized brands. Rev-A-Shelf is perhaps the most well-known name, offering a vast array of pull-out systems often seen in everything from high-end Manhattan apartment renovations to standard cabinet lines. Blum's TANDEMBOX and LEGRABOX drawer systems are frequently featured in European-inspired and luxury kitchen remodels, known for their smooth glide and quality. Even budget-friendly options exist, such as IKEA's MAXIMERA drawers with compatible organizers. The broader trend towards home organization, championed by figures like Marie Kondo, and the offerings of custom storage companies like California Closets have further cemented the popularity of these intelligent storage solutions.
Actionable Tips for Implementation:
- Measure Precisely: Accurate measurements of your cabinet interiors and potential niche spaces are crucial before ordering any system. Account for hardware clearance.
- Invest in Quality: Opt for high-quality slides and hardware mechanisms. Smooth operation and durability are worth the investment, especially for frequently used pull-outs.
- Consider Waste Bins: Integrated pull-out trash and recycling systems are extremely popular, freeing up valuable floor space and keeping bins hidden.
- Maximize Drawer Interiors: Use thin-profile dividers and organizers within pull-out drawers to keep contents tidy and prevent shifting.
- Labeling: For deep drawers or pantry pull-outs with many items, simple labels can save time searching for specific goods.
Visual Inspiration:
See some of these clever storage solutions in action:
Incorporating pull-out and hidden storage is more than just adding accessories; it's a fundamental shift in how kitchen space is utilized. By transforming dead zones into dynamic storage, this approach is invaluable for anyone looking to maximize functionality and create a more organized, enjoyable kitchen, making it a top contender in any list of small kitchen remodel ideas.
Okay, here is the detailed section for item #4, "Light-Enhancing Color Schemes," formatted in Markdown and optimized as requested.
4. Light-Enhancing Color Schemes
When tackling small kitchen remodel ideas, manipulating the perception of space is paramount, and few strategies are as effective or versatile as employing light-enhancing color schemes. This approach isn't just about picking white paint; it's a deliberate use of color theory, material finishes, and light interaction to make compact kitchens feel significantly larger, brighter, and more welcoming without moving a single wall. It stands firmly as a cornerstone technique because it directly addresses the core challenges of a small kitchen: limited square footage and potential lack of natural light.
How It Works:
The principle is simple: light colors reflect light, while dark colors absorb it. By maximizing the surfaces that bounce light around the room, you create an environment that feels more open and airy.
- Light Reflection: Whites, creams, pale grays, and soft pastels have high Light Reflectance Values (LRV), meaning they bounce back a significant percentage of the light that hits them. This brightens the entire space, especially crucial in kitchens with small windows or limited natural light sources.
- Receding Effect: Lighter colors tend to visually recede, making walls seem further away and ceilings higher. This optical illusion effectively expands the perceived boundaries of the kitchen.
- Surface Sheen: Glossy and semi-gloss finishes (on cabinets, backsplashes, even appliances) further amplify light reflection compared to matte finishes, contributing to the expansive feel.
Key Features & Implementation:
Implementing a light-enhancing scheme involves several key choices:
- Monochromatic Palettes: Sticking primarily to variations of a single light color family (e.g., different shades of white, cream, or light gray) creates a seamless, uncluttered look that allows the eye to travel uninterrupted, enhancing the sense of space.
- High-Gloss or Satin Cabinet Finishes: Opting for cabinet finishes with some sheen helps bounce light. High-gloss offers maximum reflection, while satin provides a softer glow and may hide fingerprints better. White, light gray, or pale wood-look cabinets are popular choices.
- Light-Colored Countertops: Surfaces like white quartz, light granite, marble (or convincing laminates/solid surfaces that mimic them) continue the light-reflective strategy horizontally, preventing dark countertops from visually weighing down the space.
- Reflective Backsplash Materials: Glass tiles (especially in light colors or with an iridescent finish), polished ceramic or porcelain, mirrored backsplashes, or even polished light stone slabs significantly contribute to bouncing light around the work area.
- Strategic Color Blocking (Optional & Subtle): While mostly monochromatic, you might use slightly different light shades to subtly define zones (e.g., slightly darker light gray base cabinets with white upper cabinets) without introducing jarring contrasts that shrink the space.
Benefits (Pros):
- Creates Illusion of Larger Space: This is the primary advantage, making cramped kitchens feel more comfortable and functional.
- Brightens Naturally Dark Kitchens: Maximizes both natural and artificial light, crucial for usability and mood.
- Provides Timeless Appeal: Light, neutral kitchens tend to age well and appeal to a broad range of tastes, which can be beneficial for home resale value.
- Budget-Friendly Options: While high-end materials fit this scheme, it can also be achieved effectively with affordable paint, simple light tiles, and laminate countertops.
- Versatile Style Integration: Works beautifully with various design aesthetics, from modern and minimalist to farmhouse, coastal, and Scandinavian.
Considerations (Cons):
- Maintenance: Light colors, especially whites and creams, show dirt, spills, and stains more readily than darker hues. Requires more diligent cleaning.
- Potential for Coldness: An all-white or all-gray kitchen can feel sterile or clinical if not balanced.
- Personality Infusion: Can sometimes lack personality if not carefully accessorized or layered with texture.
- Fingerprints on Gloss: High-gloss finishes are notorious for showing fingerprints and smudges, demanding frequent wiping, especially in homes with children.
Actionable Tips for Success:
- Layer Textures: To prevent monotony within a single color family, introduce varied textures. Think textured subway tiles, subtly veined countertops, cabinets with simple Shaker-style detailing, wood grain (even light wood), and woven textiles (rugs, window treatments).
- Incorporate Contrast (Carefully): Add small doses of contrast for visual interest without overwhelming the space. This could be through dark cabinet hardware, black pendant lights, dark grout with light tiles, a few dark wood accessories (cutting boards, stools), or a vibrant piece of art.
- Choose Warm vs. Cool Tones: Select whites and grays carefully. Warm whites (with yellow or pink undertones) create a cozier feel, while cool whites (with blue or green undertones) feel crisper and more modern. Consider the natural light (north-facing rooms often benefit from warmer tones).
- Add Natural Elements: Wood accents (shelving, countertops, flooring, stools) are excellent for warming up predominantly white or gray schemes and adding organic texture. Plants also add life and a pop of color.
- Mind Your Lighting Temperature: The color temperature of your light bulbs (measured in Kelvins) significantly impacts how paint colors appear. Warm light (2700K-3000K) enhances creams and warm whites, while neutral or cool white light (3500K-4100K) complements grays and cooler whites. Ensure adequate layered lighting (ambient, task, accent).
Examples & Popularizers:
You can see masterful use of light-enhancing color schemes in the work of designers like Sarah Richardson, known for her bright, airy all-white galley kitchens, and Emily Henderson, who often employs light gray and white combinations. The enduring popularity of Scandinavian design, heavily reliant on white cabinetry, light wood, and maximizing brightness, is a major influence. Design firms like Studio McGee and popular figures like Joanna Gaines (Magnolia Home) frequently utilize these principles, making them mainstream. Paint companies like Benjamin Moore heavily promote their vast ranges of whites and light neutrals, providing extensive resources for homeowners.
Why This Belongs in Your Remodel Toolkit:
For anyone searching for impactful small kitchen remodel ideas, mastering light and color is fundamental. This approach offers a powerful way to visually overcome spatial limitations, enhance the functionality of the kitchen by making it brighter, and create a clean, appealing aesthetic that stands the test of time. It's a strategy that delivers significant perceived value, adaptable across budgets and styles, making it an essential consideration for almost any small kitchen renovation project.
5. Vertical Storage Maximization
When tackling small kitchen remodel ideas, one of the most impactful strategies is Vertical Storage Maximization. This design approach focuses on utilizing the full height of your kitchen walls, transforming often-neglected vertical space between countertops and ceilings into valuable storage real estate. By extending storage upwards, you not only significantly increase your capacity to store cookware, dinnerware, and pantry items but also draw the eye upward, creating an illusion of greater height and spaciousness in a compact room.
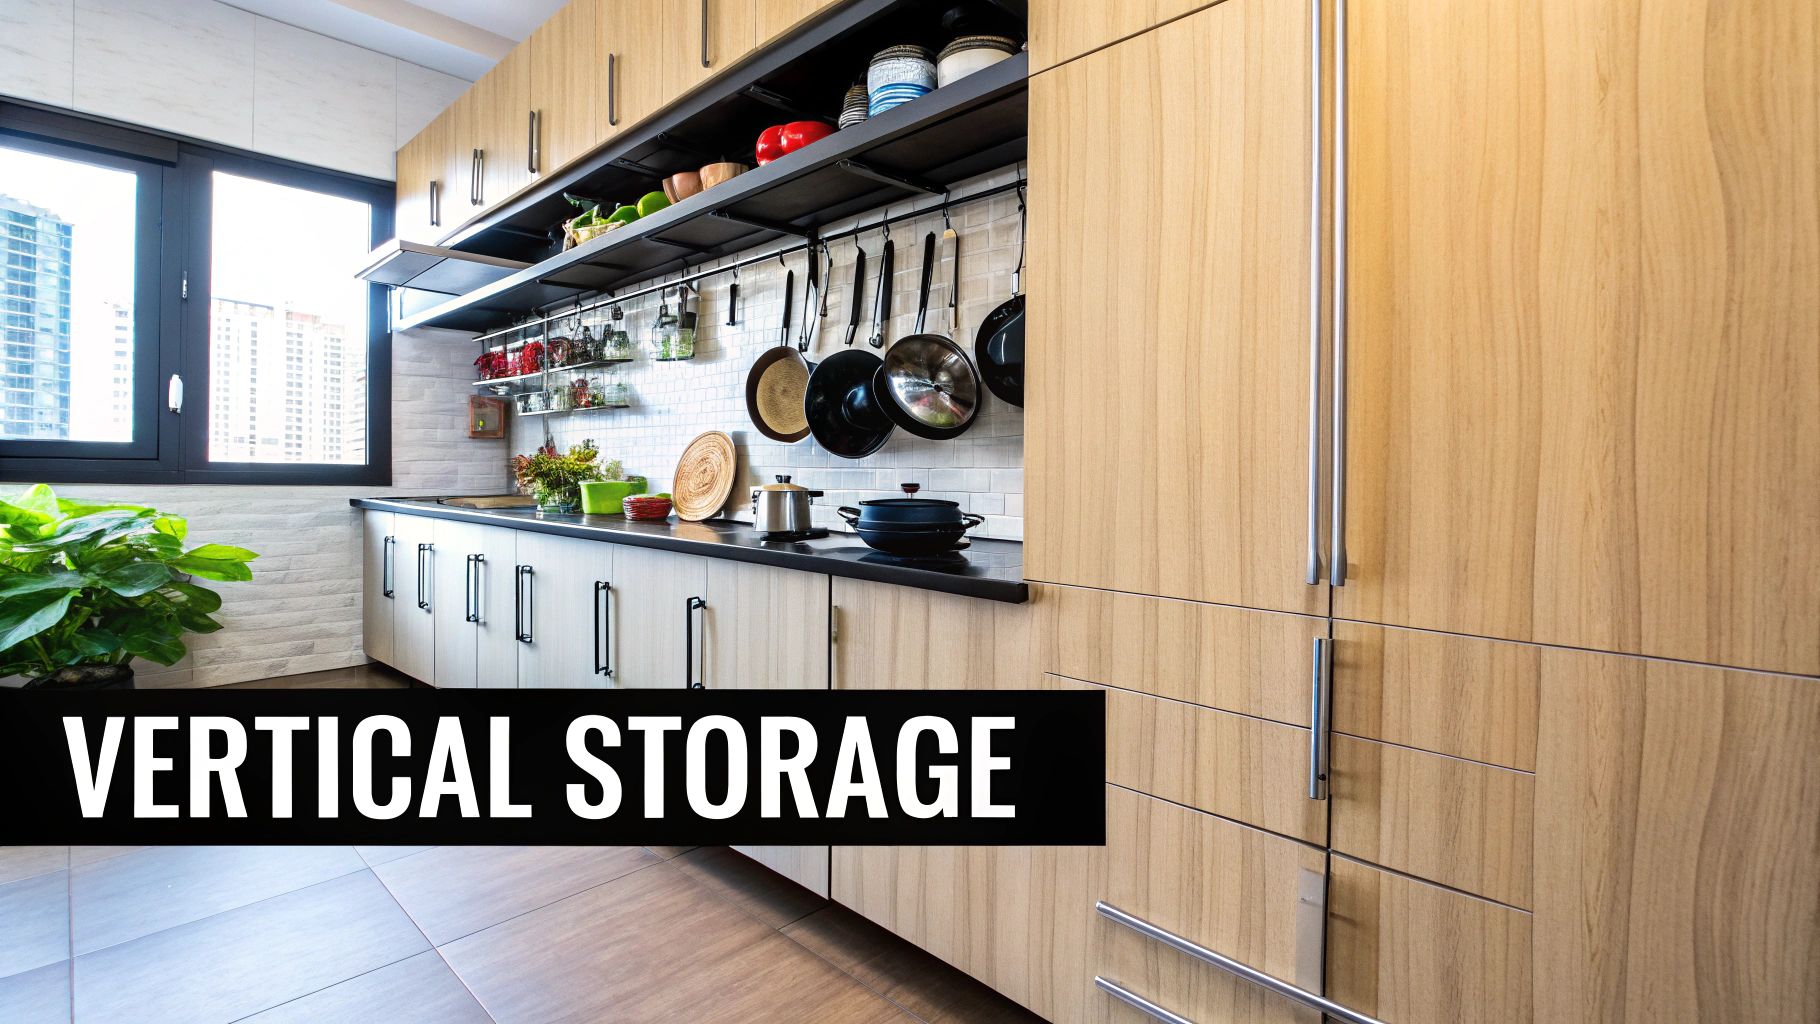
This concept is particularly crucial in small kitchens where floor space is at a premium. Instead of spreading outwards, you build upwards. It's a fundamental shift in thinking about kitchen layout, moving beyond standard-height wall cabinets that leave significant unused space above.
How it Works & Key Features:
Vertical storage maximization employs several clever features to achieve its goal:
- Floor-to-Ceiling Cabinetry: These units run the entire height of the wall, offering seamless storage and a striking visual line. They eliminate dust-collecting gaps above cabinets and provide maximum enclosed storage.
- Stacked Wall Cabinets: A common approach involves placing shorter cabinets directly on top of standard wall cabinets. Often, the upper units feature glass fronts, which helps to break up the visual mass and allows for displaying decorative items, reducing the feeling of a heavy wall of solid doors.
- Tall, Narrow Pantry Cabinets: These efficient units can slot into small footprints, offering deep, vertically organized storage for groceries and small appliances. Many feature pull-out shelves for easier access.
- Wall-Mounted Solutions: Utilizing the backsplash area and other free wall space is key. Examples include:
- Ceiling-Mounted Pot Racks: Frees up cabinet space by hanging pots and pans overhead.
- Vertical Magnetic Knife Strips: Keeps knives safely stored and easily accessible without consuming counter or drawer space.
- Wall-Mounted Rails with Hooks and Containers: Systems like IKEA's KUNGSFORS allow you to hang utensils, spices, and small containers, keeping essential tools within reach but off the work surfaces.
Why Use This Approach?
Vertical storage maximization is a go-to strategy when:
- Square footage is severely limited: It's one of the most effective ways to gain storage without expanding the kitchen's footprint.
- Counter space is minimal: Getting items off the countertop and onto walls or into tall cabinets is essential for maintaining clear prep areas.
- You have high ceilings: Taller ceilings offer more vertical real estate to exploit.
- You want a cleaner, more organized look: Enclosing items in tall cabinets or neatly organizing them on wall systems reduces visual clutter.
Pros:
- Dramatically maximizes storage capacity in small kitchens.
- Creates a sense of visual height, making the space feel larger.
- Keeps countertops clear and available for food preparation.
- Effectively utilizes wall space that is often overlooked or underused.
- Upper sections can be used to showcase attractive glassware or decorative pieces.
Cons:
- Accessing the highest storage areas typically requires a step stool.
- A wall filled entirely with tall cabinets can feel visually heavy if not balanced with elements like glass doors or open shelving.
- Installing floor-to-ceiling cabinetry or extensive wall-mounted systems may be challenging or prohibited in rental properties.
- The highest shelves are less convenient for frequently used, heavy items.
Examples of Successful Implementation:
This approach is commonly seen in urban apartments and compact living spaces. Think of IKEA's SEKTION tall cabinet systems configured for city dwellings, or custom floor-to-ceiling cabinetry integrated into high-end New York City brownstone renovations where space optimization is paramount. Sleek European kitchen manufacturers like Bulthaup often incorporate tall, integrated units. Wall-mounted systems, popularized by IKEA (GRUNDTAL, KUNGSFORS) and organization specialists like The Container Store, are ubiquitous in space-conscious designs shared across platforms like Pinterest's small space design community.
Actionable Tips for Your Remodel:
- Prioritize Placement: Store less frequently used items (seasonal dishes, specialty appliances) in the highest, hardest-to-reach cabinets.
- Organize Interiors: Use cabinet organizers like shelf risers, drawer dividers, and pull-out baskets to maximize the usability of the internal vertical space within cabinets.
- Install Lighting: Add under-cabinet lighting beneath upper cabinets (even stacked ones) to illuminate the countertop and prevent shadows, which can make a small kitchen feel darker and smaller.
- Break it Up Visually: Incorporate glass-front doors or a section of open shelving in upper cabinets to reduce the visual weight and add display opportunities.
- Keep Access Easy: Invest in a sturdy, slim, folding step stool that can be easily stored in a narrow gap or pantry.
Vertical Storage Maximization is more than just adding cabinets; it's a strategic design philosophy essential for functional and beautiful small kitchen remodel ideas. By thinking vertically, homeowners, designers, and builders can unlock significant potential in even the most compact kitchens.
Okay, here is the detailed section for item #6, "Smart and Compact Appliances," formatted in Markdown and incorporating the provided details and guidelines.
6. Smart and Compact Appliances
When square footage is at a premium, rethinking the very footprint of your essential kitchen components becomes crucial. This is where embracing smart and compact appliances emerges as one of the most effective small kitchen remodel ideas. These appliances are specifically engineered for tighter spaces, delivering the functionality you expect from standard-sized units but in significantly reduced dimensions. They merge space-saving design with advanced technology, ensuring that a smaller kitchen doesn't mean compromising on performance or modern convenience.
What Are They and How Do They Help?
Smart and compact appliances are essentially downsized versions of their larger counterparts, often incorporating features tailored to enhance usability in confined areas. They work by optimizing internal components and overall dimensions without sacrificing core functionality.
- Reduced Footprint: The most obvious benefit is their size. Think 18-inch or 24-inch wide dishwashers that slot into narrow spaces, or counter-depth refrigerators (typically 24-27 inches deep instead of 30+) that sit flush with cabinetry, saving precious floor space and improving traffic flow. Slimmer widths (like 24-inch refrigerators) are also common.
- Multi-Functionality: Many compact appliances combine roles. Combination microwave-convection ovens, for instance, provide baking, roasting, and microwaving capabilities in a single unit, eliminating the need for separate appliances.
- Enhanced Control & Efficiency: Induction cooktops are popular in compact formats not only for their sleek look but also for their precise temperature control and safety features (surfaces stay cooler), which are advantageous in tighter workspaces. Smart connectivity allows remote monitoring and control via smartphones – perfect for preheating the oven on your way home or checking if the fridge door is closed without needing to physically be in the potentially cramped kitchen space.
- Integrated Design: Options like drawer refrigerators and dishwashers offer flexibility in placement (e.g., under counters) and can be faced with custom panels (panel-ready appliances) to blend seamlessly with cabinetry, creating a visually larger and more cohesive space.
- Beyond the Core Kitchen: For those with laundry near the kitchen, all-in-one washer-dryer combos represent the ultimate space consolidation for adjacent utility areas.
Why This Deserves a Spot on the List
Choosing smart and compact appliances directly tackles the primary challenge of a small kitchen: lack of space. It allows homeowners to incorporate essential features like dishwashers, high-performance ovens, and adequate refrigeration where it might otherwise seem impossible. This approach is fundamental to creating a truly functional and modern small kitchen remodel, transforming a potentially frustrating space into an efficient and enjoyable one.
Examples of Successful Implementation:
The effectiveness of this approach is evident in high-density urban living and luxury developments where space optimization is key:
- Fisher & Paykel's 24-inch drawer dishwashers are frequently specified in luxury condominiums, offering dishwashing convenience without consuming excessive cabinet width.
- Bosch's 24-inch 800 Series refrigerators are a common sight in compact New York apartments, providing sophisticated refrigeration in a slim, counter-depth profile.
- Miele's compact ArtLine series, known for its handleless design and seamless integration, is often featured in high-end European urban residences.
- Brands like Samsung and LG continue to innovate, bringing smart home technology to increasingly compact appliance formats.
Pros and Cons:
Pros:
- Space Saving: Significantly reduced footprint frees up valuable counter, cabinet, and floor space.
- Full Functionality: Designed to perform comparably to many standard-sized models.
- Energy Efficiency: Compact models often consume less energy and may exceed standard efficiency ratings (look for Energy Star).
- Smart Features: Enhance convenience, control, and efficiency, particularly beneficial in limited spaces.
- Modern Aesthetic: Sleek designs complement contemporary small kitchen styles.
- Precise Control: Features like induction offer enhanced cooking precision, reducing errors in tight quarters.
Cons:
- Higher Cost: Generally carry a higher price tag than standard-sized appliances.
- Limited Capacity: Reduced size inherently means less internal volume (e.g., fewer place settings in dishwasher, smaller oven cavity).
- Potential Lifespan/Repair: Some specialized compact models might have different durability profiles, and repairs can be more complex or costly due to unique parts.
- Installation Nuances: May require specific considerations for ventilation, plumbing, or electrical connections in tight spaces.
When and Why to Use This Approach:
Opt for smart and compact appliances when:
- Space is severely limited: This is the primary driver. They make functional layouts possible in truly small kitchens.
- Modern features and aesthetics are desired: You don't want to sacrifice technology or style due to size constraints.
- Functionality is paramount: You need features like a dishwasher or convection oven but lack the room for standard sizes.
- Budget allows for the premium: The higher cost is justifiable for the space-saving benefits and features gained.
Actionable Tips for Your Remodel:
- Prioritize Multi-Taskers: Seek out appliances that serve multiple functions, like a microwave-convection oven or an oven with steam capabilities.
- Verify Ventilation: Ensure manufacturer requirements for airflow and ventilation are met, especially crucial in tight cabinet installations.
- Consider Panel-Ready: For a seamless, integrated look that can make the kitchen feel larger, opt for panel-ready models that accept custom cabinet fronts.
- Assess Your Needs Realistically: Carefully evaluate if the compact dimensions (e.g., oven size, fridge capacity) truly meet your household's cooking and storage habits.
- Look for Energy Star: Help offset the higher purchase price over time with potential energy savings by choosing Energy Star certified models.
By carefully selecting smart and compact appliances, you can overcome spatial limitations and achieve a highly functional, efficient, and stylish outcome for your small kitchen remodel ideas.
Okay, here is the detailed section for Item #7, "Space-Defining Backsplash Designs," formatted in Markdown and optimized as requested.
7. Space-Defining Backsplash Designs
When exploring impactful small kitchen remodel ideas, the backsplash often emerges as a surprising hero. Far more than just a protective layer against splashes and splatters, a strategically chosen backsplash can fundamentally alter the perception of space in a compact kitchen. Space-defining backsplash designs leverage the power of vertical surfaces – using color, pattern, texture, and reflectivity – to visually expand, brighten, and inject personality into even the tightest cooking areas. This approach turns a functional necessity into a powerful design tool that creates architectural interest without consuming valuable floor or counter space.
How It Works:
The core principle is visual manipulation. Our eyes are drawn to patterns, light, and vertical lines. By carefully selecting backsplash materials and installation methods, you can trick the eye into perceiving more space, height, or light than physically exists.
- Reflectivity: Materials like glass tiles (especially large format or subway style), mirrored tiles (antiqued or clear), or even polished metallic sheets bounce light around the room, instantly making it feel brighter and more open. They reflect views, creating an illusion of depth and doubling the apparent space.
- Scale and Pattern: Using large-format tiles minimizes grout lines, resulting in a less cluttered, more expansive look. Conversely, specific patterns can draw the eye upward (vertical installations like stacked tile or herringbone pointing up) to emphasize ceiling height. Bold, dramatic patterns can create a stunning focal point, drawing attention to the design rather than the room's small dimensions, though should be used judiciously.
- Continuity: Extending the backsplash material beyond its traditional boundaries – running it up to the ceiling or wrapping it around a corner – creates unbroken visual lines. This continuity helps unify the space and makes the walls feel taller and the kitchen larger. Integrating open shelving directly onto a full-height backsplash enhances this cohesive effect.
- Texture and Color: Rich textures, like those found in handmade Zellige tiles, add depth and character. Lighter colors generally make spaces feel larger, but strategic use of darker or contrasting grout can emphasize geometric patterns and add sophisticated detail.
Why Use This Approach in a Small Kitchen Remodel?
This technique is particularly effective for small kitchens because it addresses spatial limitations head-on without requiring costly structural changes. It's a prime example of working smarter, not harder, with your design.
- High Impact, Low Footprint: It delivers significant visual transformation without encroaching on limited square footage.
- Enhanced Light: Reflective options are invaluable in small or poorly lit kitchens.
- Style Statement: The backsplash is a prime area to define your kitchen's aesthetic – be it modern, traditional, bohemian, or minimalist – often with less investment than replacing cabinetry or countertops.
- Zone Definition: In open-plan living spaces, a distinct backsplash can visually anchor the kitchen area, separating it from adjacent living or dining zones.
- Relatively Easy Updates: Compared to major structural work, changing a backsplash down the line is a more manageable update if trends or tastes evolve.
Examples of Success:
We see this concept executed beautifully across various design contexts:
- Artisanal Charm: The subtle variations and light-catching glaze of handmade Zellige tile installations, often extending to the ceiling, bring warmth and understated expansion to renovated Brooklyn brownstone kitchens.
- Urban Sleek: Mirrored subway tile backsplashes are a go-to solution in tiny Manhattan studio apartments, maximizing light and creating an illusion of depth.
- Vertical Drama: Extending striking floor-to-ceiling herringbone marble tile, as sometimes seen in compact but luxurious London flats, adds a sense of grandeur and vertical space.
Key Features & Techniques to Consider:
- Reflective materials: Mirror, glass tile (clear, frosted, colored), polished metallic elements (stainless steel, brass).
- Continuous installations: Extending tile vertically to the ceiling or horizontally beyond the traditional cabinet boundaries.
- Dramatic patterns or oversized tiles: Using large-format tiles (e.g., 24×24 or larger slabs) or eye-catching geometric/mosaic patterns as a focal point.
- Contrasting grout: Highlighting tile shape and pattern (e.g., white subway tile with dark grey grout).
- Integrated open shelving: Mounting shelves directly onto the tiled wall for a seamless look.
- Extended coverage: Tiling behind refrigerators or on adjacent walls for visual continuity.
Pros:
- Creates significant visual interest and a focal point without using floor space.
- Reflective materials can dramatically increase perceived light and space.
- Allows for strong style definition with potentially moderate investment compared to other elements.
- Relatively easier and less disruptive to update later than cabinetry or layout changes.
- Can help visually delineate the kitchen zone in open-concept homes.
Cons:
- Bold or highly specific patterns may feel dated more quickly than neutral choices.
- High-quality materials like authentic Zellige, mirrored tile, or natural stone slabs can be expensive per square foot.
- Complex installations (intricate patterns, ceiling-height work) increase labor costs.
- Some materials (like mirrors or certain unsealed natural stones) require specific cleaning methods and careful maintenance.
Actionable Tips for Your Remodel:
- Go High: Extend your chosen backsplash material right up to the ceiling, especially behind open shelving or range hoods, to draw the eye upward.
- Think Big (Tile): Opt for large-format tiles to minimize grout lines, creating a cleaner, less busy appearance that feels more spacious.
- Reflect On It: Seriously consider glass, mirrored, or high-gloss finish tiles to bounce light around the room.
- Vertical Emphasis: Install rectangular tiles (like subway tiles) vertically instead of horizontally to make the ceiling feel higher.
- Strategic Boldness: If you love a vibrant pattern (like those from cement tile makers Clé Tile or Granada Tile), consider using it on just one focal wall (e.g., behind the range) to avoid overwhelming the small space. Pair it with simpler finishes elsewhere.
Why This Idea Deserves Its Place:
Space-defining backsplashes are a cornerstone of effective small kitchen remodel ideas because they offer one of the highest ratios of visual impact to physical footprint. Inspired by the work of designers like Sarah Sherman Samuel and Emily Henderson, and utilizing beautiful materials from companies like Heath Ceramics, this approach directly tackles the feeling of confinement in small kitchens by cleverly manipulating visual perception. It adds style, enhances light, and creates a sense of spaciousness, making it an indispensable tool for anyone looking to maximize the style and function of a compact kitchen.
Okay, here is the detailed section for item #8, Multi-Level Lighting Systems, formatted in Markdown and incorporating all the requested elements.
8. Multi-Level Lighting Systems
One of the most transformative small kitchen remodel ideas involves moving beyond a single, central ceiling fixture and embracing a multi-level lighting system. This sophisticated approach layers different types of illumination – ambient, task, and accent lighting – working together to make a compact kitchen feel significantly larger, brighter, and far more functional. Instead of relying on one source that often casts shadows and leaves corners dim, a multi-level system strategically places lights to serve specific purposes, enhancing both usability and atmosphere.
Why This Deserves a Spot on the List:
Multi-level lighting directly addresses the inherent challenges of small kitchens. Limited square footage can often feel darker or more cramped, especially if natural light is restricted. By thoughtfully layering light, you can:
- Visually Expand the Space: Eliminating dark corners and illuminating vertical surfaces (like cabinet fronts and backsplashes) tricks the eye into perceiving more depth and height.
- Maximize Functionality: Proper task lighting ensures cooking, chopping, and cleaning are done safely and efficiently, without working in your own shadow.
- Create Atmosphere: Different layers allow you to adjust the mood, from bright and energetic for cooking to soft and inviting for relaxing or entertaining, all within the same compact area.
How It Works: Layering Light
A successful multi-level system integrates several types of lighting, each fulfilling a distinct role:
- Ambient Lighting: This provides the general, overall illumination for the room. It's the foundational layer.
- Examples: Recessed ceiling fixtures (pot lights), flush-mount or semi-flush mount ceiling lights. Using slim-profile recessed LEDs maximizes precious headroom in small kitchens.
- Task Lighting: Focused light directed at specific work zones where activities like food preparation, cooking, and washing up occur. This is crucial for safety and efficiency.
- Examples: Under-cabinet LED strips or puck lights are essential for illuminating countertops directly. Pendants hung over a small island or sink area also provide excellent task lighting. Quality under-cabinet lighting is a cornerstone of this approach; you can Learn more about Multi-Level Lighting Systems and their installation specifics.
- Accent Lighting: Used to draw attention to architectural features, display items, or add visual interest.
- Examples: In-cabinet lighting (behind glass doors to showcase dishware), toe-kick lighting (subtle illumination at floor level, great for nighttime visibility or mood), or directional spotlights highlighting artwork or textured backsplashes.
Key Features & Benefits:
- Eliminates Dark Corners: Properly layered lighting reaches all parts of the kitchen, preventing gloomy areas that make the space feel smaller.
- Improves Functionality: Precise task lighting drastically improves visibility for all kitchen activities.
- Creates Visual Interest & Depth: The interplay of different light sources adds dimension and character.
- Adaptability: With separate controls (switches, dimmers, smart systems), you can adjust the lighting for cooking, dining, cleaning, or nighttime navigation.
- Highlights Design Elements: Showcase beautiful cabinetry, countertops, or backsplashes that might otherwise be lost in shadow.
- Modern Control: Features like dimmable options and smart controls (e.g., Philips Hue systems) allow for customizable scenes and effortless atmosphere adjustments via apps or voice commands.
Pros:
- Significantly enhances the perception of space in small kitchens.
- Vastly improves safety and efficiency during food preparation.
- Adds significant visual appeal and creates a high-end feel.
- Highly flexible and adaptable to different needs and times of day.
- Can accentuate architectural details and expensive finishes.
Cons:
- Hardwired systems often require professional electrical installation, adding to remodel costs.
- High-quality LED fixtures and smart control systems can have a higher initial purchase price.
- More complex systems might require learning new controls or apps.
- Simpler battery-operated options (like some puck lights) require ongoing battery replacement or recharging.
Examples & Popular Systems:
This approach is common in modern design. You'll see integrated systems like Philips Hue used in contemporary apartments, Hafele's LOOX LED system featured in sleek European-inspired kitchens, and custom under-cabinet and in-cabinet lighting specified in high-end condo renovations. Brands like Kichler, WAC Lighting (known for slim profiles), and even IKEA offer components that enable homeowners and designers to build effective multi-level lighting plans.
Actionable Tips for Implementation:
- Plan Early: Integrate your lighting plan into the initial stages of your kitchen remodel design.
- Choose the Right Color Temperature: Aim for LEDs in the 2700K to 3000K range (warm white) for a comfortable, inviting kitchen glow.
- Use Separate Controls: Install different lighting layers on separate switches or dimmers for maximum flexibility.
- Position Task Lighting Carefully: Place under-cabinet lights towards the front of the cabinets to illuminate the counter effectively without casting shadows from your body.
- Consider Dimmers Everywhere: Adding dimmers to ambient, task, and even accent lighting provides ultimate control over intensity and mood.
- Opt for Slim Fixtures: Especially for ceiling and under-cabinet lights, choose low-profile designs to conserve space.
When & Why to Use This Approach:
Implementing a multi-level lighting system is highly recommended for virtually any small kitchen remodel idea, but it's particularly crucial when:
- You want to make a small kitchen feel as spacious and open as possible.
- Functionality and task visibility are top priorities.
- The kitchen lacks abundant natural light.
- You desire flexibility to change the kitchen's ambiance.
- You are investing in quality finishes (cabinets, counters, backsplash) and want to showcase them effectively.
By strategically layering light, you can overcome the limitations of a small footprint and create a kitchen that is beautiful, highly functional, and feels surprisingly spacious.
8 Small Kitchen Remodel Ideas Comparison
| Idea | Implementation Complexity 🔄 | Resource Requirements ⚡ | Expected Outcomes 📊 | Ideal Use Cases 💡 | Key Advantages ⭐ |
|---|---|---|---|---|---|
| Open Shelving Installation | Medium – requires wall mounting and customization | Low to Medium – materials vary by choice | Moderate – improves visual openness & accessibility | Small kitchens needing open storage and decor | Creates spacious feel, inexpensive, easy access to items |
| Multi-Functional Kitchen Island | Medium to High – depends on features like mobility, extendability | Medium to High – quality mobile units and materials required | High – adds workspace, storage, and seating flexibility | Small kitchens needing versatile counter and storage | Adds workspace and storage, enhances social interaction |
| Pull-Out and Hidden Storage Solutions | High – specialized hardware and professional installation often needed | Medium to High – quality hardware can be costly | Very High – maximizes storage in minimal space | Tight kitchens needing smart space reclamation | Maximizes storage, improves accessibility, reduces clutter |
| Light-Enhancing Color Schemes | Low – primarily paint and finishes | Low to Medium – depends on paint and materials | Moderate – visually enlarges and brightens space | Small, dark kitchens needing visual expansion | Creates illusion of space, budget-friendly, timeless appeal |
| Vertical Storage Maximization | Medium to High – cabinetry installation and balancing design | Medium to High – tall cabinets and hardware | High – increases storage without expanding footprint | Kitchens with limited floor space but high ceilings | Maximizes vertical space, clears countertops, adds visual height |
| Smart and Compact Appliances | Medium – may require special installation | High – cost of advanced, compact units | High – space-saving with full functionality | Tech-forward small kitchens needing efficiency | Saves space, energy-efficient, modern convenience |
| Space-Defining Backsplash Designs | Medium – tile installation and pattern work | Medium to High – quality materials & skilled labor | Moderate – enhances style and perceived space | Small kitchens needing focal points and light reflection | Visually expands kitchen, easy to update, defines style |
| Multi-Level Lighting Systems | High – electrical work and multiple fixture types | Medium to High – quality LEDs and controls | Very High – improves functionality and atmosphere | Small kitchens requiring adaptable and layered lighting | Eliminates shadows, highlights features, adaptable lighting |
Bringing Your Small Kitchen Vision to Life
Transforming a compact kitchen doesn't mean sacrificing style or functionality. As we've explored, a wealth of small kitchen remodel ideas – from clever storage solutions like open shelving and pull-outs to space-enhancing techniques like light color palettes and vertical maximization – can dramatically reshape your culinary space. The most important takeaways emphasize that smart, intentional design choices are paramount in limited areas. Whether it's integrating multi-functional elements like a versatile island, selecting compact appliances, or using strategic lighting and backsplashes, every decision counts towards creating a kitchen that feels open, efficient, and uniquely yours.
Mastering these small kitchen remodel ideas isn't just about aesthetics; it's about fundamentally improving how you use and experience your home's hub. A well-designed small kitchen enhances daily routines, makes cooking more enjoyable, and can significantly boost your property's value and appeal. Your next steps involve assessing your specific needs and space constraints, prioritizing the ideas that resonate most, and beginning your research. Visualize how concepts like multi-level lighting or hidden storage could work together in your kitchen environment.
Many of the most effective small kitchen remodel ideas, particularly those involving optimized storage like custom pull-outs and perfectly fitted vertical solutions, rely heavily on precision and customization. This is where expert craftsmanship becomes invaluable for achieving a seamless and highly functional result.
Ready to implement truly tailored storage solutions for your compact space? Explore how Sinclair Cabinetry inc crafts high-quality, real wood custom cabinets, perfectly designed to maximize efficiency and style within your unique small kitchen layout. Their expertise ensures your vision for a beautiful, functional kitchen is realized with lasting quality.