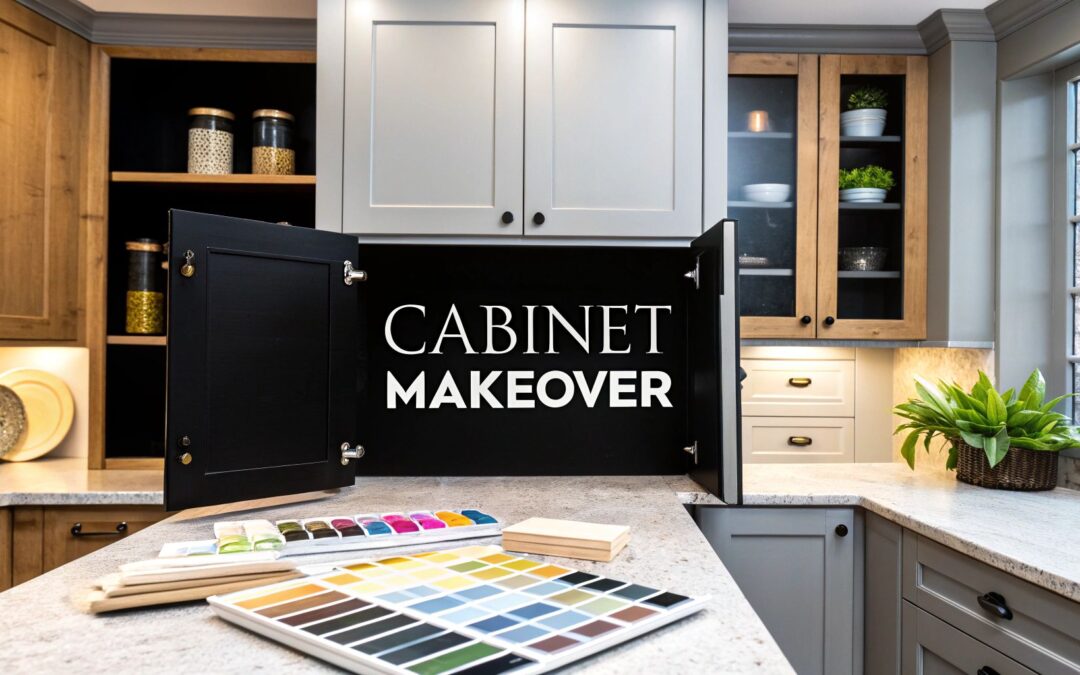
Your kitchen is more than just a place to cook; it's the central hub of your home where life unfolds. Dated or worn cabinets can drag down the entire aesthetic, making the space feel uninspired and inefficient. Fortunately, a full-scale demolition isn't the only path to a stunning kitchen. This guide explores nine transformative kitchen cabinet remodeling ideas designed to fit various budgets, styles, and skill levels. Whether you're aiming for a minor refresh or a major style overhaul, these actionable strategies will help you create a space that is both beautiful and functional.
We'll delve into specific techniques, from simple hardware swaps and strategic painting to professional refacing and crown molding additions, providing the details you need to make an informed decision. These projects can be part of a larger renovation, and understanding all the components is key. For instance, when breathing new life into your kitchen, practical considerations like learning how to install a kitchen sink correctly are vital for a successful remodel. For homeowners in Cape Coral seeking unparalleled craftsmanship, Sinclair Cabinetry offers custom solutions to bring these ideas to life with exceptional quality and over 35 years of expertise.
1. Two-Tone Cabinet Design
One of the most impactful kitchen cabinet remodeling ideas is the two-tone design, a sophisticated approach that breaks up the monotony of a single-color kitchen. This method involves using two different colors, materials, or finishes for your cabinetry to create visual depth and a custom-designed feel. It’s a versatile trend popularized by design leaders like Shea McGee and Joanna Gaines, celebrated for its ability to add personality without overwhelming the space.
The most common application is painting upper cabinets a lighter color and lower cabinets a darker, grounding shade. This technique not only draws the eye upward, making the ceiling feel higher, but also helps hide scuffs and wear on the more heavily used lower cabinets. Another popular strategy is to use a contrasting color or finish for a kitchen island, turning it into a stunning focal point.

How to Implement a Two-Tone Design
Successfully executing a two-tone look requires careful planning to ensure a harmonious and balanced result.
- Classic Contrast: For a timeless look, pair white or off-white upper cabinets with navy blue, forest green, or charcoal gray lower cabinets. This creates a crisp, clean aesthetic that remains visually interesting.
- Natural & Painted: Combine the warmth of natural wood with the sleekness of paint. Consider white oak uppers paired with sophisticated sage green lowers, or dark walnut island cabinets set against light gray perimeter cabinetry.
- Create Cohesion: Unify the two distinct looks by using the same hardware (pulls and knobs) throughout the kitchen. This small detail ensures the overall design feels intentional and connected.
Pro Tip: Before committing to colors, always test large sample swatches in your kitchen. View them at different times of the day to see how natural and artificial light affects their appearance and interaction. This simple step can prevent costly color mistakes.
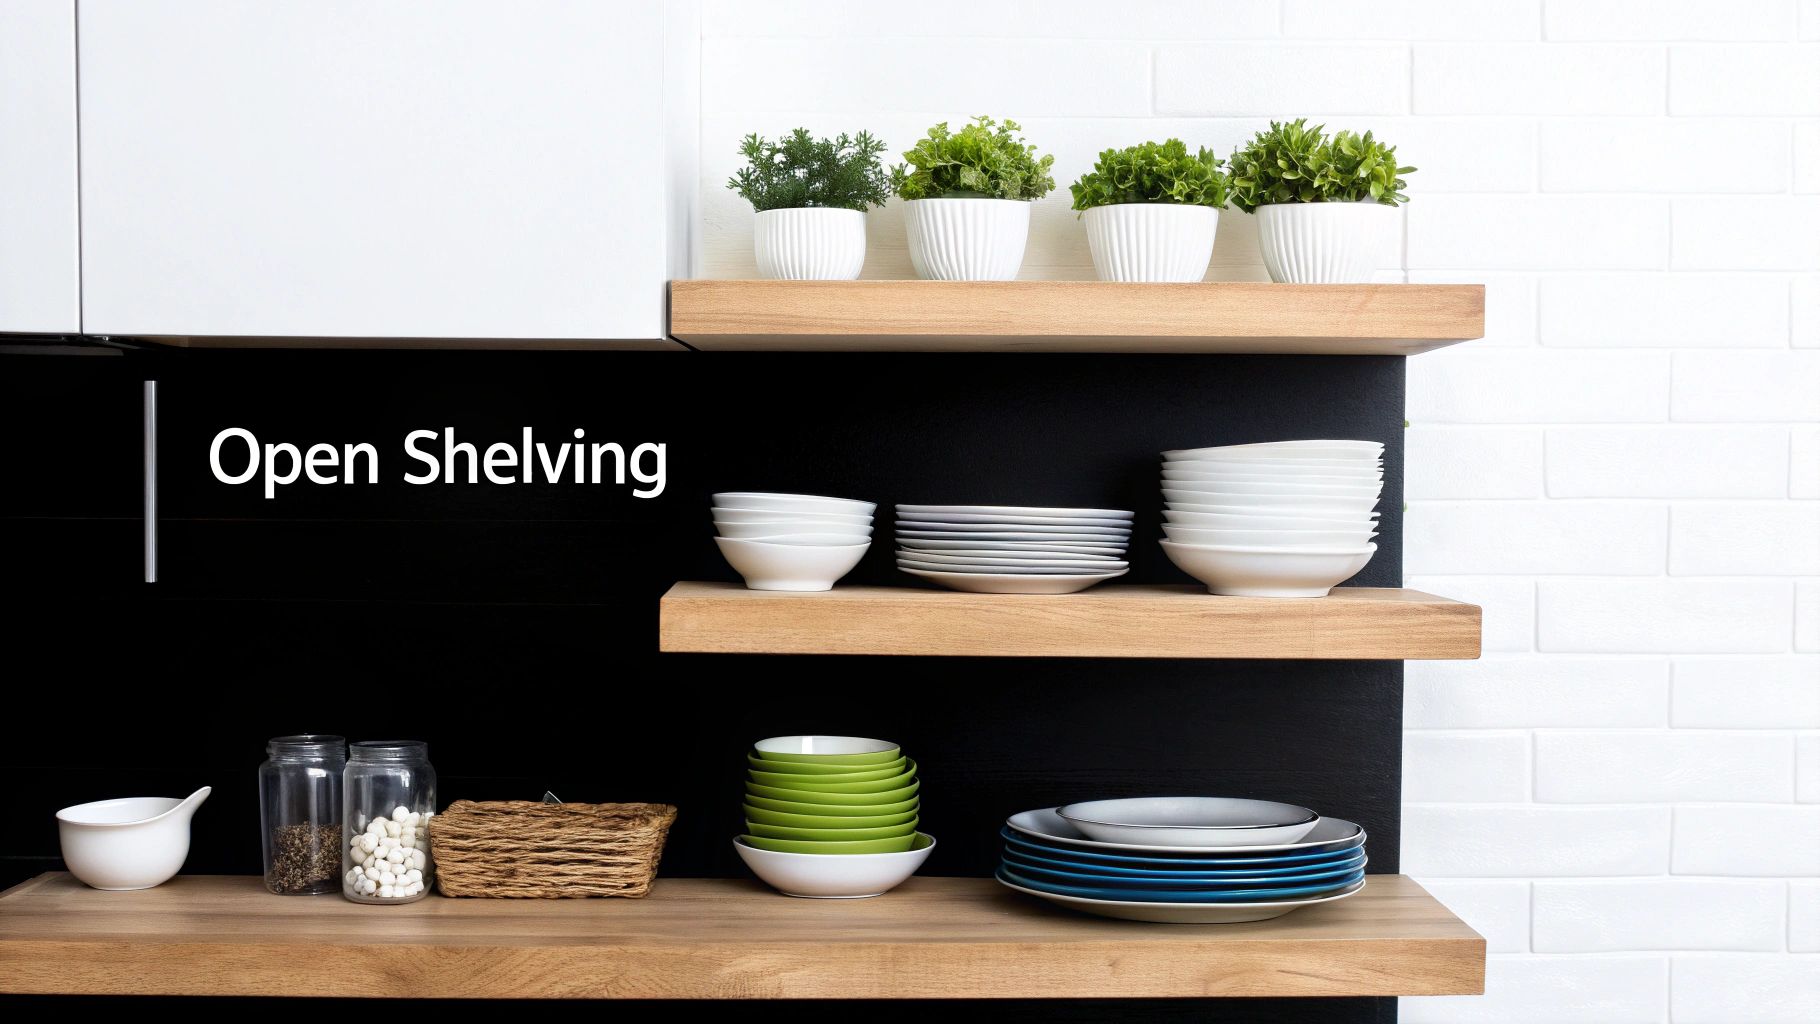
2. Open Shelving Integration
A fantastic kitchen cabinet remodeling idea for creating a more open and personalized space is to integrate open shelving. This involves strategically replacing some traditional upper cabinets with shelves, which serves to break up visual bulk and display your favorite dishware, cookbooks, or decorative pieces. Popularized by modern farmhouse and Scandinavian designs, this approach makes a kitchen feel larger, brighter, and more like a curated living space.
Open shelving offers both aesthetic charm and practical accessibility. By placing everyday items like glasses and plates on easily reachable shelves, you enhance the kitchen's workflow. It's an excellent solution for small kitchens where solid banks of upper cabinets can feel oppressive, or for homeowners who want to inject personality and style into their design.
How to Implement Open Shelving
To ensure your open shelving looks intentional and stylish rather than cluttered, thoughtful implementation is key.
- Start Small: Begin by replacing cabinets on just one wall, such as the area flanking a range hood or a window. This creates a beautiful focal point without sacrificing all of your concealed storage.
- Mix Materials: Combine different textures for a high-end look. Pair thick, rustic wood shelves with sleek metal brackets for an industrial touch, or opt for floating shelves painted the same color as the wall for a seamless, minimalist appearance.
- Curate with Purpose: Style the shelves with items you use daily to ensure they remain practical. Group similar items together, vary the heights of objects, and leave some negative space to avoid a cluttered look. Mix in a small plant or a piece of art for a personal touch.
Pro Tip: Not everything belongs on display. Keep less attractive appliances and bulk items in your remaining cabinets or a pantry. This strategic balance ensures your open shelves remain a beautiful, functional highlight of your kitchen design.
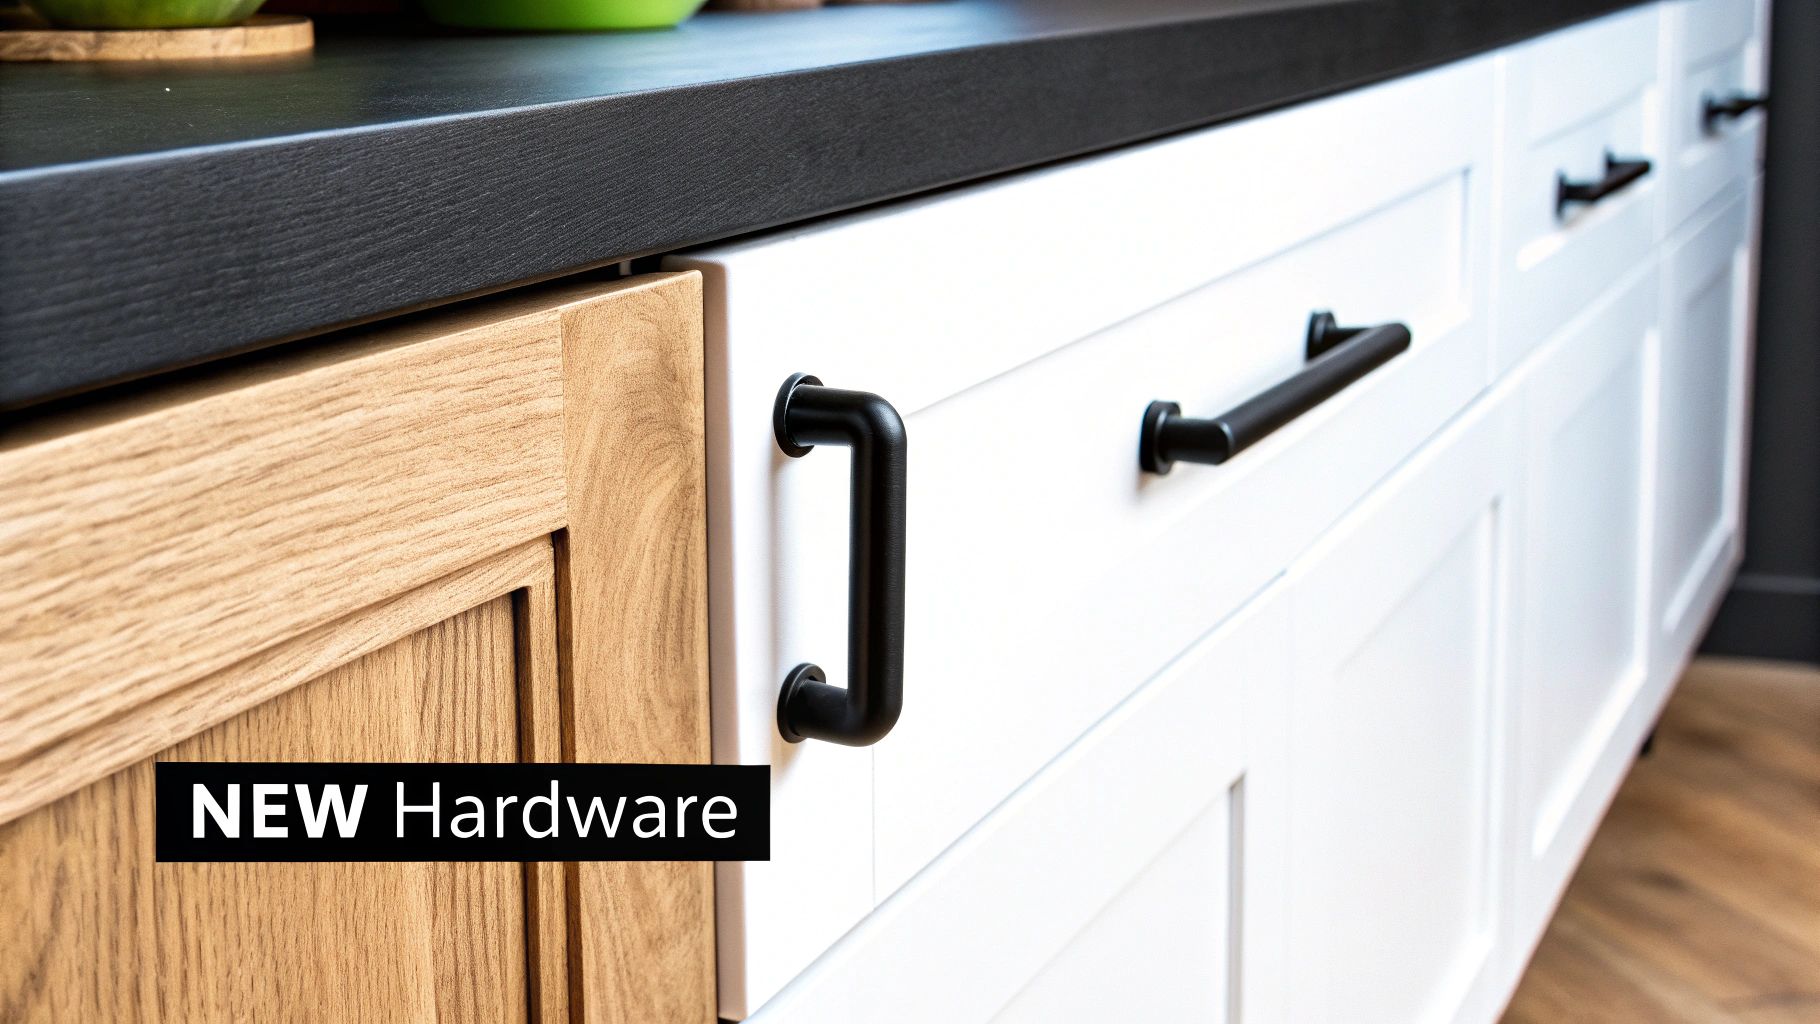
3. Cabinet Hardware Upgrade
Often overlooked, upgrading your cabinet hardware is one of the quickest and most cost-effective kitchen cabinet remodeling ideas available. This simple swap of knobs, pulls, and handles can dramatically shift the entire aesthetic of your space without the need for dust, paint, or major demolition. Influencers like Emily Henderson and brands such as Rejuvenation have championed hardware as the "jewelry" of the kitchen, proving how a small detail can redefine a style from modern to farmhouse or industrial to glamorous.
This high-impact, low-effort project breathes new life into existing cabinetry, making it an ideal weekend update. Whether you're aiming for a subtle refresh or a complete style overhaul, new hardware provides a polished, finished look. It's the perfect solution for homeowners seeking a significant visual change on a minimal budget and timeline.
How to Implement a Hardware Upgrade
Choosing the right hardware is key to elevating your kitchen's design. Focus on style, finish, and functionality for a successful transformation.
- Define Your Style: Select hardware that complements your desired aesthetic. Matte black bar pulls create a sleek, modern look, while aged brass knobs add vintage charm. For a touch of luxury, consider crystal knobs, or opt for unique leather-wrapped pulls for textural interest.
- Coordinate Metals: Ensure your new hardware harmonizes with other metallic elements in the room, such as your faucet, light fixtures, and appliances. For a deeper understanding of how to pair different looks, you can explore a complete guide to cabinet hardware finishes.
- Measure Carefully: Before purchasing, measure the distance between the screw holes on your existing hardware (the "center-to-center" measurement). This ensures your new pulls will fit perfectly without requiring you to drill new holes.
Pro Tip: Comfort is crucial for hardware you'll use every day. Before committing to a full set, order a single sample of your top choices to test how they feel in your hand and look against your cabinets.
4. Glass Front Cabinet Doors
One of the most elegant kitchen cabinet remodeling ideas is incorporating glass-front doors. This design choice breaks up the visual weight of solid cabinetry, creating an open, airy feel while providing a sophisticated space to display your favorite dishware, glassware, or decorative items. It’s a timeless look, often featured in traditional and transitional kitchens by designers and custom cabinet makers like Plain & Fancy, that adds character and a layer of curated style.
Glass-front cabinets act as a window into your kitchen's personality, blending storage with display. They are most effective when used strategically on upper cabinets to draw the eye upward and add reflective light to the room. The type of glass you choose, from perfectly clear to textured or frosted, dictates the level of visibility and contributes significantly to the overall aesthetic, making it a highly customizable option.

How to Implement Glass-Front Doors
Successfully integrating glass doors requires thought about both style and function to ensure they enhance your kitchen's design.
- Choose Your Glass Style: Select a glass type that fits your kitchen's theme. Use seeded glass for a vintage or farmhouse look, frosted glass to subtly obscure contents while maintaining lightness, or clear glass with mullion grids for a classic, traditional appearance.
- Create a Balanced Layout: Avoid overwhelming the space with too much glass. A great strategy is to use glass-front doors to flank a range hood or a window, creating a symmetrical and pleasing focal point. Mixing them with solid doors provides visual balance.
- Enhance with Lighting: Install interior cabinet lighting (like puck lights or LED strips) to illuminate the contents. This turns your display cabinets into a stunning feature, especially in the evening, and adds ambient light to the kitchen.
Pro Tip: Before committing, remember that what's inside will always be on display. Keep the contents neat, organized, and curated. If your dishware isn't perfectly matched, opt for frosted or seeded glass to offer a beautifully blurred view.
5. Cabinet Refacing
For homeowners seeking a dramatic transformation without the cost and disruption of a full gut renovation, cabinet refacing is one of the most effective kitchen cabinet remodeling ideas. This process involves keeping your existing cabinet boxes intact while replacing the doors and drawer fronts with new ones. To complete the look, a matching veneer is applied to all visible exterior surfaces of the cabinet boxes, creating a seamless, brand-new appearance.
This method offers a "best of both worlds" solution, providing the aesthetic impact of new cabinetry at a fraction of the price and installation time. Popularized by services like Home Depot and specialized franchises, refacing allows you to completely change your kitchen's style. You can easily transition from dated, raised-panel oak doors to sleek, modern flat panels or from a dark, worn laminate to a bright, contemporary white finish.
How to Implement Cabinet Refacing
A successful refacing project hinges on good preparation and smart choices to ensure a durable and high-quality finish.
- Assess Your Boxes: Before you begin, thoroughly inspect your existing cabinet boxes. They must be structurally sound, free from water damage, and in good overall condition to serve as a solid foundation for the new doors and veneer.
- Choose a Timeless Style: Select new door and drawer front styles that will stand the test of time. Shaker, slab (flat-panel), or simple raised-panel designs are versatile choices that complement a wide range of kitchen aesthetics and add long-term value.
- Upgrade While You're At It: This is the perfect opportunity to enhance functionality. Consider adding modern organizational features like pull-out shelves, soft-close hinges, or drawer dividers while the doors are off.
Pro Tip: While DIY refacing kits are available, professional installation is highly recommended for a flawless result. Experts have the specialized tools and experience to apply veneers perfectly and align doors with precision, which can be challenging for a novice.
6. Crown Molding and Trim Addition
For a truly transformative upgrade that elevates standard cabinets to a high-end, custom look, consider adding decorative trim and molding. This is one of the most effective kitchen cabinet remodeling ideas for adding architectural character and a sense of permanence. By installing crown molding at the top, light rail molding underneath, and other decorative elements, you can bridge the gap between your cabinets and the ceiling, creating a seamless, built-in appearance that feels both grand and intentional.
This technique is a hallmark of traditional, high-quality cabinetry and has been popularized by shows like This Old House for its ability to add significant visual value for a relatively modest investment. It conceals awkward gaps, provides a polished finish, and can be adapted to suit any design style, from ornate and traditional to clean and modern. The result is a kitchen that looks thoughtfully designed and professionally finished.
How to Implement Crown Molding and Trim
Successfully adding trim requires precision and an eye for proportion to ensure the final look is cohesive and elegant.
- Select the Right Profile: Choose a molding style that complements your cabinet doors and overall kitchen aesthetic. A simple, angled crown works well for modern or Shaker-style cabinets, while more ornate, multi-layered trim is suited for traditional or Victorian designs.
- Create a Finished Look: Use light rail molding on the bottom of upper cabinets to conceal under-cabinet lighting fixtures for a clean, professional installation. This small detail adds to the custom-built feel. To learn more about selecting the perfect trim, explore these options for kitchen cabinet crown molding.
- Ensure a Seamless Finish: Before installation, prime and paint all trim pieces to match your cabinets perfectly. Once installed, use painter's caulk to fill any gaps between the molding, cabinets, and ceiling for a flawless, integrated look.
Pro Tip: The scale of the molding should be proportional to your ceiling height. Taller ceilings can handle larger, more elaborate crown molding, while standard or lower ceilings benefit from more modest profiles to avoid looking top-heavy.
7. Cabinet Interior Organization Systems
A truly functional kitchen remodel goes beyond aesthetics to address what’s inside the cabinets. One of the most practical kitchen cabinet remodeling ideas is to integrate interior organization systems. This approach transforms chaotic, hard-to-reach spaces into highly efficient, accessible storage zones. By installing pull-out shelves, specialized dividers, and corner solutions, you can eliminate clutter and make every item in your kitchen easy to find and use.
This upgrade focuses on maximizing every square inch of your cabinetry. Instead of digging through a deep base cabinet for a pot lid, a multi-tiered pull-out rack brings everything into view. Awkward corner cabinets become usable with lazy Susans or swing-out shelves. Brands like Rev-A-Shelf and the modular systems from IKEA have popularized these solutions, making a custom-organized kitchen achievable for various budgets.
How to Implement Interior Organization Systems
Integrating these systems effectively requires thoughtful planning based on your specific storage needs and cabinet layout.
- Solve Problem Areas: Identify your biggest kitchen frustrations. A narrow cabinet next to the stove is perfect for a spice rack pull-out. The cabinet under the sink can be optimized with a sliding caddy for cleaning supplies. Convert a deep drawer into a peg-board system for organizing dishes.
- Corner Cabinet Solutions: Don't let corner cabinets become dead space. Install a classic lazy Susan, a kidney-shaped swing-out shelf system, or a "Magic Corner" pull-out to bring the contents of the entire cabinet out to you.
- Dedicated Pull-Outs: Streamline daily routines with specialized pull-outs. Concealed trash and recycling centers keep waste bins hidden but accessible. A vertical pull-out with hooks is ideal for hanging pots and pans, while utensil bin base organizers keep cooking tools neatly sorted.
Pro Tip: Before you buy, take a full inventory of your kitchen items. Plan your organization around what you actually own, not an idealized version of your kitchen. Measure your cabinet interiors precisely-width, depth, and height-to ensure your chosen organizers will fit perfectly.
8. Cabinet Painting and Refinishing
Perhaps the most budget-friendly yet transformative of all kitchen cabinet remodeling ideas is painting or refinishing your existing units. This approach allows you to completely overhaul your kitchen's aesthetic without the expense and disruption of a full cabinet replacement. It involves thoroughly preparing, priming, and applying a new coat of high-quality paint or stain to give dated cabinets a fresh, durable, and professional-looking finish.
This method is incredibly effective for updating common but outdated styles, such as turning 90s honey oak cabinets into a modern, crisp white or a sophisticated dark gray. It is a favorite among DIY enthusiasts and has been widely popularized by home improvement bloggers and specialized paint lines like Benjamin Moore’s Advance, which is formulated for a hard, furniture-like finish. When executed properly, the results can rival the look of brand-new cabinetry.
How to Implement Cabinet Painting and Refinishing
Achieving a flawless, long-lasting finish requires patience and attention to detail, but the payoff is enormous.
- Proper Preparation is Key: The most critical step is preparation. Remove all doors, drawers, and hardware. Thoroughly clean all surfaces with a degreaser to remove any grime, then lightly sand to scuff the surface, which helps the primer adhere.
- Use the Right Products: Don't use standard wall paint. Invest in a high-quality bonding primer and a durable cabinet enamel or urethane-alkyd paint. For laminate or thermofoil cabinets, a shellac-based primer is essential for proper adhesion.
- Achieve a Smooth Finish: For the smoothest possible surface, sand lightly with fine-grit sandpaper (220-grit) between each coat of primer and paint. If you're comfortable with the equipment, using an HVLP (High Volume, Low Pressure) sprayer will deliver a factory-like finish with no brush marks.
Pro Tip: Allow for adequate cure time, which is different from dry time. While paint may feel dry to the touch in hours, most cabinet paints require several days to a week to fully harden and become durable enough to resist chipping and scratching. Avoid re-installing hardware or using the cabinets heavily until they are fully cured.
9. Kitchen Island Cabinet Addition
Adding a kitchen island is one of the most transformative kitchen cabinet remodeling ideas, as it introduces a multifunctional hub for cooking, storage, and socializing. This addition serves as a powerful focal point while dramatically increasing your counter space and cabinet capacity. Driven by the popularity of open-concept living and celebrity cooking shows, a well-designed island can redefine a kitchen’s layout and workflow.
The core benefit is its versatility. An island can be a simple block of stock cabinets providing much-needed storage, or it can be a custom-built centerpiece with integrated appliances, a prep sink, and bar seating. It offers a perfect opportunity to introduce a contrasting color or countertop material, similar to a two-tone design, creating a high-impact statement piece that anchors the entire room.
How to Implement a Kitchen Island Addition
Proper planning is essential to ensure the island enhances, rather than hinders, your kitchen's functionality.
- Custom vs. Stock: Choose between custom-building an island to your exact specifications or using stock cabinets for a more budget-friendly approach. Stock cabinets can be configured to create a semi-custom look with unique hardware and a high-end countertop.
- Feature Integration: Decide on the island's primary function. Popular additions include a compact unit with built-in wine storage, a large island with seating for four, or even a mobile island on casters for ultimate flexibility in smaller kitchens.
- Create a Focal Point: Use a contrasting countertop material, like a thick butcher block on the island against quartz perimeter counters, or paint the island cabinets a bold color like deep navy or emerald green to make it stand out.
Pro Tip: Functionality is key. Ensure you have at least 36 to 42 inches of clearance on all sides of the island for comfortable traffic flow. Don't forget to plan for electrical outlets to power small appliances and charge devices.
Kitchen Cabinet Remodeling Ideas Comparison
| Feature / Item | Implementation Complexity 🔄 | Resource Requirements ⚡ | Expected Outcomes 📊 | Ideal Use Cases 💡 | Key Advantages ⭐ |
|---|---|---|---|---|---|
| Two-Tone Cabinet Design | Medium – requires careful color planning and coordination | Moderate – painting multiple finishes, hardware coordination | Stylish, visually deep kitchen; can increase home value | Homeowners wanting modern, personalized kitchens | Adds depth, personality, hides wear, boosts value |
| Open Shelving Integration | Medium – needs structural support and styling | Low to moderate – shelving materials vary widely | Creates open, airy feel; showcases dishware | Those desiring easy access and display, cost-effective upgrade | Enhances space perception, easy access, affordable |
| Cabinet Hardware Upgrade | Low – simple DIY or professional swap | Low – cost per piece varies widely | Quick style update, improved function | Budget-conscious, frequent style changers | Very cost-effective, instant transformation |
| Glass Front Cabinet Doors | Medium – may require professional install | Moderate – glass and lighting add cost | Brighter, visually lighter cabinets, display focus | Displaying attractive dishware/storage | Architectural detail, brightness, visual interest |
| Cabinet Refacing | Medium to High – professional recommended | Moderate to High – doors, veneer, hardware | New look without full replacement, cost-saving | Existing cabinets in good structural shape, want style update | Cost-efficient full style change, less disruption |
| Crown Molding and Trim Addition | Medium – precise measurement & installation needed | Low to moderate depending on complexity | Custom, high-end cabinet appearance | Enhancing standard cabinetry with architectural details | Affordable custom look, adds value and detail |
| Cabinet Interior Organization Systems | High – installation of specialized hardware | Moderate to High – custom organizers | Maximizes storage, reduces clutter | Functional upgrades, maximizing awkward spaces | Improves accessibility, highly customizable storage |
| Cabinet Painting and Refinishing | Medium to High – prep-intensive, skill needed | Moderate – paint, primer, possible DIY | Full color and finish transformation | Updating outdated cabinets on a budget | Cost-effective major update, unlimited color choices |
| Kitchen Island Cabinet Addition | High – requires space, possible plumbing/electrical work | High – cabinetry, countertop, installation | Additional workspace, storage, social hub | Larger kitchens needing more storage and prep area | Great increase in function, focal point, home value |
Your Next Step Towards a Dream Kitchen
We've explored a wide spectrum of kitchen cabinet remodeling ideas, each offering a unique pathway to transforming the heart of your home. From the budget-friendly, high-impact change of updating hardware to the more involved process of cabinet refacing, it’s clear that a stunning kitchen is within reach, regardless of your project's scope. The key takeaway is that strategic, well-planned updates are more effective than a total overhaul.
Whether you're drawn to the modern, airy feel of open shelving, the classic elegance of glass-front doors, or the bold statement of a two-tone design, your cabinets set the foundational tone for the entire room. Remember that a successful remodel blends aesthetics with functionality. Integrating smart interior organization systems or adding a versatile kitchen island doesn't just improve looks; it enhances your daily life and the overall efficiency of your space.
From Inspiration to Actionable Plan
Transforming these ideas from a list into a reality requires a clear plan. Here are the essential next steps to guide your project:
- Define Your Goals and Budget: Start by clarifying what you want to achieve. Are you aiming for a cosmetic refresh, improved storage, or a complete style transformation? Setting a realistic budget from the outset will help narrow down your options and prevent overspending.
- Assess Your Existing Cabinets: Take a critical look at your current cabinetry. Are the boxes structurally sound? If so, painting or refacing could be excellent, cost-effective choices. If they are deteriorating, a full replacement might be the more sensible long-term investment.
- Gather Visual Inspiration: Create a mood board or save images that capture your desired aesthetic. This visual guide will be invaluable when selecting colors, hardware, and finishes, ensuring a cohesive final look.
- Plan Your Kitchen’s Functionality: Beyond the aesthetics of cabinets, ensuring your kitchen functions perfectly is key to a dream space. A beautiful kitchen with a faulty dishwasher or a noisy refrigerator can be frustrating. Before finalizing your cabinet plans, take inventory of your appliances. If any of your essential kitchen components need attention, consider consulting professional appliance repair services to get them in top working order.
By thoughtfully moving through these stages, you can confidently choose the right kitchen cabinet remodeling ideas that align with your vision and practical needs. Your kitchen is more than just a room; it's a central hub for daily life, and investing in its design is an investment in your home's value and your personal enjoyment.
Ready to bring your vision to life with unparalleled craftsmanship? For homeowners seeking high-quality, custom wood cabinetry and expert design guidance, Sinclair Cabinetry inc offers bespoke solutions tailored to your unique style. Explore their gallery of stunning projects and schedule a consultation to start building your dream kitchen today.