
Transforming your house into your dream home is an exciting journey, but it's one filled with complex decisions, critical deadlines, and significant financial investment. Without a clear plan, a renovation can quickly become overwhelming, leading to budget overruns, project delays, and unnecessary stress. This comprehensive home renovation checklist is designed to guide you through every stage of the process, from initial concept to final walkthrough, ensuring no critical step is missed.
We'll provide actionable steps, expert tips, and crucial insights to help you navigate the process like a seasoned pro. Whether you're planning a minor bathroom update or a full-scale home remodel, this guide will serve as your essential roadmap to success. As you plan your home renovation, consider that specific areas like the kitchen require detailed attention to achieve a successful outcome; explore the 7 Elements of a Dreamy Kitchen Renovation for inspiration on creating a truly functional and beautiful space. Following this checklist will ensure your project is completed on time, within budget, and to your exact specifications, turning your vision into a reality with confidence and control.
1. Establish a Realistic Budget and Add 20% Contingency
Your budget is the single most critical element that will dictate the scope, timeline, and ultimate success of your project. Before you even think about paint colors or tile samples, you must create a detailed, realistic financial plan. This foundational step in your home renovation checklist prevents overspending and ensures you can complete the project without financial strain.
A comprehensive budget goes beyond the obvious costs. It requires a granular breakdown of every anticipated expense. Start by researching the costs of materials, professional labor, necessary permits, and even the disposal of construction waste. Don't estimate; get concrete numbers.

Why a 20% Contingency Fund is Non-Negotiable
No renovation goes exactly as planned. Demolishing a wall might reveal outdated electrical wiring, rotted framing, or unexpected plumbing issues. These surprises can quickly derail a tight budget. Industry experts universally recommend setting aside a contingency fund of 15-20% of your total estimated project cost.
Pro Tip: Keep your contingency fund in a separate, dedicated savings account. This prevents you from accidentally dipping into it for non-emergency upgrades, like more expensive countertops. It's strictly for unforeseen problems.
Actionable Budgeting Tips:
- Get Multiple Quotes: Contact at least three different licensed contractors. Ask for itemized estimates so you can compare line items like labor, materials, and permit fees directly.
- Track Everything: Use a spreadsheet or a budgeting app to meticulously track every single expense as it occurs. This helps you stay aware of your spending in real-time.
- Price Materials Separately: Research the cost of big-ticket items yourself, such as appliances, cabinetry, and flooring. This gives you a baseline and helps you spot any significant markups in a contractor's quote.
- Example Scenario: For a kitchen renovation budgeted at $40,000, your contingency fund should be $8,000 (20%). This gives you a total project fund of $48,000, providing a crucial safety net for those inevitable hidden costs.
2. Obtain All Required Permits and Approvals
Navigating the world of permits can seem daunting, but it's a non-negotiable step that ensures your project is safe, legal, and compliant with local building codes. Attempting to bypass this crucial part of your home renovation checklist can lead to hefty fines, project shutdowns, and even being forced to tear out completed work. Official approvals guarantee that any structural, electrical, or plumbing changes meet established safety standards.
Securing the right permits is your official green light to begin work. It protects your investment and ensures the safety of your family. Whether you're moving a wall, adding a new bathroom, or rewiring your kitchen, your local building authority needs to review and approve the plans. This process validates the work and is often required for insurance purposes and future home sales.
Why You Can't Afford to Skip Permits
Ignoring permit requirements is a high-stakes gamble. Unpermitted work can void your homeowner's insurance policy, meaning you wouldn't be covered in case of a fire or flood related to the renovation. Furthermore, when you decide to sell your home, unpermitted work can derail the sale or force you to complete costly, retroactive permitting processes.
Pro Tip: Your general contractor should be able to manage the entire permitting process. Verify this is included in their scope of work and ask for copies of all approved permits before any demolition or construction begins.
Actionable Permitting Tips:
- Apply Early: The permit approval process can take weeks or even months. Submit your applications as soon as your project plans are finalized to avoid significant delays to your start date.
- Check with Your HOA: In addition to city or county permits, your Homeowners' Association may have its own set of rules and an approval process for exterior changes or major renovations.
- Keep Documents On-Site: A copy of the approved permit must be posted and accessible at the job site at all times for city inspectors.
- Example Scenario: A primary bathroom addition will almost certainly require multiple permits: a building permit for the new structure, a plumbing permit for new water lines and drains, and an electrical permit for new circuits and lighting.
3. Hire Licensed and Insured Contractors
Selecting the right professionals is as crucial as setting the budget. The quality of your renovation, your legal protection, and the project's overall success hinge on hiring qualified, licensed, and insured contractors. This step in your home renovation checklist is your primary defense against shoddy workmanship, project delays, and financial liability.
Hiring a professional isn't just about finding someone who can do the work; it's about finding a partner you can trust to bring your vision to life safely and correctly. A licensed contractor has proven their competency to a state board, while insurance protects you from accidents on your property.
Why Vetting is Your Most Important Task
Skipping the vetting process can lead to disastrous consequences, from unfinished jobs to legal battles. A detailed contract with a reputable professional ensures everyone is aligned on scope, schedule, and payment terms, preventing misunderstandings down the line. Proper insurance is equally critical; without it, you could be held financially responsible for any injuries or property damage that occurs during the project.
Pro Tip: Always request a Certificate of Insurance (COI) directly from the contractor's insurance provider. This confirms their coverage is current and hasn't been altered or cancelled.
Actionable Hiring Tips:
- Verify Licenses: Check your state or local licensing board’s website to confirm a contractor's license is active and in good standing.
- Check References: Don't just ask for references; call them. Ask about their experience with communication, budget adherence, and the quality of the final work.
- Get Written Bids: Obtain at least three detailed, itemized bids to compare. This helps you understand the true cost and prevents you from overpaying.
- Sign a Detailed Contract: Never start work without a signed contract that outlines payment schedules, materials, a project timeline, and cleanup procedures. In addition to ensuring your contractors are insured, consider whether your project requires specific Builders Risk Insurance, which covers damage to the property during construction.
- Example Scenario: You are rewiring a kitchen. You hire a licensed master electrician who provides proof of general liability and workers' compensation insurance. Their detailed contract specifies the exact wiring to be replaced, the cost of materials, and a three-day completion timeline, protecting your investment. For more guidance, see this contractor hiring checklist from Sinclair Cabinets.
4. Create a Detailed Timeline and Schedule
A detailed timeline is the roadmap for your renovation, providing clarity on when each phase will start and finish. It helps coordinate tradespeople, material deliveries, and crucial inspections, ensuring the project moves forward efficiently. This step in your home renovation checklist is essential for managing expectations and preventing costly delays caused by poor planning.
Developing a realistic schedule involves identifying the critical path, which is the sequence of tasks that determines the project's total duration. You must account for dependencies; for example, drywall cannot be installed until electrical and plumbing rough-ins are complete and inspected. A well-structured timeline brings order to the chaos of renovation.
This simplified timeline for a standard kitchen remodel illustrates the typical phasing of major tasks.
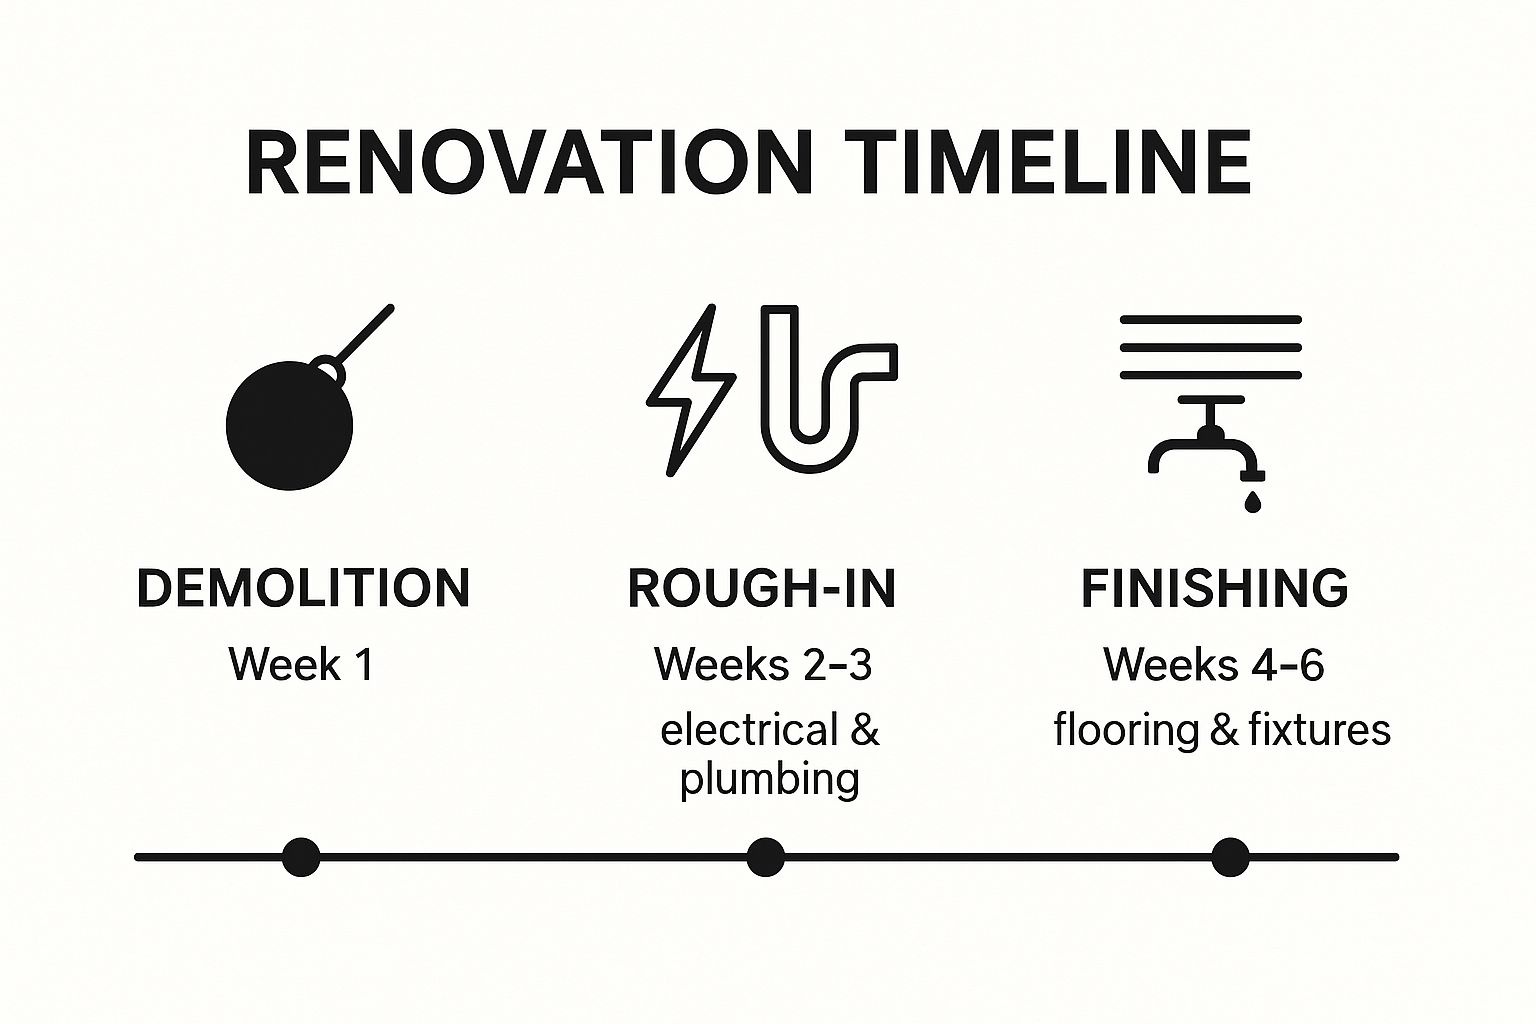
The visualization highlights how foundational "rough-in" work consumes a significant portion of the schedule before any finishing touches can begin.
Why a Schedule Buffer is Crucial
Even the best-laid plans can face setbacks. Material deliveries can be delayed, subcontractors may have scheduling conflicts, or inspections might require rework. Building a time buffer of 20-30% into your schedule provides a realistic cushion to absorb these unexpected issues without derailing the entire project.
Pro Tip: Use a shared digital calendar or a project management app like Asana or Trello. This allows you, your contractor, and key tradespeople to view the schedule in real-time, track progress, and adjust to changes immediately.
Actionable Scheduling Tips:
- Order Long-Lead Items First: Custom cabinetry, special-order tiles, and certain appliances can take weeks or months to arrive. Order them before demolition even begins.
- Schedule Inspections Promptly: As soon as a phase like electrical or plumbing is complete, schedule the required inspection. Delays here can halt all subsequent work.
- Plan Around Obstacles: Be aware of holidays, potential weather delays, and your contractor's vacation schedule. Factor these non-working days into your timeline from the start.
- Example Scenario: For a bathroom remodel planned for 3 weeks, adding a 30% buffer (about one week) accounts for potential tile-curing delays or fixture backorders. For a more in-depth look at project phasing, you can learn more about a typical kitchen remodel timeline on SinclairCabinets.com.
5. Plan for Temporary Living Arrangements
Major renovations, especially in key areas like kitchens and bathrooms, will significantly disrupt your daily life. Overlooking logistical planning for how you'll live during the project is a common mistake that adds unnecessary stress. A crucial part of any home renovation checklist is creating a functional, temporary living situation before demolition even begins.
Thinking ahead about where you will cook, bathe, sleep, and store your belongings prevents daily chaos and helps keep the project moving smoothly. A well-considered plan ensures you and your family can comfortably navigate the construction phase without feeling displaced in your own home.

Why a Temporary Setup is Essential
Living in a construction zone is challenging. Dust, noise, and a lack of access to essential amenities can quickly take a toll. Proactively setting up alternative arrangements protects your sanity and keeps you from making rushed decisions just to end the disruption. This foresight is what separates a stressful renovation from a manageable one.
Pro Tip: If the renovation is extensive (e.g., a whole-floor remodel), seriously consider staying elsewhere during the most intense phases, like demolition and drywall installation. The cost of a short-term rental can be a worthwhile investment in your well-being.
Actionable Tips for Living Through a Renovation:
- Create a Mini-Kitchen: Before your main kitchen is out of commission, set up a temporary station in another room. Include a microwave, mini-fridge, electric skillet or hot plate, and your coffee maker.
- Seal Off the Zone: Use heavy-duty plastic sheeting and painter's tape to create a barrier between the construction area and your living space. This is critical for containing dust.
- Organize Your Belongings: Pack away items from the renovation zone into clearly labeled boxes. If space is tight, renting a small, short-term storage unit can be a lifesaver.
- Plan Simple Meals: Prepare for a period of meals that require minimal cooking. Think sandwiches, salads, slow-cooker recipes, and supporting your local takeout restaurants.
6. Address Infrastructure and Safety Systems
While cosmetic upgrades are exciting, the long-term success and safety of your renovation depend on the health of your home's core systems. Before covering walls with drywall and paint, you must address the foundational infrastructure. This critical step on your home renovation checklist ensures your home is safe, functional, and up to current building codes, preventing catastrophic failures and costly rework down the line.
A thorough infrastructure assessment involves evaluating everything unseen, from the electrical panel to the pipes in your walls. Crucial infrastructure like plumbing, electrical, and HVAC systems should be assessed, along with exterior considerations such as professional drainage tile installation services to protect your foundation. Ignoring these elements for the sake of aesthetics is a recipe for disaster.
Why Infrastructure Upgrades Come First
Addressing hidden systems before cosmetic work is a non-negotiable rule of renovating. Opening up walls and floors provides the easiest and most cost-effective access to plumbing, wiring, and structural components. Retrofitting these systems later would mean tearing out your brand-new finishes, effectively doubling your costs and timeline.
Pro Tip: Have licensed electricians, plumbers, and HVAC technicians perform detailed inspections before you finalize your renovation scope. Their reports will reveal necessary upgrades that must be factored into your budget and schedule from day one.
Actionable Infrastructure Tips:
- Prioritize Professional Inspections: Never assume your home's systems are fine. Hire professionals to identify outdated wiring, failing pipes, or inefficient HVAC units that need replacement.
- Plan for Modern Needs: Upgrade your electrical panel from 100 to 200 amps to support modern, high-draw appliances and smart home technology without overloading the system.
- Address Issues Before Covering Them Up: Replace old galvanized pipes with modern PEX or copper to prevent future leaks and improve water pressure. This is the time to do it.
- Example Scenario: During an open-concept kitchen renovation, your contractor discovers the load-bearing wall you want to remove requires a significant structural beam for support. By addressing this infrastructure need first, you ensure the home's integrity before proceeding with cabinetry and countertop installation.
7. Select and Order Materials Early
A major source of project delays stems from one common oversight: waiting too long to order materials. This step is a crucial part of any home renovation checklist because many key components, especially custom-made items, have significant lead times. Ordering early ensures that everything from your cabinets to your flooring is on-site and ready when your contractor needs it, preventing costly downtime.
Securing your materials well in advance locks in your design choices and protects your project timeline from supply chain disruptions. For instance, custom cabinetry can take 8-12 weeks to arrive, while specialty tiles or custom windows might have a 6-8 week lead time. Waiting until demolition is underway to place these orders is a recipe for a stalled project.

Why Early Ordering is Essential for a Smooth Timeline
The construction schedule is a sequence of dependent tasks. Plumbers can't install fixtures until the vanity is in place, and the vanity can't be installed without the flooring being finished. A delay in one material delivery creates a domino effect, pushing back every subsequent step and potentially increasing labor costs as your crew waits.
Pro Tip: For materials like hardwood or engineered flooring, have them delivered at least 72 hours before installation. This allows the wood to acclimate to your home's specific temperature and humidity levels, preventing warping or gapping after it's laid.
Actionable Material Ordering Tips:
- Create a Master List: Work with your designer or contractor to create a detailed materials list with specifications, model numbers, quantities, and desired delivery dates.
- Order a Surplus: Always order 10-15% extra of materials like tile and flooring. This covers cuts, mistakes, and provides matching material for any future repairs.
- Inspect Deliveries Immediately: As soon as materials arrive, open the boxes and inspect for damage or discrepancies. It's much easier to resolve issues with a supplier before the installation date.
- Confirm Schedules: Once you have a confirmed delivery date from a supplier, share it immediately with your contractor so they can fine-tune the project schedule accordingly. For complex items like cabinetry, understanding the best material for kitchen cabinets can help streamline your choices. Learn more about cabinet materials on sinclaircabinets.com.
8. Plan for Proper Waste Management and Cleanup
Renovations generate a surprising amount of waste, from old drywall and cabinetry to packaging and scrap materials. A critical but often overlooked part of any home renovation checklist is creating a clear plan for managing this debris. Proper waste disposal keeps your worksite safe, organized, and compliant with local regulations.
A well-thought-out waste management strategy prevents project delays and potential fines. It involves estimating the volume of debris your project will produce and arranging for the appropriate disposal method, whether it's a dumpster rental, a junk removal service, or coordinating with your contractor.
Why Proactive Cleanup is a Safety Imperative
A cluttered worksite is a dangerous one. Piles of debris create tripping hazards, and stray nails or sharp scraps can cause serious injuries. Implementing a daily cleanup protocol is essential for maintaining a safe environment for your family and the construction crew. This ensures clear walkways and reduces the risk of accidents.
Pro Tip: Clearly define cleanup responsibilities in your contractor agreement. Specify whether they are responsible for daily tidying and final debris removal to avoid disputes and unexpected costs at the end of the project.
Actionable Waste Management Tips:
- Estimate Waste Volume: A small bathroom remodel might only require a junk removal service, while a full kitchen gut renovation will likely need at least a 20-yard dumpster for old cabinets, countertops, and drywall.
- Check Local Regulations: Many municipalities have rules about where you can place a dumpster on your property and for how long. Check these regulations before you order a rental.
- Segregate Recyclables: Separate materials like clean wood, metal scraps, and cardboard. Some recycling centers or scrap yards may even pay you for certain metals, slightly offsetting your disposal costs.
- Handle Hazardous Waste Safely: Old paint, solvents, asbestos, and certain adhesives are considered hazardous waste and cannot go in a regular dumpster. Contact your local waste authority for instructions on proper disposal.
9. Establish Quality Control and Inspection Protocols
Don't wait until the end of your project to discover mistakes. Establishing a proactive system for quality control and regular inspections is a vital part of your home renovation checklist. This process ensures that all work meets your standards and building codes, catching potential issues early when they are far easier and less expensive to correct.
A robust quality control plan involves both your personal oversight and official, required inspections. By actively monitoring progress, you can address minor issues like a crooked tile or a poorly patched wall before they become significant, costly problems hidden behind finished surfaces.
Why Ongoing Inspections are Crucial
Waiting for a final walk-through is a common but risky strategy. Key systems like plumbing, electrical, and HVAC are covered by drywall and flooring, making later fixes incredibly disruptive and expensive. Regular checks at each phase ensure foundational work is done correctly from the start.
Pro Tip: Create a shared digital folder with your contractor to upload daily progress photos. This creates a visual timeline and a clear record of the work, which is invaluable for resolving any disputes or questions about quality.
Actionable Inspection Tips:
- Schedule Formal Inspections Promptly: Coordinate with your contractor to schedule mandatory municipal inspections (e.g., framing, electrical, plumbing) as soon as a phase is complete to avoid project delays.
- Conduct Weekly Walk-Throughs: Set a recurring meeting with your contractor to walk the site. This allows you to ask questions, review the work done, and discuss the week ahead.
- Document Everything: Take photos and videos of work in progress, especially before it gets covered up. Maintain a written log of any issues you identify and the agreed-upon resolutions.
- Create a Final Punch List: Before making the final payment, walk through the entire project and create a detailed "punch list" of every remaining item that needs to be fixed or completed, no matter how small. Do not release the final payment until every item is checked off to your satisfaction.
10. Document Everything and Maintain Records
Comprehensive documentation is the unsung hero of a successful renovation. Keeping meticulous records of contracts, permits, receipts, and photos protects your investment and serves as a vital resource for future maintenance, potential insurance claims, or even increasing your home's resale value. This step on your home renovation checklist creates a complete history of your project.
A thorough documentation system goes far beyond stuffing receipts in a drawer. It involves creating an organized archive of every decision, payment, and milestone. This record-keeping provides proof of work completed, clarifies warranties, and gives you a powerful tool if any disputes arise with contractors or suppliers.
Why a Centralized Record System is Crucial
Imagine trying to find a specific warranty for a faucet five years from now or needing proof of a permitted electrical upgrade for a home sale. A disorganized system can turn these simple tasks into major headaches. A centralized digital and physical folder system ensures all critical information is secure and accessible when you need it most.
Pro Tip: Use a cloud storage service like Google Drive or Dropbox. Create a main project folder with subfolders for "Contracts," "Permits," "Receipts," "Photos," and "Warranties." Scan and upload every physical document immediately.
Actionable Record-Keeping Tips:
- Create a Photo Timeline: Take photos before demolition begins, during key construction phases (like after framing or electrical work), and after completion. These visual records are invaluable.
- Organize Your Paperwork: Use a dedicated binder with dividers for physical copies of all contracts, change orders, and warranty cards for materials and appliances.
- Track Every Penny: Maintain your budget spreadsheet diligently, logging every expense and payment date. Note the payment method and check number for easy reference.
- Example Scenario: You are renovating a bathroom. You should have a digital folder containing the contractor's signed agreement, the plumbing permit, scanned receipts for tile and fixtures, before-and-after photos, and the warranty information for the new vanity and exhaust fan.
Home Renovation Checklist: Key Steps Comparison
| Item | Implementation Complexity 🔄 | Resource Requirements ⚡ | Expected Outcomes 📊 | Ideal Use Cases 💡 | Key Advantages ⭐ |
|---|---|---|---|---|---|
| Establish a Realistic Budget and Add 20% Contingency | Moderate: requires detailed research and regular updates | Moderate: time for research, tracking tools | Prevents funding shortfalls, reduces stress, prioritizes elements | All types of renovations needing financial control | Avoids delays, improves negotiations |
| Obtain All Required Permits and Approvals | High: paperwork, approvals, inspections with potential delays | Moderate to high: time, money for fees | Ensures code compliance, legal protection, maintains home value | Projects with structural, electrical, or plumbing work | Legal compliance, safety assurance |
| Hire Licensed and Insured Contractors | Moderate to high: vetting, contracts, scheduling | High: cost for professionals, scheduling effort | Professional quality, legal protection, code compliance | Major renovations requiring skilled labor | Quality workmanship, insurance coverage |
| Create a Detailed Timeline and Schedule | Moderate: coordination of trades, inspections, buffers | Moderate: project management tools, meetings | Coordinated work, realistic deadlines, early delay detection | Complex, multi-trade renovations | Efficient resource use, delay mitigation |
| Plan for Temporary Living Arrangements | Low to moderate: logistical setup and adjustments | Moderate: costs for temporary setups, inconvenience | Maintains comfort, reduces stress, protects belongings | Extensive or disruptive renovations | Family comfort, safer work environment |
| Address Infrastructure and Safety Systems | High: technical upgrades, inspections, possible permit complexity | High: professional inspections, expensive upgrades | Long-term safety and functionality, increases property value | Renovations involving major system updates | Prevents costly future repairs, modernizes home systems |
| Select and Order Materials Early | Moderate: detailed planning, early procurement | Moderate to high: upfront purchase & storage | Prevents delays, assures style consistency, potential discounts | Projects with custom or specialty materials | Avoids shortages, aligns deliveries with schedule |
| Plan for Proper Waste Management and Cleanup | Low to moderate: planning dumpster, recycling, daily cleanup | Moderate: dumpster rental, disposal fees | Safe, organized site, reduced environmental impact | All sizable renovations | Safer site, potential cost savings via recycling |
| Establish Quality Control and Inspection Protocols | Moderate: ongoing inspections, documentation | Moderate: time investment, inspection fees | Early problem detection, ensures standards compliance | All renovations where quality is critical | Maintains standards, protects investment |
| Document Everything and Maintain Records | Low to moderate: organizational effort for records | Low to moderate: time, storage solutions | Protection for claims, resale value, future maintenance | All renovations with documentation needs | Legal protection, reference material for future projects |
From Checklist to Dream Home: Your Renovation is Complete
Congratulations, you’ve navigated the intricate journey of a home remodel. The dust has settled, the final walkthrough is complete, and your vision has finally materialized into a tangible, beautiful space. By diligently working through this comprehensive home renovation checklist, you have transformed more than just your living area; you have mastered a process that can seem overwhelming to many. The careful planning and execution you've undertaken are the cornerstones of a successful project, preventing costly errors and ensuring the final result meets, and even exceeds, your expectations.
Reflecting on the journey, the value of this structured approach becomes crystal clear. From establishing a realistic budget with a 20% contingency fund to obtaining the necessary permits, each step served a critical purpose. You protected your investment by hiring licensed contractors, maintained control by creating a detailed timeline, and ensured a smooth process by planning for temporary living arrangements. This checklist wasn't just a list of tasks; it was a strategic roadmap to success.
Key Takeaways for Lasting Value
The true victory in any renovation lies not just in the aesthetic outcome but in the quality and longevity of the work. Remember these core principles for any future projects:
- Proactive Planning is Paramount: The time spent selecting materials early, planning waste management, and addressing infrastructure before demolition is what separates a smooth project from a chaotic one. These upfront decisions save time, money, and immense stress down the line.
- Documentation is Your Safety Net: Maintaining meticulous records, from contracts and invoices to change orders and photos, provides an essential safety net. This documentation is invaluable for warranty claims, future maintenance, and even increases your home's resale value by providing a clear history of improvements.
- Quality Control is Non-Negotiable: Your commitment to regular inspections and quality control protocols ensures that the workmanship behind the walls is as impressive as the finishes you see every day. This attention to detail is what creates a truly high-end, durable, and safe living environment.
You have successfully turned a daunting project into a manageable one, proving that with the right home renovation checklist, anyone can achieve their dream home. The skills you’ve honed, from budget management to contractor communication, are now a permanent part of your homeowner toolkit. Enjoy the profound satisfaction of living in a space you thoughtfully and expertly created. The daily comfort, pride, and joy are the ultimate rewards for your hard work and meticulous planning.
As you admire your newly renovated space, remember that foundational elements like cabinetry define the functionality and style of key rooms. For your next project, whether it's a kitchen, bathroom, or custom built-ins, trust the experts at Sinclair Cabinetry inc to provide exceptional, real-wood cabinetry that elevates your home's design and value. Explore our portfolio and discover the difference that quality craftsmanship makes at Sinclair Cabinetry inc.